FOREVER ARTISAN®6

INTERACTIVE TRAINING MANUAL FOR BEGINNERS


This manual is designed to bring a variety of resources together in one place and in an order with a logical workflow conducive to learning Artisan® 6. In this manual you will find FOREVER® Support articles, printable handouts and videos organized in specific lessons. Every lesson has one or more Put2Practice activities encouraging you to complete a technique and practice what you have learned before proceeding to the next step. You can print this manual and check off the Put2Practice activities as you complete them. Feel free to use any other space to write in notes, questions you may have, or key points you want to remember
This experience is best when viewed online. As you turn the pages of this manual the videos will be available to play directly from within the manual. There is no need to go to a different location. When you are done with one video, close the video and you are right back in the manual.
Should you choose to download this manual, you will still be able to use it from your computer provided you have internet access. All the links will open in your internet browser.
Key things to note:
• We encourage you to download and print this manual so that you can keep track of where you have left off.
• In order to use this Interactive Manual, you need to have the PDF open on a device with an active internet connection or you must view online. We recommend you view this manual online at ISSUU.com/pixels2Pages or directly on the pixels2Pages.net website for the best experience.
• All text shown in green is a hyperlink.
• If you are viewing this Interactive Manual on ISSUU.com or pixels2Pages.net you can simply watch the videos within the publications.
• If you are following the training from a PDF you have downloaded, clicking the green video name or splash screen image will take you to the offering on the p2P Website.
• All handout images are clickable links which will lead you to the downloadable PDF
CLICK HERE to download a PDF of this Manual.
CLICK HERE to view this manual on pixels2Pages.net.
Note: All of the functionality available in FOREVER Artisan® 5 is available in FOREVER Artisan® 6. While FOREVER Artisan 6 has a fresh new look and some buttons may look differently, every button is in exactly the same place and has the same functionality as it did in FOREVER Artisan 5. Most of the videos available in this manual have been recorded using FOREVER Artisan 5, but the procedure is exactly the same in FOREVER Artisan 6. We have updated all of the tutorials in this manual to utilize screenshots from FOREVER Artisan 6.
Welcome new FOREVER® Artisan® 6 user! We are so excited that you have decided to use FOREVER Artisan 6 for your design needs. FOREVER Artisan 6 is a very powerful and robust desktop software. While it includes everything that you need to create the most intricately designed projects, it is flexible enough for a novice to create professional looking projects with ease.
pixels2Pages provides training and inspiration for FOREVER Desktop software. This includes FOREVER Artisan 5, FOREVER Artisan 6 and FOREVER Historian™ software. The focus of this interactive training manual is on the basics of FOREVER Artisan 6.
Here are just a few of the features available in Artisan 6 Software.
Video: Let’s Take A Tour of Artisan 6 [7:16 mins]
This Interactive Manual brings together all of the public training available on www.pixels2Pages.net. No pixels2Pages membership is required.
1. Save Often! Things happen. Be proactive and click save every now and then so you don’t lose the work you’ve just done and the time you spent working on it.
2. Don’t Get Frustrated! You are still learning While you may know lots of things due to life experience, when it comes to Artisan 6, it is all new. Take your time.
3. Start where you are! This goes hand in hand with “Don’t get frustrated.” With practice, you will be able to push the software to the limits. However, as a new user you can’t jump right in and do some of the most advanced techniques that challenge even experienced Artisan 5 users. Enjoy the phase that you are in and watch how your pages change with every new page you create. Remember, you don’t know what you don’t know.
4. Ask for help! We don’t expect you to do it alone. FOREVER Support is there to help every step of the way. Join pixels2Pages and your membership will prove priceless as you learn your way around the software.
5. Have fun! Don’t make memories a chore.
Here is a breakdown of all our Beginner Training in order. Print the training checklist and as you complete each section, mark it complete.
FOREVER owns several trademarks, both registered and unregistered. The following products and services are repeated throughout this Getting Started with Artisan 5 Interactive Manual and the trademarks are deemed to be applied throughout.
Registered FOREVER owned trademarks:
FOREVER®
Artisan®
FOREVER Artisan®
FOREVER Storage®
Unregistered FOREVER owned trademarks:
FOREVER Historian™
FOREVER Print™
pixels2Pages™
p2P™
Training Manual Version 11 NOV2020

PREPARATION: Purchasing, Downloading and Installing Artisan 6
PREP STEP 1: Purchase
If you are looking for training on Artisan 6, we assume that you have already downloaded and installed the software. If you have not yet downloaded and installed the software, that is where you should start.
CLICK HERE to purchase or upgrade to FOREVER Artisan 6 Software.
• These are the minimum Artisan 6 Software System Requirements
• Operating System: 64-bit (x86) Edition of Windows 7, 8, 8.1, or 10
• Processor: An Intel Core i5 Processor (8th Generation) (i7 Processor or higher is recommended), 64-bit (x86) or better
• System Memory (RAM): 8 GB (16 GB or higher recommended)
• Display: Minimum 1366 x 768 resolution with 32-bit color
• Connectivity: Broadband internet required for software activation and purchase (Wireless N or gigabit connectivity recommended)
• Storage Capacity: Minimum 500 GB, Solid State Drive (SSD) or 7200RPM Spinning Disk Drive
• Warranty: Minimum 1-year Basic Warranty from your retailer or manufacturer
• The pixels2Pages Team also recommends a dedicated graphics card typically found in gaming computers.
PREP STEP 2: Download and Install FOREVER Artisan 6 Software.
Whether you are moving your software from one computer to a new computer, or doing a fresh install, CLICK HERE for detailed instructions.
ATTENTION: DO NOT GO TO LESSON 1 WITHOUT COMPLETING THIS STEP.
PREP STEP 3: ImportthefreeDigitalArtkits
It is important that you utilize the new auto install feature in Artisan 6 to immediately download the free digital art included in your FOREVER Artisan 6 software purchase. Some of our new digital art sorting functionality will not work properly until you do so.
• From the Welcome Screen, click on Manage Content
• Log in to your FOREVER Account.
• Click Import Purchased Items

• Designate a library folder for the kit to be added to and click OK
o Repeat for each kit or check “Put all kits here” to have all kits downloaded and added to the same library folder.
CLICK HERE for our tutorial on adding newly purchased digital art to your FOREVER Artisan 6 content library.
Now that your software is downloaded and installed, it is time to have a little bit of fun.
FOREVER Artisan 6 can be as easy or as complex as you want or need it to be. With all that can be done with Artisan, it is very easy to get overwhelmed because you want to learn and do it all at once. The pixels2Pages Team encourages you to slow down and enjoy the learning process while you complete your projects. Even the most advanced users are still learning after using the software for over a decade. Many advanced users, including the pixels2Pages Team, started digital scrapbooking using pre-designed pages.
If you are a new or inexperienced FOREVER Artisan user, one thing that can inhibit productivity is not knowing where to find what you need. Before you start creating, we want you to get familiar with where everything is located. This will help you quickly find things that we mention throughout this training.
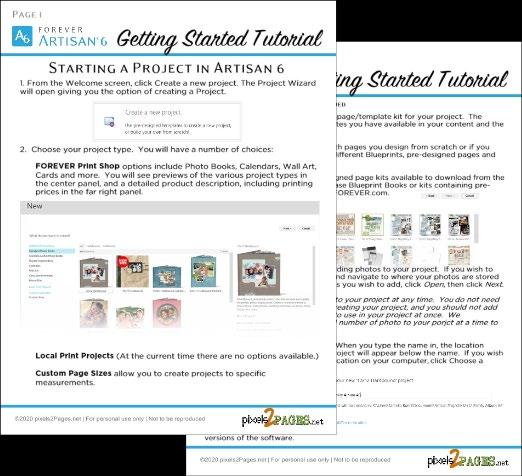
Here is a handout that will give you a quick tour of the Artisan 6 Welcome Screen. This is what you see when you first open the software. Click on the image to open the handout in full page view. You may download and print this handout for easy reference.
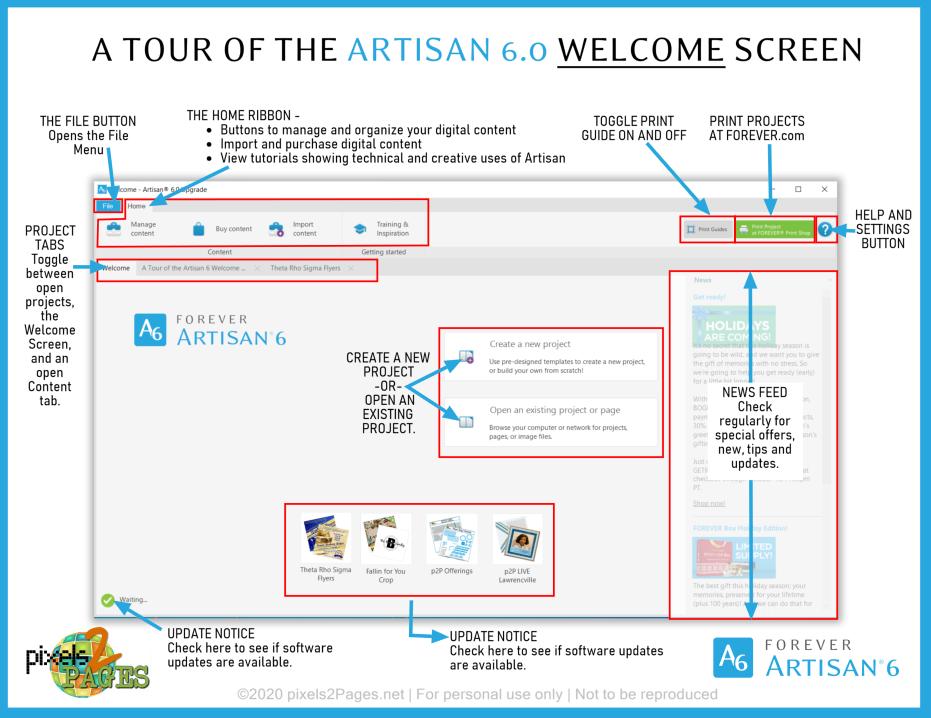
PUT2PRACTICE 1: Familiarize Yourself with the Welcome Screen.
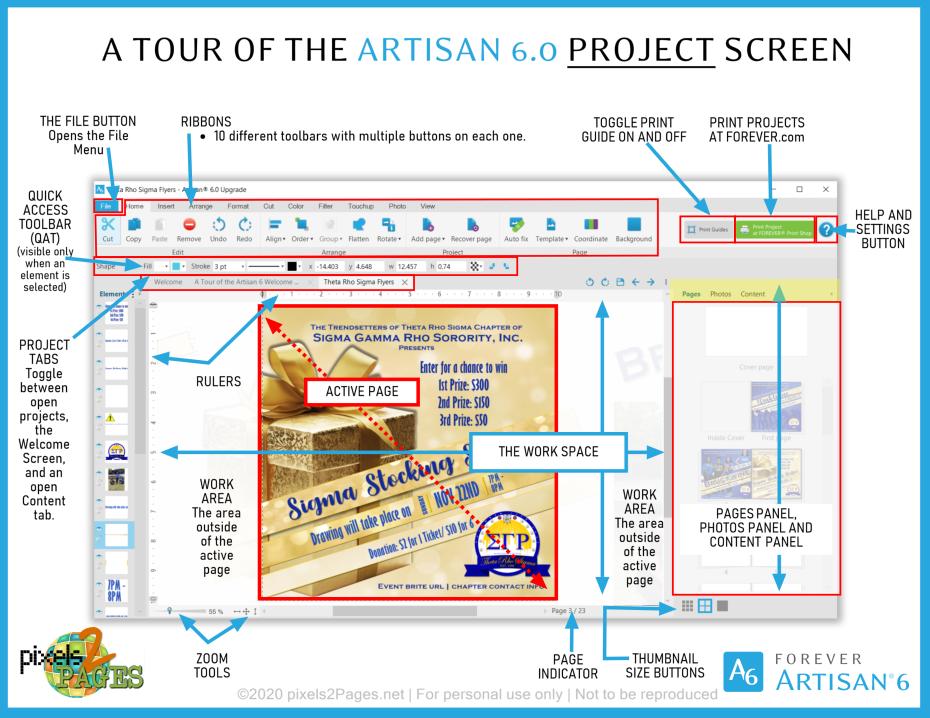
After you have created a project, you’ll want to be able to work on it. This handout explains what the different parts of the project screen are. Click on the image to open the handout in full page view. You may download and print this handout for easy reference.
PUT2PRACTICE2:FamiliarizeYourselfwiththeProjectScreen.
Once you have familiarized yourself with the software by reviewing the Welcome and Project Screen tutorials, it is time to create your first project.


You've installed Artisan 6, you've activated it, and you're ready to jump right in. The more you use the software, the more comfortable and familiar you will be with the software and its tools. We encourage you to start with pre-designed layouts and gradually progress to creating projects from a blank canvas. Even the most advanced users learned how to use Artisan 6 by using pre-designed pages.
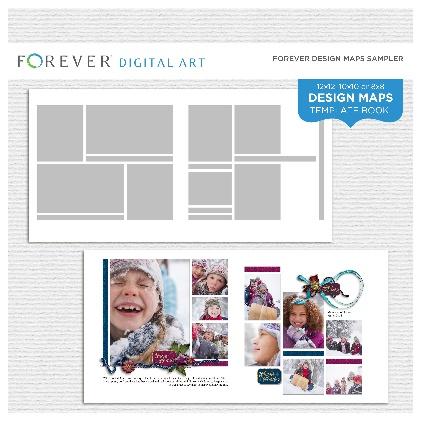
Sit back and watch how easy it is to start a project and make a page using a pre-designed book/page. We recommend you use the FOREVER Design Maps Template Book for this lesson. This kit is one of the free exclusive kits which you received with your purchase of Artisan 6 and installed during Prep Step 3 (see page 1).
PUT2PRACTICE 3: Create a new project using the FOREVER Design Maps Template Book
You are going to need some photos to work with. Decide which photos you would like to use because you are going to need them in the next Put2Practice.
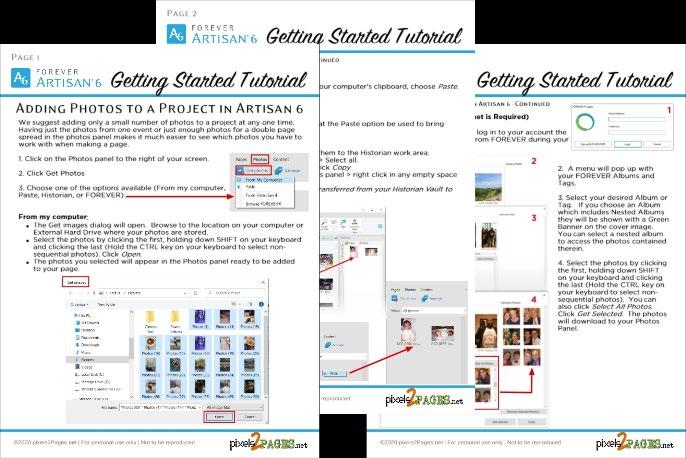
Here is a handy tutorial showing you how to add photos to your project from FOREVER Historian and your computer.
PUT2PRACTICE 4: Addphotostoyourproject.
Here is a video that will show you how to add photos to existing photo holders on your page.
Video: Adding Photos to Photo Holders [ 1:36 mins]
Recorded in Artisan 5/Artisan 6 Compatible
Here is a video that will show you how to add text to existing text boxes on your page.
Video: Filling Text Boxes [1:47 min]
Recorded in Artisan 5/Artisan 6 Compatible
Here is a video that will review your text formatting options.

Formatting Text [2:46 mins]
Recorded in Artisan 5/Artisan 6 Compatible
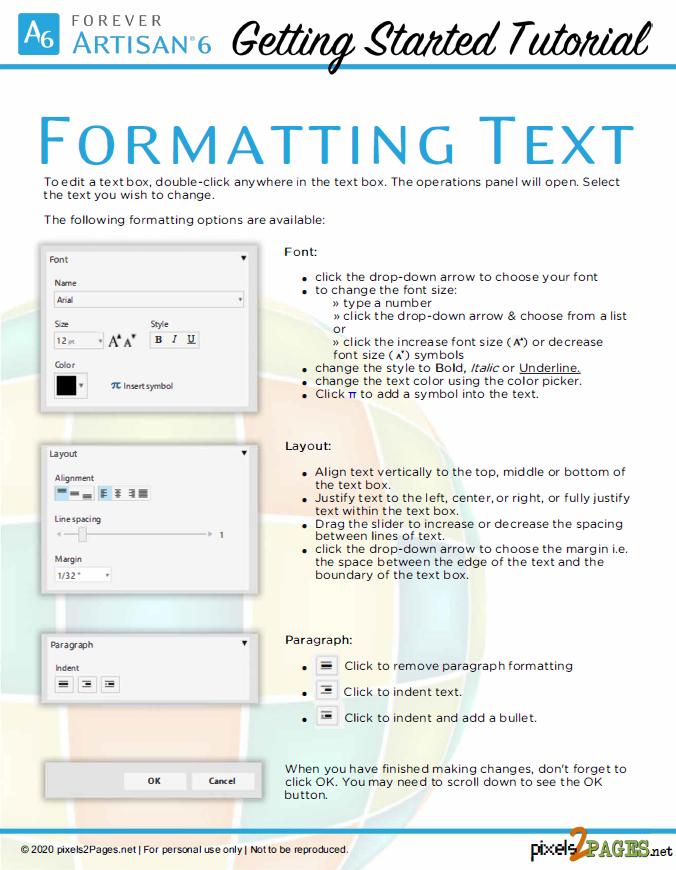
Here is a printable companion handout about formatting text boxes:
PUT2PRACTICE5:Addphotosandjournalingtoyourfirstpage
We highly recommend you repeat this section and create another page to reinforce what you have learned so far. We totally understand if you are too excited and are ready to go to the next section.
You did such a great job with your first page(s). Let’s create another page starting with a pre-designed page. You will add additional photos and content to create your own unique design. After you have watched the videos in this lesson, you will be ready to dig a little deeper into all that Artisan 6 can do.
Video: Pre-designed Your Way [4:46 mins]
Recorded in Artisan 5/Artisan 6 Compatible

To truly make a page your own, you will be adding additional photo holders and text boxes to your pages. We touched on this in the Pre-DesignedYourWay Video, but we still encourage you to watch these videos and review the tutorials which specifically focus on adding photos and text boxes to your page.
Video: Adding Photos to a Blank Page [1:34 mins]
Recorded in Artisan 5/Artisan 6 Compatible
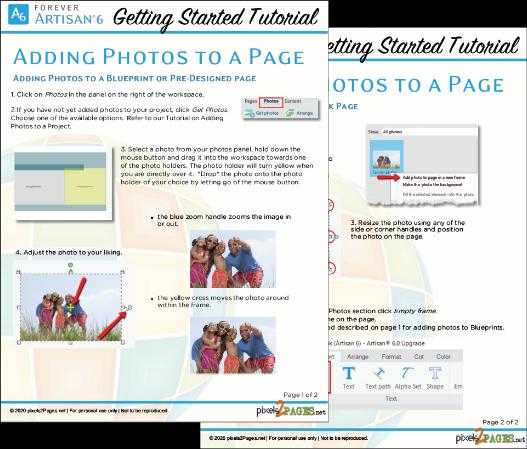
Here are some printable tutorials related to adding photos to your page.
Video: Adding New Text Boxes [2:12 min]
Recorded in Artisan 5/Artisan 6 Compatible
Here are some printable tutorials related to adding text to your page.

PUT2PRACTICE 6:Createanotherpageortwoandmakethemyourown.
You dove right in and began creating, and there is still so much more to learn Before we dive deeper into Artisan 6, we would love to see what you have created.
Video: S aving a Single Page for Sharing [1:53 mins]
Recorded in Artisan 5/Artisan 6 Compatible
This video will show you how to save a two-page layout as a single JPEG for sharing via email or social media.
Video: S aving a Double Page f or Sharing [4:47 mins]
Recorded in Artisan 5/Artisan 6 Compatible
PUT2PRACTICE7:Saveyourlayoutsinshareableformat.
You may not be a pixels2Pages member yet, but you can still be a part of the Community. The pixels2Pages Community Facebook Group is a place where you can go to be inspired and encouraged by other Artisan 6 users. You can also engage with the community and create lasting friendships. CLICK HERE to join.

Once your request to join the group has been approved, please read the group’s Terms and Conditions and post the pages you created to the group. Don’t forget to list the content you used. If you do not use Facebook, you can skip this section.
PUT2PRACTICE8:Jointhepixels2Pages Communityand shareyourPages.
Getting Started with Artisan 6
LESSON 4: Make Sure Your Project will Print as Expected Congratulations! You did it. You created your first project and posted your first pages to the pixels2Pages Community. There is so much more to learn, and we are here to teach you the technical and creative aspects of Artisan 6 While working on your project, it is important for you to know what your project will look like when it is printed. These videos will help you make sure your elements are aligned on your pages so that they will print as expected.
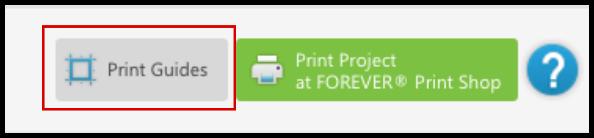
Note: In Artisan 6 the Print Guide button has a new look, but remains in the same place and with the same function:
Video: Print Guide (Project) [6:05 mins]
Recorded in Artisan 5/Artisan 6 Compatible
Video: Print Guide (Covers) [2:44 mins]

Recorded in Artisan 5/Artisan 6 Compatible
Video: Two Page Spreads [1:05 mins]

Recorded in Artisan 5/Artisan 6 Compatible
PUT2PRACTICE 9: Turn on the Print Guide and review your page to make sure all pertinentdetailisinthesafezoneandyourdesignmatchesyourexpectedoutcome.
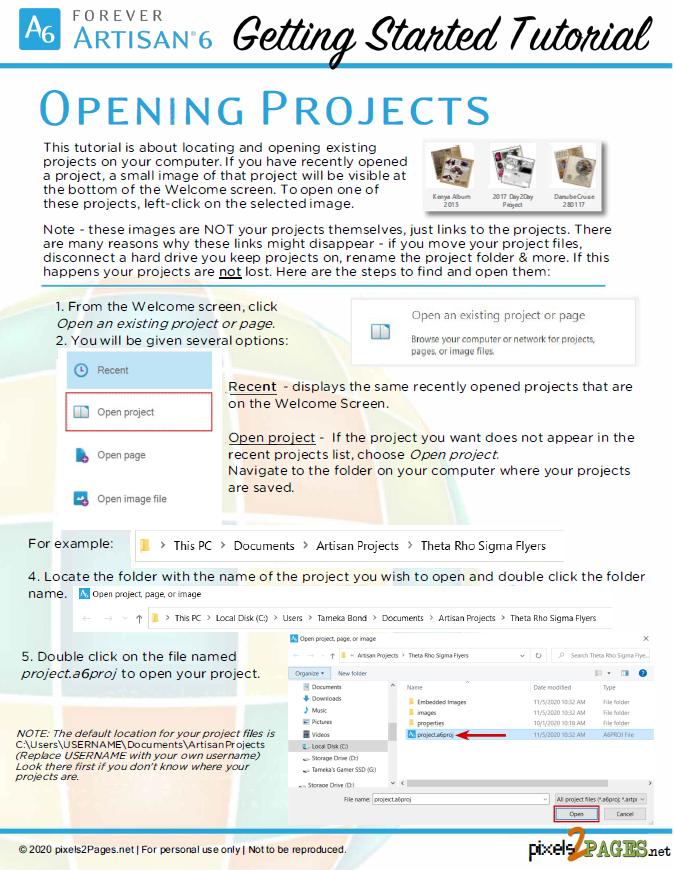
Openingaproject:

After you have created and started work on a project, saved the project and closed the software, you’ll need to know how to find and open that project again, to continue working on it. The following handout will take you through the steps of finding and opening your project. Click the image to open the tutorial online or download it for your personal use.
PUT2PRACTICE 10:Opentheprojectyoucreatedand/orstartasecondproject .
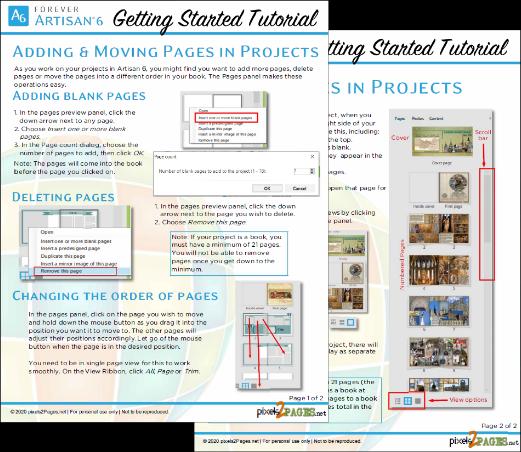
Once you have started on your project, you need to know how to add new blank pages, move pages around in your project, and delete unwanted pages. This 2-page tutorial introduces you to the pages panel and shows you how to manage your pages.
PUT2PRACTICE 11:Navigateyourprojects,practicemovingpages around and delete a blankpage.
Once you are comfortable using pre-designed pages let’s move on to the next level. We want you to get comfortable exploring digital art and using it in your projects.

If you are looking for a specific type of digital content, this video we will show you just how easy it is to find exactly what you are looking for.

Note: FOREVER.com has had some updates to the look and organization of the site. The functionality off the digital art store remains the same. Go to FOREVER.com and on the Digital Art menu you will be able to Browse Digital Art . CLICK HERE to go directly to the digital art store to search and sort using the facets. The video below will explain how to use the facets to search and sort so you can find the digital art that is perfect for you.
Video: Searching for Digital Art [4:15 mins]
Artisan 6 has changed the way you build your content library. In this tutorial we will show you how easy it is to download and install newly purchased digital art.

FindingyourdigitalartthatyouhaveinstalledinArtisan6
There may come a time when you will feel that you are missing content that you have installed in the software Everything has a place in Artisan 6. This video will give you an overview of where to find specific types of content and explain why sometimes your content goes missing. This is the first step of learning how to manage content that you own.
Video: Where is My Content? [5:58 mins]
Recorded in Artisan 5/Artisan 6 Compatible

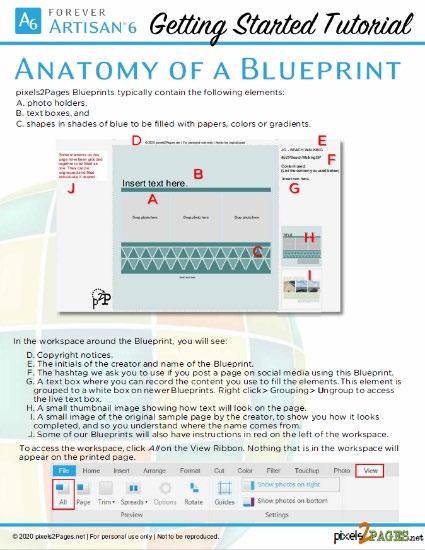
Templates are similar to pre-designed pages in that the design work is already done for you – photo holders, text boxes and design detail are perfectly placed. The main difference between a template and a pre-designed page is that templates do not have content filled in on the page. With templates, you are meant to add your photos, journaling and your favorite papers and embellishments to complete the page. Templates take the convenience of pre-designed pages and give you the flexibility to add a mix of your favorite content.
Blueprints are pixels2Pages’ branded templates Since January 2019, Blueprints have been designed in Artisan 5 specifically to optimize the tools in Artisan 5 and now in Artisan 6. Every Blueprint has a story behind it as they have all started out as a page that the pixels2Pages team member designed for their personal album projects. pixels2Pages distributes Blueprints in two ways. Membership Blueprints and some freebies are distributed as individual page files (usually in a zipped folder). Blueprints can also be purchased or downloaded from the FOREVER Store in .pakit format. We will review these options below.

Blueprints purchased from FOREVER.com get downloaded and installed just like any other digital art that you purchase. (Blueprints sold on FOREVER.com are created in Artisan 4 and have limited functionality.)
Refer to Lesson 6 for instructions on downloading and installing digital art kits in .pakit format.
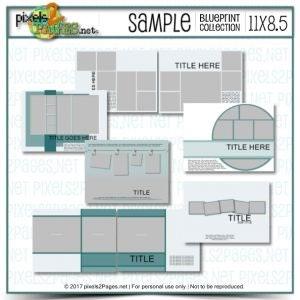
We are pleased to offer a free sample Blueprint collection in .pakit format. The collection is available in two sizes. These can be downloaded free from the FOREVER Store.
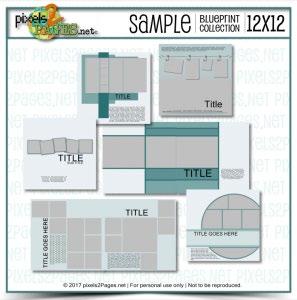
Downloading Blueprints from the pixels2Pages site (Individual page files in a zipped folder)
You can get Blueprints as freebies and membership offerings on the pixels2Pages site. The download process may be a little different depending on the browser you are using. Whether you are a pixels2Pages member or not, you will find Blueprints on the site under Membership Offerings> Blueprints> Get Blueprints. If you are a member, you should log in to the site to access all of the Blueprints you are entitled to. If you are not a pixels2Pages member, no log in is required to access public Blueprints. We have included some of our public Blueprints right here in this training manual (see below).

THE WEBSITE HAS CHANGED. NEW SCREEN SHOTS WILL BE AVAILABLE IN THE UPDATE TO THIS PUBLICATION.
FREE DOWNLOAD of .page file/membership Blueprints


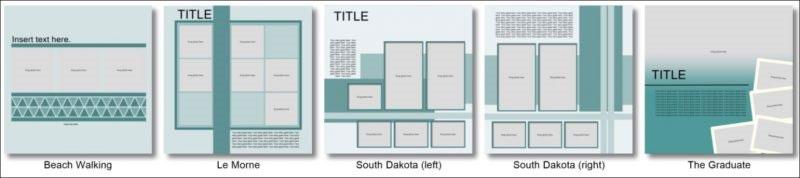
These Blueprints are available free. Click the Download buttons below to download all these Blueprints in 12x12 and 11x8.5 sizes. The Blueprints come in zip files for easy downloading.
BLUEPRINTS ARE NOT AVAILABLE AT THIS TIME BUT WILL BE MADE AVAILABLE DURING AN UPCOMING UPDATE TO THIS PUBLICATION.
After you download your Blueprints, they need to be unzipped for you to use them.
Video: Unzipping the Easy Way [2:05 mins]
Our Blueprints are named so that they automatically sort themselves.
Video: Blueprint File Names [2:59 mins]
Note:Sincetherecordingofthisvideo,wehavemadeslightchangestoourBlueprintnaming convention so that doublepageBlueprintsstaytogether. Whenyoubecomeapixels2Pages memberyouwillhaveaccesstoBlueprintswiththenewnamingconventionalongwithatip explaininghowtheyarenamed.
PUT2PRACTICE 14: Download, Unzip and add the sample membership Blueprints to a BlueprintFolder.

When choosing a Blueprint to use in your project, it is very helpful to be able to see a preview of that Blueprint before you import it into your project. This video will show you how to adjust your settings to make the preview easy to see.
Video: Previewing Blueprints [2:58 mins]
Recorded in Artisan 5/Artisan 6 Compatible
This video is about adding a Blueprint page to your project using Add Page on the Home Ribbon.
Video: Importing Blueprints: Template [1:24 min]
Recorded in Artisan 5/Artisan 6 Compatible
Note: If importing a Blueprint from a .pakit, you will choose “ Using a template from an art kit.”
Video: Importing Blueprints: Add Page [1:39 min]
Recorded in Artisan 5/Artisan 6 Compatible
Note: If adding a Blueprint from a .pakit, you will choose “ Using a template from an art kit.”
This handout explains the process of importing a .page or .artpage file Blueprint into your project.
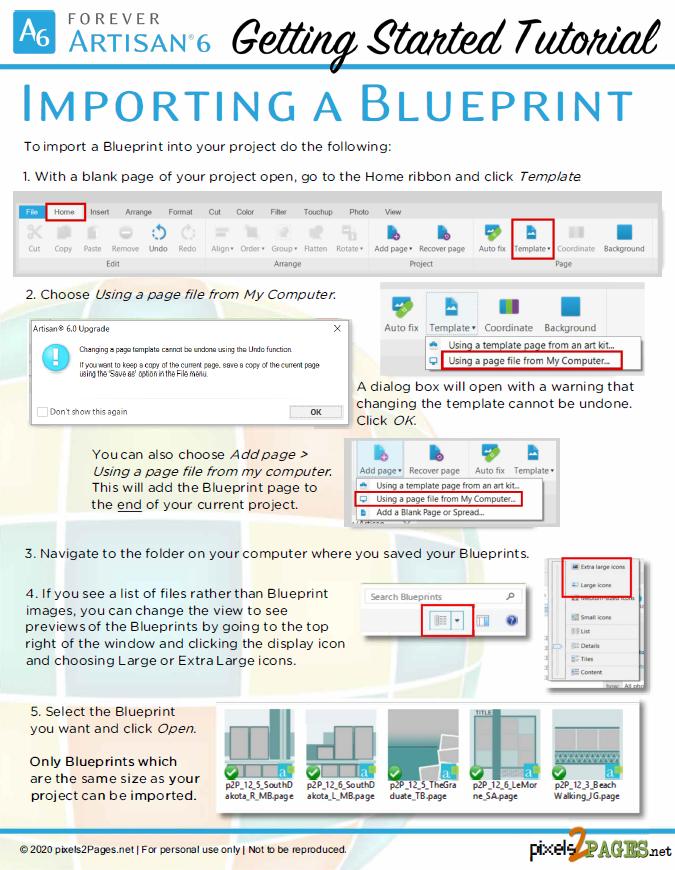
PUT2PRACTICE 15:ImportaBlueprintintoyourproject.


Remember, the Blueprints downloaded from the FOREVER Store are considered Art Kits. If you are using one of those Blueprints, you must Import from an Art Kit instead of Import from My Computer.
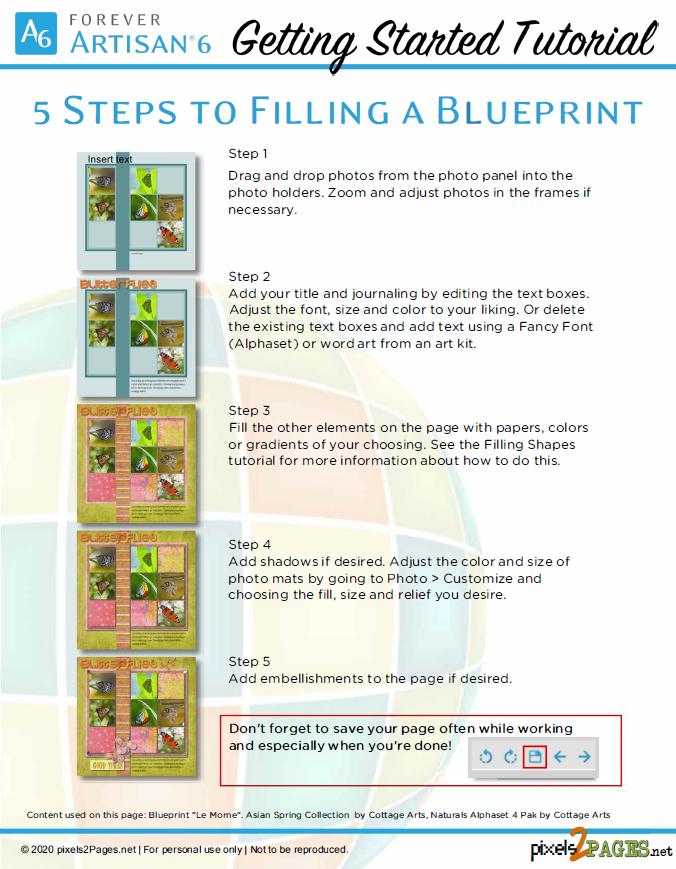
FillingBlueprints
Blueprints make page creation easy and fast. This tutorial summarizes the 5 steps to filling Blueprints with photos, digital art and stories.
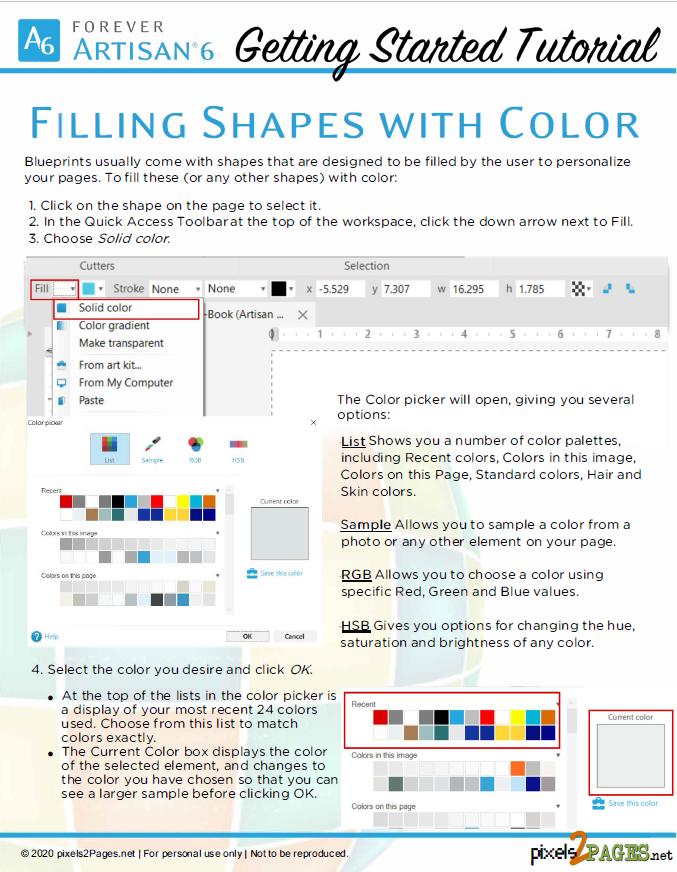
This video will review filling your Blueprint with color:
Video: Filling Shapes with Color [2:18 mins]
Recorded in Artisan 5/Artisan 6 Compatible
This printable handout will also review FillingShapeswithColor :

The Cutting Board is the key to using the perfect section of paper to fill your element just right. This video gives you a thorough overview of the Cutting Board.
Video: The Cutting Board [1:53 min]
Recorded in Artisan 5/Artisan 6 Compatible

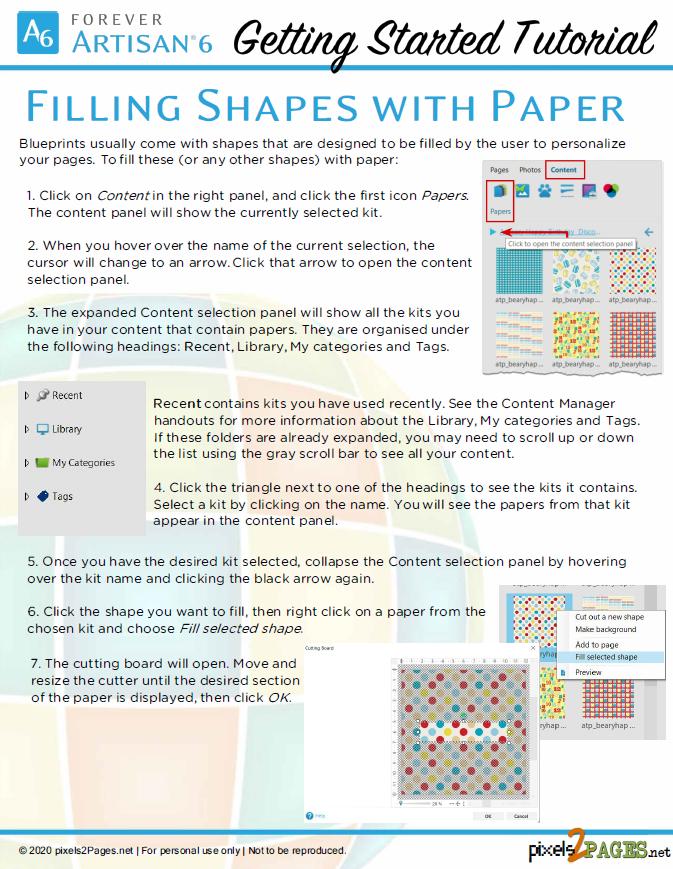
This video will review filling your Blueprint with papers:
Video: Filling Shapes with Paper [2:15 mins]
Recorded in Artisan 5/Artisan 6 Compatible

This printable handout will also review FillingShapeswithPaper.
Once you start filling Blueprints and templates with papers and embellishments, it is important for you to be able to navigate the Content Panel.
Video: Content Panel Tour [1:48 mins]
Recorded in Artisan 5/Artisan 6 Compatible
PUT2PRACTICE 16: Have fun filling your Blueprint and creating another page, or two, orthree. Asamatteroffact,everytimeapageiscompletedjustrepeatthisstep.


Now it is time to get adventurous and start building pages from a blank canvas. No need to panic. Artisan 6 turns us all into artists at the click of a mouse. The pixels2Pages has you covered. In this lesson we would like to introduce you to Bright Ideas. Bright Ideas are our written detailed instructions which are like a road map to a completed page.
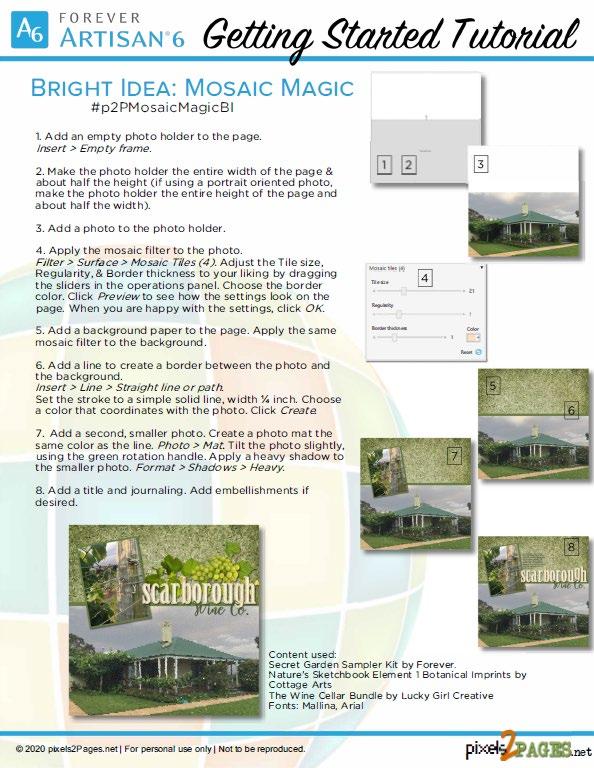
BrightIdea:MosaicMagic
This sample Bright Idea will help you add an artistic touch to a page. Follow the step by step guide to a completed page. CLICK HERE to visit the original Bright Idea post and see additional sample pages.

PUT2PRACTICE 17:CompleteBrightIdea:MosaicMagic
Brightidea:Two-Toned Halves
This sample Bright Idea will help you use colors to make a layout that stands out from the crowd. Follow the step by step guide to a completed page. CLICK HERE to visit the original Bright Idea post and see additional sample pages.

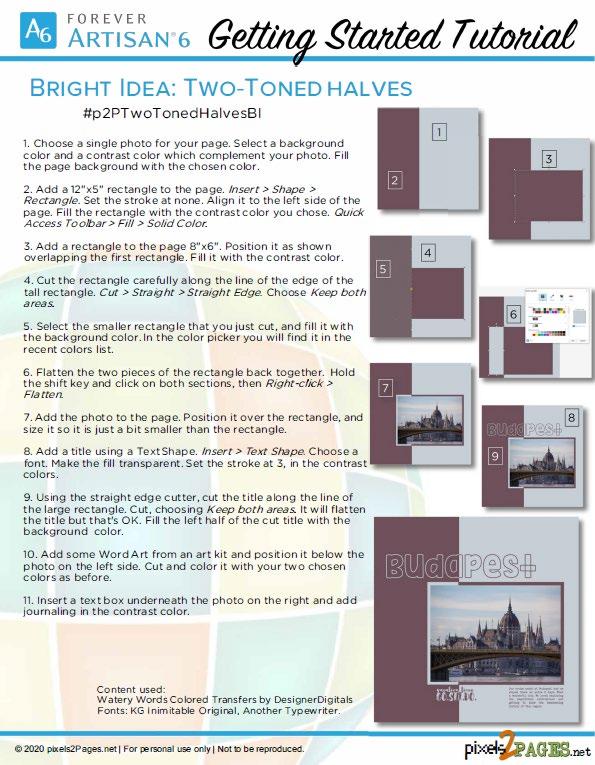
PUT2PRACTICE 18:CompleteBrightIdea:Two-Toned Halves
BrightIdea:OverandUnder
This sample Bright Idea will help you create a layout with flair. Follow the step by step guide to a completed page. CLICK HERE to visit the original Bright Idea post and see additional sample pages.

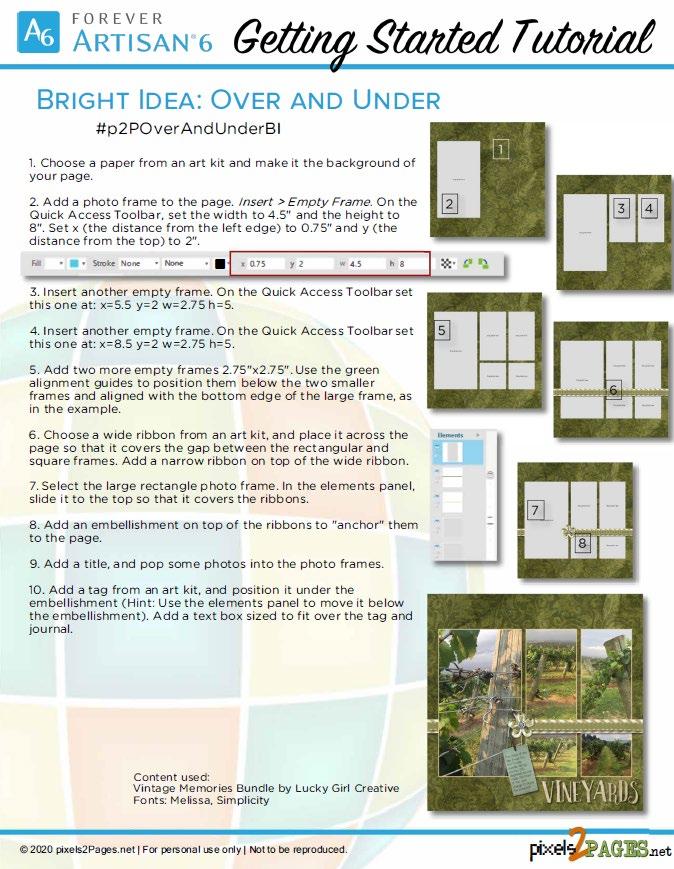
PUT2PRACTICE 19:CompleteBrightIdea:OverandUnder
pixesl2Pages’SignatureTechnique
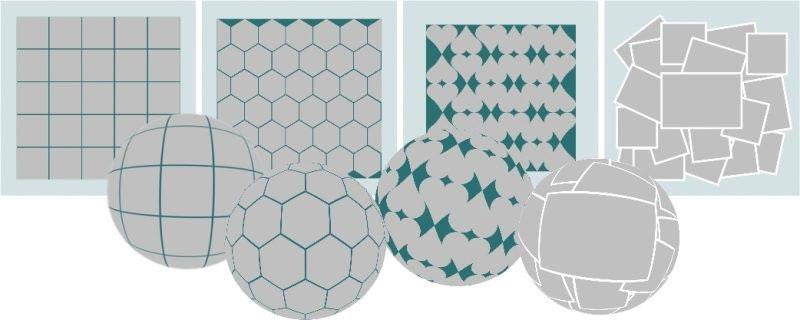
Video: Going Global [10:26 mins]
The globe is pixels2Pages signature video based on its logo. Creating a photo globe is much easier than you’d think and creates a striking page for any album project. Watch this video to learn how to create a photo globe using a grid of photos, tracking lines and the spherize tool.
Recorded in Artisan 5/Artisan 6 Compatible
You will learn more about Alignment tools in Lesson 9. Though we showed you how to create this stunning layout from scratch, here are some templates that will help you complete your Globe super-fast. Click the image to download the zip file of these templates in .page format.

PUT2PRACTICE20:Createaglobeandgoglobal.
NOT AVAILABLE AT THIS TIME. WILL BE REDONE AND MADE AVAILABLE AT A LATER DATE.
LESSON 9: But Wait…There’s More
You’ve come a long way baby. If you have gotten this far you have completed several pages and you have the knowledge and skill to complete your project. There is plenty for you to learn. In this lesson we will review a variety of items that we think can be helpful to you on your journey. In about 30 minutes, you can watch a variety of videos designed to enhance your Artisan 6 experience.
Good2Know
Video: Tiny Triangles [2:34 min]

Recorded in Artisan 5/Artisan 6 Compatible
Video: Managing Warning Levels [2:01 mins]
Recorded in Artisan 5/Artisan 6 Compatible
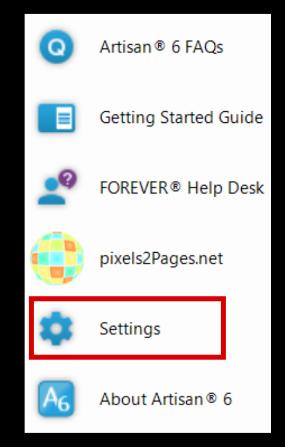
Note: Minor changes were made to the Help Menu. Warning Levels can be managed under Settings.
Video: Removing Photos from Frames [0:51 mins]
Recorded in Artisan 5/Artisan 6 Compatible
Video: Applying Mats to Photos [1:49]
Recorded in Artisan 5/Artisan 6 Compatible
Video: Basic Strokes [1:47 min]
Recorded in Artisan 5/Artisan 6 Compatible
Video: Text Shapes [3:29]
Recorded in Artisan 5/Artisan 6 Compatible
Page 24 | Getting Started with Artisan 6
Video: Tracking Lines [ 2:07 min]
Recorded in Artisan 5/Artisan 6 Compatible
Video: Alignment Tools [2:01 min]
Recorded in Artisan 5/Artisan 6 Compatible
Time Savers
Video: Sample and Apply [1:57 min]
Recorded in Artisan 5/Artisan 6 Compatible
PUT2PRACTICE 21: Set aside 30 minutes and watch all of the videos in this section.

As you build up your digital content library, you will want to organize your content so that you can quickly find what you need. Content management is very personal and will differ from person to person. It is important to make your Content Manager something that will work for you. These Content Manager videos and tutorials are the perfect starting place for you to get ideas on how you would like to organize your content.
Content Manager overview:

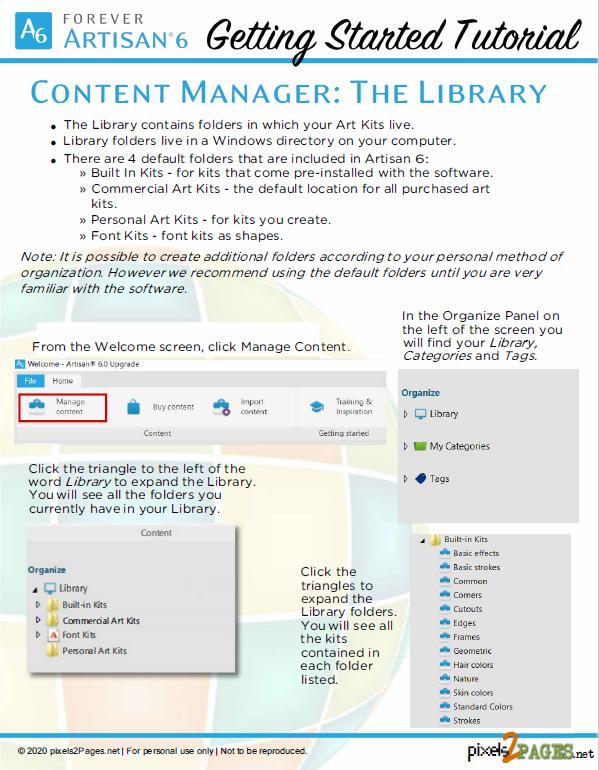
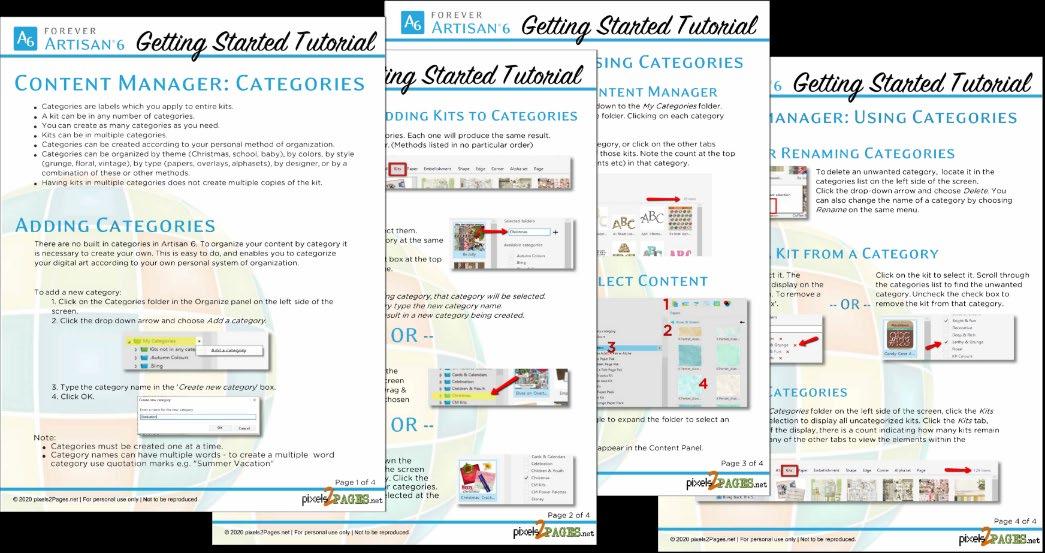
Below is a tutorial explaining the three levels of organization within the Content Manager (Library, Categories and Tags) and the differences between each level.

Companion printable tutorial:
Video: Content Manager - Categories [3:23 mins]
Recorded in Artisan 5/Artisan 6 Compatible

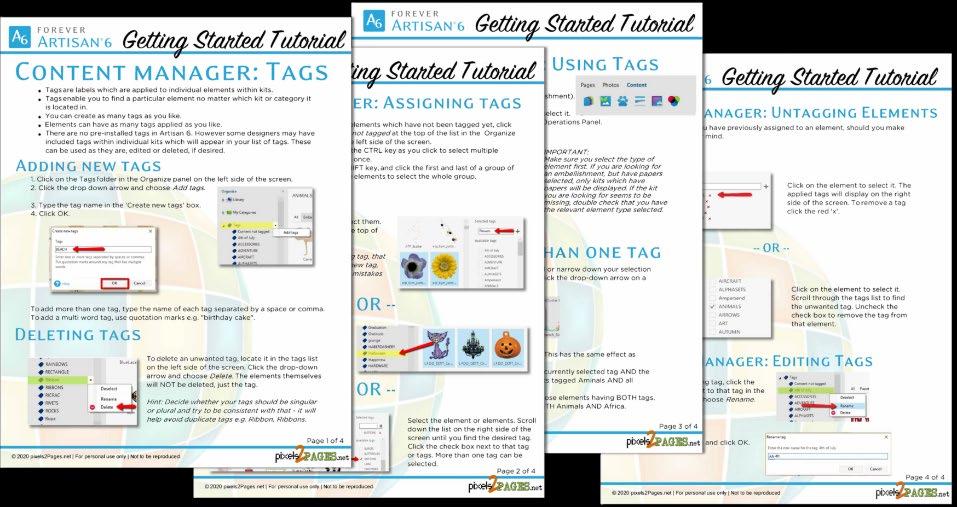
Companion printable tutorial:
Video: Content Manager - Tags [3:16 min]
Recorded in Artisan 5/Artisan 6 Compatible
Companion printable handout:
PUT2PRACTICE 22: Grab a pen and some paper and take notes on how you would organizeyourLibraryFolders,CategoriesandTags. Onceyouhaveyourorganization planinwriting,beginimplementingyourplan.
Note: There is so much more to know about Content Management. Become a pixels2Pages member to check it out.

You have unlocked the Power of Artisan 6 and there is nothing stopping you now. We want you to stay inspired. CLICK HERE and join pixels2Pages today. You won't believe how much more we have to show you.