7 minute read
Fly Tying: The Totally Tubular Baitfish

Fly tyer, Steve Yewchuck, has amazed many with his innovative fly tying techniques and catchy flies. Here, he presents one of his latest baitfish patterns; The Totally Tubular Baitfish.
I wanted to design a translucent baitfish pattern where the innards were visible making the pattern more realistic looking. I have used body tubing to create many flies. Body tubing allows you to make many different shaped bodies and can give a translucent effect. Body tubing is a great material to use on flies you want to descend quickly.

Step 1. Run a nice thread base from the eye of the hook to just past the barb . Tie in the butt section of Marabou and trim creating the tail. Step 2. Tie in the chenille leaving a spot in front of the tail for the body tubing to be tied in. Palmer the chenille towards the eye leaving room for the head.

Step 2. Tie in the chenille leaving a spot in front of the tail for the body tubing to be tied in. Palmer the chenille towards the eye leaving room for the head.

Step 3. Tie off the thread and reconnect it between the tail and chenille. Slide the body tubing over the chenille and tie in the butt section of tubing. I always use a lighter to slightly melt the ends of tubing to keep it neat and from unraveling.

Step 4. Take the pine squirrel zonker strip and trim off about 1/3 of fur creating the dorsal fin. Tie and glue in the end of the zonker strip. Using your fingers tie the thread off using a half hitch knot.

Step 5. Push the body tubing back toward the hook point and reattach the thread at the eye. Hold the tube back creating the body shape and tie in. When I tie down the tubing I always add a drop of glue to make sure it stays in place . At this point, I use the Caramel colored marker and color the top half of the tubing.

Step 6. Add some glue to the bottom of the zonker strip and pull the zonker strip forward over the back of the tubing and tie in creating the dorsal fin. On each side of the fly, tie in the tip section of the bugger hackle making the baitfish’s lateral line.

Step 7. Take two clumps of coastal deer hair. Tie one clump on top and the other on the bottom with the butts facing out over the eye of the hook using tight wraps of thread. Step 5. Push the body tubing back toward the hook point and reattach the thread at the eye. Hold the tube back creating the body shape and tie in. When I tie down the tubing I always add a drop of glue to make sure it stays in place . At this point, I use the Caramel colored marker and color the top half of the tubing.

Step 8. The tight wraps of thread will partially flare the deer hair. Fold the flared butt sections of hair back evenly and place a bunch of thread wraps in front of the hair creating a thread dam that will hold the hair in place. Step 3. Tie off the thread and reconnect it between the tail and chenille. Slide the body tubing over the chenille and tie in the butt section of tubing. I always use a lighter to slightly melt the ends of tubing to keep it neat and from unraveling.

At this point you need to make the pectoral fins. The fins are made out of swiss straw which is cut to shape.

I coat the fins with Raidzap flex uv resin on both sides. Then cure with the uv torch. Step 9. Tie in a pectoral fin on each side of the baitfish’s body.

Then cure with the uv torch.
Step 9. Tie in a pectoral fin on each side of the baitfish’s body.

Step 10. Add a pencil thick clump of Creamers Floor-colored Magnum dubbing to the top of the hook with the tapered ends face out over the hooks eye. On the bottom, add the white facing the same way.

Step 11. Take the orange marker and color a small area of the white dubbing near the thread wraps that will create a vailed hot spot.

Step 12. Fold the Magnum dubbing back keeping the Creamers Floor color on the top section of the fly and the white on the bottom . Make a few wraps of thread in front of the dubbing holding it in place and tie off with a whip finish knot. Add a drop of glue or head cement to the knot. Then use a bodkin to tease the dubbing out and create a nice head.

Step 13. I use the Caramel colored marker to add a nice fade to the top of the head and you can add more orange to the bottom of leave vailed by the folded over white that adds a translucent effect. Add the eyes to finish off the fly. I like to add a drop of super glue gel to the back of each eye before placing.

Material List//
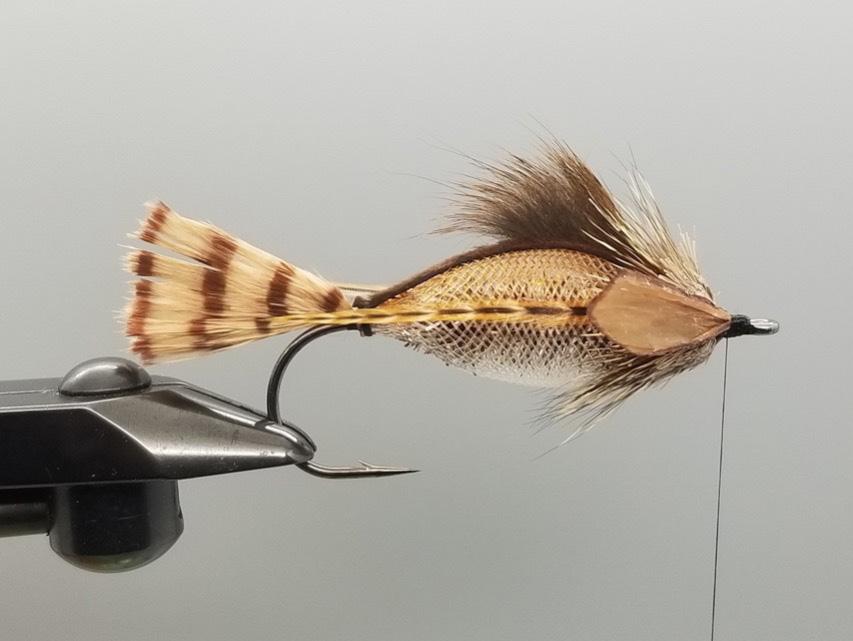
Hook: Partridge 1/0 to 4/0 Sea Streamer Thread: Black UTC 70 Tail: MFC tan black barred marabou Innard: Hareline brown holographic Cactus Chenille Body: Clear 1/8 to 1/4 body tubing Dorsal fin: Brown pine squirrel Pectoral fins: Brown swiss straw coated in Raidzap flex uv resin Lateral line: Whiting barred ginger bugger hackle Head: Coastal natural deer hair and Letera’s magnum dubbing in Creamers Floor and white colors Eyes: Hareline holographic 7/32 eyes Markers: Premiere caramel and Sharpie Neon orange
I’ve tied this pattern in multiple sizes, colors and innard materials. By changing the innard material you can give the fly different looks under water. I’ve used just thread and chenille - or colored uv resins. I’ve had success catching multiple species from trout, bass, pickeral up to larger predators like pike. I usually fish the pattern on an intermediate line getting it down in the zone.

