BLACK & WHITE MASTER PHOTOGRAPHY


ESSENTIAL TIPS FOR IMPROVING YOUR MONOCHROME PHOTOGRAPHY


178 pagesexpertof advice

NEW NEW
TECHNIQUES INSPIRATION PROJECTS KIT ADVICE
SHOOT AND EDIT STUNNING IMAGES WITHOUT COLOUR Digital Edition FIRST EDITION

Welcome to BLACK & WHITE MASTER PHOTOGRAPHY
ESSENTIAL TIPS FOR IMPROVING YOUR MONOCHROME PHOTOGRAPHY
Black and white photography is having something of a renaissance in our bright and busy modern world – and it’s easy to see why. Stripping away the distraction of colour from a photograph allows you to focus on shapes, textures and patterns, and your subject, whether it’s a dramatic landscape or an intimate portrait. Black and white photography can be enhanced by great editing, but it starts when you’re shooting. For the best results possible, you need to see and feel in Black and white, and use the right gear. That’s where this book comes in! Over the next few hundred pages, we’ll equip you with the skills needed to capture, edit, and master monochrome photos – whether you’re into mindful photography, gritty street shots or fine art wildlife. We’ll cover essential kit, from cameras and lenses to filters and even printers. Then our in-depth technique guides will teach you how to set up your camera to extract every ounce of detail and atmosphere from a scene. We’ll also explore the essential elements you need to consider when composing an image; form, shape, contrast and tone. And let’s not forget some inspirational interviews and case studies from the experts. Welcome to the stunning world of black and white photography. Grab your camera, and get reading!
Future PLC, Quay House, The Ambury, Bath, BA1 1UA
Editorial Editor Lauren Scott
Senior Designer Neo Phoenix
Senior Art Editor Andy Downes
Head of Art & Design Greg Whitaker
Editorial Director Jon White
Contributors
Peter Fenech, Alistair Campbell, Tom Calton, Jeremy Walker, James Abbott, Jon Adams, Helen Trust, Tom Calton, Niall Hampton, Adrian Davies, Andrew James, Angela Nicholson, Lee Frost, Paul Sanders
Cover images Neil Burnell, Tom Calton, Jeremy Walker, Andrew James, Getty Images
All copyrights and trademarks are recognised and respected
Advertising
Media packs are available on request

Circulation Head of Newstrade Tim Mathers
Production Head of Production Mark Constance
Production Project Manager Matthew Eglinton
Advertising
Commercial Director Clare Dove International Head of Print Licensing Rachel Shaw licensing@futurenet.com www.futurecontenthub.com
by William Gibbons, 26 Planetary Road,
West Midlands, WV13 3XT Distributed by Marketforce, 5 Churchill Place, Canary Wharf, London, E14 5HU www.marketforce.co.uk Tel: 0203 787 9001 Master Black & White Photography First Edition (5161) © 2023 Future Publishing Limited We are committed to only using magazine paper which is derived from responsibly managed, certified forestry and chlorine-free manufacture. The paper in this bookazine was sourced and produced from sustainable managed forests, conforming to strict environmental and socioeconomic standards. The paper holds full FSC or PEFC certification and accreditation. All contents © 2023 Future Publishing Limited or published under licence. All rights reserved. No part of this magazine may be used, stored, transmitted or reproduced in any way without the prior written permission of the publisher. Future Publishing Limited (company number 2008885) is registered in England and Wales. Registered office: Quay House, The Ambury, Bath BA1 1UA. All information contained in this publication is for information only and is, as far as we are aware, correct at the time of going to press. Future cannot accept any responsibility for errors or inaccuracies in such information. You are advised to contact manufacturers and retailers directly with regard to the price of products/services referred to in this publication. Apps and websites mentioned in this publication are not under our control. We are not responsible for their contents or any other changes or updates to them. This magazine is fully independent and not affiliated in any way with the companies mentioned herein. bookazine series Part of the Future plc is a public company quoted on the London Stock Exchange (symbol: FUTR) www.futureplc.com Chief executive Jon Steinberg Non-executive chairman Richard Huntingford Chief financial officer Penny Ladkin-Brand Tel +44 (0)1225 442 244 MASTER BLACK & WHITE PHOTOGRAPHY
Production Manager Joanne Crosby Digital Editions Controller Jason Hudson Production Managers Keely Miller, Nola Cokely, Vivienne Calvert, Fran Twentyman Printed
Willenhall,


CONTENTS FUNDAMENTALS 37 42 ADD MORE IMPACT 54 GET DRAMATIC SHOTS 66 TRY ARTISTIC METHODS 78 IMPROVE YOUR LANDSCAPE SCENES 90 USE LIGHT AND SHADE 102 DISCOVER MINDFUL PHOTOGRAPHY
6 51 16 ESSENTIAL KIT GUIDE 24 REVIEW: LEICA Q2 MONOCHROM 28 HOW TO SHOOT BETTER BLACK AND WHITE
TECHNIQUES


168 140 PROJECTS 148 WHY SHOTS WORK 152 SHOOT LIKE A PRO: CLIVE BOOTH AT THE BALLET 162 SHOOT LIKE A PRO: STREET 170 INTERVIRE: ANOUK MASSON KRANTZ INSPIRATION 7
8 KICKSTART YOUR MONOCHROME JOURNEY WITH WINNING IMAGES FROM THE BLACK AND WHITE PHOTO AWARDS B&W
116 DIGITAL INFRARED 122 BLUE HOUR TO BLACK & WHITE 128 GRITTY MONO PORTRAITS 134 FINE ART LANDSCAPES 140 HOME STUDIO PORTRAITS
PAGE
AWARDS
© Main: Jeremy Walker
Insert images left to right: James Abbott, Jon Adams, Tom Calton, Alistair Campbell
The Gallery Black and White Photo Awards 2022

8
© Johan Willems THE GALLERY
Black and White Photo Awards 2022

The Black and White Photo Awards is a newlycreated international photography contest designed to recognise and reward talent in the field of black and white photography. The awards are split into five categories; architecture, street, portrait, flora and fauna and landscapes. For more, visit: www.bwphotoawards.com


Far left Cheetah with cubs
This overall winner was shot with a Canon EOS-1D X Mark II and EF500mm f/4L IS II USM lens
Left The artist and his fans
A clever composition shows an array of phones capturing a street artist
Above Great Ridge walkway
This landscape taken in the Peak District got a bronze mention in the competition

9
© Herve Boutrouille
© Andy Gray


10 THE GALLERY
© Juan Jesús González Romero
© Antonio Figueras Barranco
© Pavlos Evangelidis
© Saurabh Sirohiya
“The striking contrasts are what make B&W so dynamic”
Far left Waves
The striking contrasts are what black and white photography so dynamic, as shown in this architectural winner

Far left upper Patterns Of Eid
Repetitive subjects can work well in monochrome – in a way they don’t with the distraction of colour
Far left lower Fan Club
The photographer has focussed on the detailed patterns of the fan with their minimalist entry
Far left bottom La cúpula
The high key image is dominated by bright, white and pure tones to create an almost ethereal feeling
Top left Ramble and roam
Shooting through the arrow has proved to be a clever framing technique in this urban scene
Middle Sea of Sand
A wide panoramic crop and wide angle lens captures the expanse of this landscape effectively

Top right
Backlight horse
Photographing the subject in front of the sun can create a dramatic contrast – what a majestic creature

Left Entre luces y sombras retornan sus sueños
A black background can often be a good way of separating the subject in a monochrome portrait

11
© Karen Gajate
© Vasilis Livanos
© Alessandro Accordini
© Michael Duckworth


THE GALLERY 12
© Kazutoshi Kawakami
© Ricardo Tormo Massignan
© Enric Adrian Gener
Far left Pattern
Contrasting tones and textures make this body study work so well. The eyes are the most striking part of the image
Left Mobulas in the Mediterranean Sea Rays of light burst through the waters of this impressive atmospheric underwater shot

Left below Posado de girafas
A long 400mm telephoto lens allowed the photographer to get closer to these wild animals

Below The Dolomites Seiser Alm Capture on a Hasselblad L1D-20c, a state-of-the-art aerial camera, Ales was able to capture a unique perspective

13
©
Ales Krivec
FUNDAMENTALS
ESSENTIAL KIT
Discover what cameras, lenses and accessories are best-suited to shooting black and white photographs, plus the best ways to edit and print your work
24
REVIEW: LEICA Q2 MONOCHROM
Is it worth getting a specialist black and white camera? We’ve put a popular monochrome-only Leica through its paces to find out what the images reveal
28
SHOOT BETTER BLACK AND WHITE IMAGES
Our first introductory guide will explain how to set up your camera, see in black and white, consider tonal range, and edit like a pro in Photoshop and Lightroom.

14
16

© Getty 15

MASTER B&W PHOTOGRAPHY 16
Essential kit for B&W photography
If you’re looking for the best equipment for a monochrome workflow, then this is the guide for you

This whole bookazine is dedicated to the intricate art of black and white photography, and one area that really has to be considered to get the best results is the kit that you choose to use. Over these pages, we will explore all the top kit – from your cameras and lenses, to software and printing, to finally presenting your work. There are several genre-specific features that you need to look for, and we will break these
down as we move through this gear guide. One decision that you will need to make when it comes to monochrome photography is whether you are going to shoot in black and white, or convert it after in post-production. There are advantages to both. If you shoot in black and white, then you can see how the tones and contrast are applied in the image, which means that you can correct the shot to match your own artistic vision. We have included
cameras that have monochrome modes, as well as lenses and filters that will improve your blackand-white shots for a variety of subjects. However, we also take a look at the best software options to do the conversion for you, the advantage being that you can keep the colour version and work on the mono version separately. Think carefully about your requirements and then read on to find out what your kit bag is crying out for…
17
More options
From DSLR to compact system cameras, here are some great camera options
HIGH-RESOLUTION DSLR
If having a compact-sized camera isn’t important to you, opt for a high-end DSLR like the Nikon D850. It remains one of the best DSLRs that you can buy today, equally capable of shooting portraits, landscapes or fine art black and white. Its 45.7MP fullframe sensor offers potential for large and detailed images, the solid build can withstand the elements and the 3.2-inch tilt-angle touchscreen makes composition a breeze. You’ll have access to a myriad of Nikon lenses, and for now, Nikon is still releasing new firmware to improve the camera and keep it up to date with the latest features.

Cameras
Picking a camera for monochrome work isn’t so different from choosing a camera for colour work, as it’s unlikely that your only use for a camera will be black and white. Ensure that your chosen model has features that will help you to capture the subjects you want to portray in mono, including black and white shooting options in the menu. A high resolution sensor is ideal, as sharp images are especially suited to monochrome conversion. Noise will generally be enhanced in monochrome,
MIRRORLESS CAMERA
Enthusiast mirrorless cameras are ideal if you know you’re going to shoot a range of styles. That’s because they offer you a wide range of lens options and a weatherproofed build, but are more lightweight than a DSLR and cheaper than a specialist monochrome camera. The full-frame Panasonic Lumix S5 camera features an L.MONOCHROME mode designed specifically to optimise black and white shooting, and it offers impressive dynamic range too.
Lens compatibility
Mirrorless cameras are compatible with a range of manufacturer and third-party lenses, so there’s flexibility


but the latest cameras now handle ISO very well. We’ve mainly focussed on interchangeable lens cameras – like a DSLR or mirrorless camera – here, as these are the best option for covering all manner of subjects and projects with different focal lengths. If you’re really serious about black and white photography, specialist cameras like the Leica M10 and Q2 Monochrom (see a full review on p24) exist just for this. Without a color filter array, they’re hard to beat when it comes to detail and tone.
Built-in picture profiles
Most digital cameras offer black and white shooting modes or film simulations, which are perfect for capturing more atmospheric shots
RETRO STYLED APS-C COMPACT
Rather than being a buying a larger DSLR, you could try a compact-system camera with interchangeable lenses, which means that you have the benefit of flexibility and compactness. The Fujifilm X-T30 II is a brilliant value mirrorless camera with a 26.1MP X-Trans CMOS IV APS-C sensor. Fujifilm’s Film Simulations are interesting , too, as they allow you to emulate classic black and white film stocks. Several modes can be used with red, green or yellow filters for further experimentation and control over your images.

MONOCHROME ONLY CAMERA
If you have a lot of money to spend, there are high-end camera that can capture images at greater quality purely in monochrome. The Leica M10 Monochrom is a pricey but beautifully engineered option. With its custom-made monochrome 40MP full frame sensor, each photosite captures only luminance (brightness) information – no colour. The rangefinder system offers accurate focusing, and the maximum ISO 100,000 is impressive.

Live view
Live View mode enables you to check that a shot works in mono before capturing
18 MASTER B&W PHOTOGRAPHY
Lenses
Picking a lens for your camera to use for black and white photography is dependent on the subject that you’re shooting. If landscape is preferable, then it is worth looking into an ultra-wide angle zoom lens, so that you can play with your composition to bring focus to the details and heighten the perspective, both traits that are essential to monochrome photos. We have picked a couple of our favourites here, new and old,
and these have built-in stabilisation features and large apertures to help get that perfect tonal range that is so necessary for working in black and white. If it’s portraits that you’re working with, then look for a wide aperture lens, so the maximum amount of light is taken in during low-light and indoor shots. These lenses are also good for working in conjunction with lighting setups to produce high and low-key effects.
Picking a lens for your camera to use for black and white photography is dependent on the subject
Beneficial design
This lens is designed in such a way that it minimises lens fall-off and increases peripheral brightness
Lenses & subjects
See what optics you need for what you want to shoot
TRAVEL AND STREET PHOTOGRAPHY
When you’re shooting street photos, you’ll need a lens that will let you get in close to your subject while you stay back, so this 18-135mm f3.5-5.6 zoom lens is perfect. The longer focal length will help you get great candids but the wide angle also means you can capture landscapes too while travelling. It also has quiet STM focusing and Dynamic Image Stabilizer to reduce camera shake.
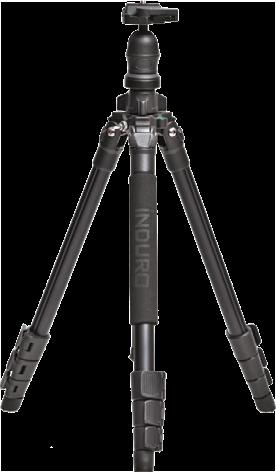
KEEP IT STEADY
When shooting certain monochrome shots like long exposure landscapes, it’s important to use a tripod to eliminate unwanted motion blur. There are hundreds of tripods out there; Manfrotto and Peak Design are two good brands with a variety of options depending on your budget and needs. Tailor your tripod to your camera and lens setup – you won’t need the sturdiest model for a compact camera, for example.
LENSES FOR LANDSCAPES
Landscapes are one of the most popular subjects for monochrome photography, and an ultra-wide-angle lens like the Sigma 12-24mm f4.5-5.6 DG HSM II (pictured) will do a great job of capturing them. Landscape lenses need to be lightweight and quiet, and the Sigma even has a full-frame view with Super Multi-Layer Coating to reduce flare and ghosting.
Weight
This compact lens weighs just 670g, making it good for taking out and about
PORTRAITS
If it is monochrome studio portraits that you’re interested in, then you should look for a fast maximum aperture and a rounded diaphragm to help produce softly blurred depth-of-field effects. The Nikon 85mm f1.4G AF NIKKOR (pictured) is a great lens that will help you to achieve people shots in the studio. It’s a medium telephoto lens with a fast maximum aperture of f1.4 and internal focusing. It’s lightweight too at 595g, which isn’t necessary for portraits, but it always helps!


MULTIPURPOSE
Release your creativity
The wide-angle view will exaggerate perspective, giving landscape photographers room for creative compositions
If it’s a multipurpose lens that you require, then you will need a good all-rounder. The Sigma 24-70mm f2.8 EX DG HSM (pictured) is a large aperture, standard zoom lens, meaning that it is as comfortable taking portrait shots as it is landscapes. The f2.8 aperture throughout the zoom range ensures quality when indoors or in low light, and the lens coatings help to remove aberrations and distortion. It has HSM for quiet yet fast focusing and it can focus down to a distance of 38cm.


19
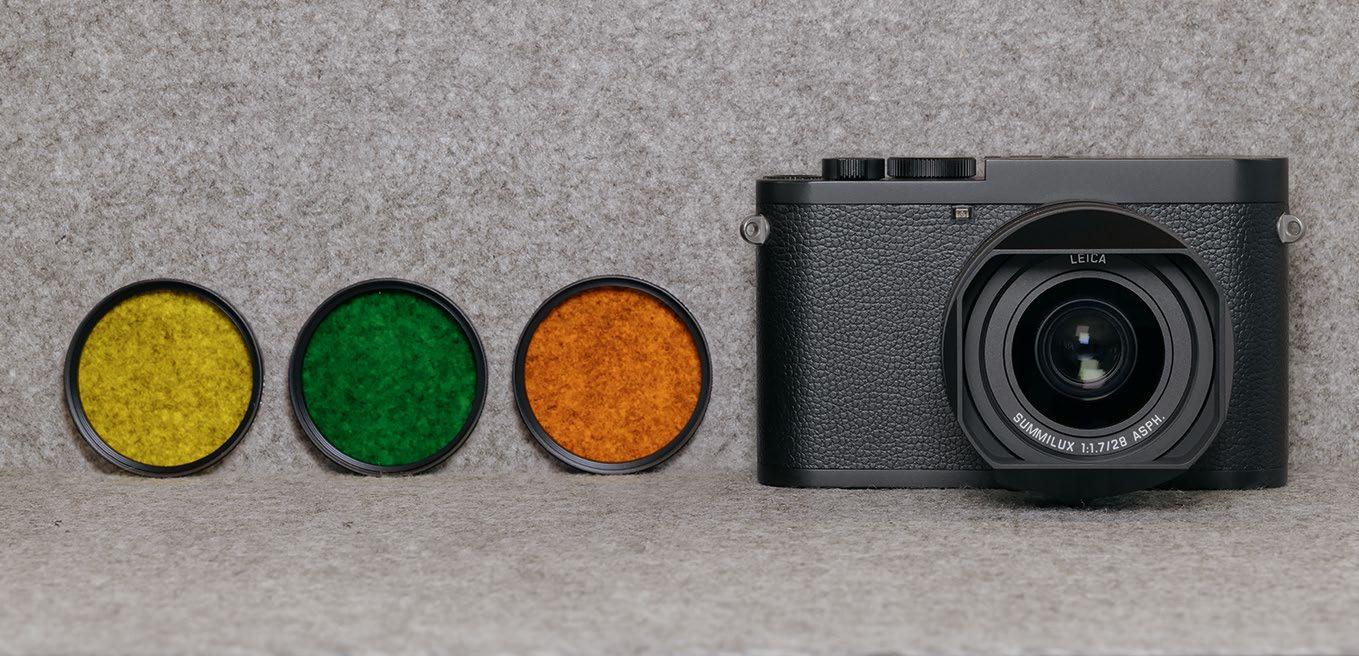
ESSENTIAL KIT
With filter
Filters
Filters are essential in black and white photography if you want to produce the very best results. By using them, you can make a big difference to the tonal range of your photos. With good black and white photos the viewer can almost visualise the scene in colour without any colour information present, simply by the tones presented. When a filter is used, it enhances certain colour tones in the final image, and can make a monochrome image really pop. By using a filter of a set colour, you will

HOYA COLOUR FILTERS
Hoya offers a wide range of coloured filters, which can be used to enhance the tones in your monochrome images. Prices vary depending on the size and the colour chosen, so visit the website to find out more. Use the Red filter to boost contrast in images with red, brown and orange – perfect for autumnal shots. There are also corrective filters, warm filters and portrait filters to choose from.
Compatibility
Hoya offers a massive range of different colours of filter to suit all lens types

Contrast boost
The K2 Yellow filter, which is a popular choice for portraits, can help to boost contrast between sky and foreground


Pick your colour
The colour of filter that you choose will have a dramatic impact on your final photo. Here we show you what four popular colour filters do to the same monochrome image.
Filter options
Some of the best filters and brands available right now

COKIN FILTERS
Cokin’s P series of filters are square filters designed to fit with a filter holder. You need to chose the holder to for your lens, but you can then use the filter on any lens size as long as you have the holder for it. Cokin’s colour filters are modestly priced and come in a range of colours, so you can experiment with tones at minimal cost. The H40003 P Series Filter
Kit pictured here is designed for enhancing contrast between colours in black and white photography, and includes four filters.

TIFFEN
No filter
lighten that particular colour in tone, and you will pop the tones of the complementary colours. Yellow filters are particularly popular, as they are good for making subtle changes, especially to the blue sky in landscape shots. Red is best for creative effects with loads of contrast. Blue and green are also available.
The Tiffen Black & White Three Filter Kit combines the essential yellow #6, green #13, and red #25 contrast filters together, along with a four-pocket filter pouch, to provide a convenient solution for producing varying degrees of contrast when working with black and white film. Available in a wide range of sizes, Tiffen filters are known for being highquality but well-priced. The Black & White starts at around £40 ($40), depending on the filter size that you buy.

URTH INFRARED (R72) FILTER PLUS+
If you are interested in experimenting with infrared digital photography, an R72 filter is what you need. It permits only light above the 720nm wavelength to pass through, effectively filtering out all light bar infrared light, which can’t be seen by the naked eye. This option from Urth is backed by a lifetime warranty, and as an eco-conscious company – Urth says your purchase will fund local communities to plant five trees in areas affected by deforestation.
Infrared
The 25A Red filter is great for those with an interest in infrared photography


Original Blue Green Red Yellow

20 MASTER B&W PHOTOGRAPHY
Software
Post-production is one area of the photographer’s workflow that just can’t be ignored. While many cameras will come with their own software solutions, if you want dramatic and striking black and white images then you need access to a good image editor. We have listed the four best software packages, but there are others out there that are worth considering.
Photoshop Elements, for example, has really upped its game over the last few versions, so if the full Photoshop package seems a little heavy
handed for the editing you require, then it’s a good option at a fraction of the cost. Photoshop, however, is now available in monthly payments through Creative Cloud, which helps to break the cost down. Lightroom is also a good alternative to Photoshop, as it’s tailored just to photographers, rather than digital artists, 3D artists, web designers and the many other creatives. And don’t forget that the majority of big-name packages will be extendable via plug-ins.
For dramatic and striking black and white images you need access to a good image editor


Catalog Lightroom’s easy-to-use interface makes it easy to find the image you want
Plug-ins Lightroom supports external plug-ins to extend its functionality even more
BLACK AND WHITE SOFTWARE PLUG-INS
Silver Efex Pro is a powerful black and white converter in the Nik Collection.Silver Efex Pro remains the best digital black and white plug-in ever and is updated in the latest Nik Collection 4 version with a fresh, modern interface, a new ClearView option and more powerful selective control points. You can use the Nik Collection 4 plug-ins with Photoshop, Lightroom and from within DxO PhotoLab – or use them as external editors with other programs like Capture One.
More software
Select the image-editing software you need
ADOBE PHOTOSHOP CC
Adobe’s subscription plans have made Photoshop more affordable. The Creative Cloud Photography Plan – which includes Lightroom, Lightroom Classic, Photoshop, and 20GB of cloud storage – starts at £9.99/$9.99 per month, giving you access to software updates and the latest features.
Photoshop is still the top image-editing software for a reason, but you may find it provides more than you need. If you’re working with colour images, the Black & White adjustment layer is a great way to tailor results without affecting the original permanently, and the many colour and tone tools mean that monochrome images can be made to pop.
AFFINITY PHOTO

With unique new features alongside an interface overhaul, Serif Affinity Photo 2 proves that budget software doesn’t have to mean compromise – or a monthly subscription. There are a range of tools for black and white image processing. Where things get really interesting is when you take advantage of the colour mix sliders, which you’ll find under Black and White in the Tones panel. The Black and White Adjustment is the best tool for mono conversions in the Photo Persona, while Nondestructive adjustments can be made with a Black and White Adjustment Layer – in much the same way as Adobe Photoshop CC (but for a one-off price).
DXO PHOTO LAB
ADOBE LIGHTROOM

Lightroom has really worked hard to win popularity among professional photographers, offering more and more editing options in each version so that having Photoshop is less essential. Whether you use Lightroom Classic or the streamline CC version, its sophisticated colour and tone tools mean that when working with monochrome or colour images, it’s a relatively simple process to enhance contrast in a nondestructive manner.
Easy edits
The editing options are becoming more and more advanced while still retaining ease of use
Newest version
Lightroom Classic offers advanced black and white conversions, letting you adjust a mix of colour bands
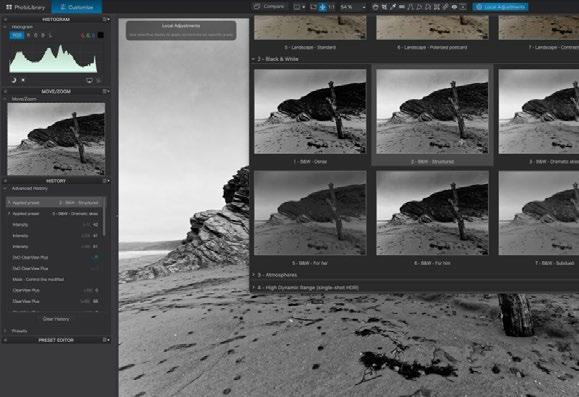
DxO PhotoLab 6 is arguably the best photo editing software for RAW image processing. Its lab-developed lens corrections are excellent, correcting edge softness too, and its improved DeepPRIME XD processing gives spectacular results with high ISO images. Thanks to the ‘nested’ Projects feature, DxO Photo Lab is also now a much better photo organizer. All your adjustments can be changed, removed or added to in the future, and you can create ‘virtual copies’ to try out different adjustments.
ESSENTIAL KIT
21
Buy the best you can afford within your budget
Printers
Once you have a perfectly shot and edited black and white picture, it’s time to turn your attention to output options. A printer is the first vital step in the workflow chain, and there are two key types of printer that you are likely to come across. First, there are the consumer printers, which we will look at here, and then there are professional printers, if you want to get more serious. When looking at consumer printers, don’t just go straight
CANON IMAGEPROGRAF PRO-1000
This A2 format photo printer brings pro-grade capabilities with a better price tag to appeal to enthusiasts. It’s big, and over £1,000, but a serious choice for home printing. With 11 colour pigmented inks overall, the grey and photo grey inks in combination with either the photo black or matte black ensure neutral prints with deep blacks and good tonal spread from highlight to shadow areas. The Grayscale print panel also allows adjustments to be made.
More printers
Home printing no longer has to mean low quality
HP ENVY PHOTO 6230 ALL-IN-ONE
For an affordable price, the Envy 6230 is a high-quality inkjet model that can also make photocopies and scans. The compact shape is designed to fit on your desk or on a shelf, so it won’t take up too much room. You can also print directly from your smartphone and tablet using an app and it will make speedy work of it, printing up to 13 pages per minute for black and white. You can print borderless photos and the built-in photo tray lets you print 4x6-inch photos without changing paper. It’s a great entry-level model for home printing.


SCANNING
If you are interested in scanning in old monochrome film photos, then it is worth investing in a dedicated scanner rather than using the all-in-one functions of many of these printers. Photo scanners come with a negative or slide tray, which holds the film in place while it’s scanning, ensuring the highest quality. All-inone printers with scanners are usually best for document scanning.
in for the most expensive you can afford, but don’t snap up super-low bargains either – both can be misleading. Think carefully about what you need from your printer. If you need innovation and quality, then buy the best that you can afford within your budget; however, if bells and whistles don’t tickle your fancy, you may be paying for things that you don’t really need. We present some great options for you here.
Easy transfers
Wi-Fi enabled cameras can share shots straight to it and the Canon Print app shares from phones
CANON SELPHY CP910

If you’re after a more compact printer, Canon’s Selphy series may be for you. The revamped CP1500 portable photo printer is sleek, fast and well connected, and a battery pack is available as an optional extra so you can use it outdoors too. The on-screen instructions make it easy to use, and it can produce standard 1015cm, square and credit card size prints. It runs on dye-sublimation technology, so there’s no ink to consider. Instead, each specialist sheet of paper is fed through the printer, followed by a final protective, smudge and fingerprintresistant coating to ensure longevity.
EPSON EXPRESSION PHOTO XP-970
Print in common sizes
Print stunning quality photos in borderless sizes up to A2
Billed as a ‘small-in-one’ printer, the XP-970 aims to keep size and weight to a minimum. It still manages to pack in some useful extras like a high-res 4800dpi scanner, an SD/HC/XC card slot and a PictBridge port, all brought together by a 4.3-inch touchscreen with an intuitive interface. Although the maximum print size is A3, the scanner is limited to A4. Going large to A3 format printing makes your photos look much more imposing, and print quality itself is very good. It’s not a specialist black and white printer, but a versatile and well-priced model that will suit most of your general printing and office needs at the same time.
The LCD screen panel makes it easy to select and navigate through all of the available printing options
22 MASTER B&W PHOTOGRAPHY
Frames and mounting
It’s all well and good producing amazing black and white images, but if you never display them, the prints will end up going dusty in an old shoebox. Make your photographs into the works of art that they are by investing in a decent frame. Custom frames give the best results as the size, finish and mounting method are all interchangeable so that you can get exactly what you want. This is
especially useful if you want to print at a nonstandard size to fit a particular wall or to show the work off to its best potential. Also, for holding personal exhibitions or selling work, then custom frames give that air of quality and uniqueness. Here we round up four popular online services that enable you to create the frame that you want with no restrictions.
Custom frames give that air of quality and uniqueness
EFRAME
eFrame is a great custom frame site as it’s really easy to navigate. It has loads of guides on how to measure a print properly, how to use the website and inspirational galleries to get an idea of how a frame will look. Everything is customisable with both wood and metal frames, standard and custom size options and an online preview. www.eframe.co.uk

Framing online
More online framing options
PICTURE FRAMES EXPRESS
This simple site stocks a range of made-tomeasure frames, mounts and multi-frame options. As well as offering a variety of colours and materials including wood and metal, there are also box frames and wooden frames too. The site is easy to navigate around, and you can generate a quick quote by entering the photo dimensions. There’s also a useful help section that talks you through measuring, deciding what mount you want and how to order.


www.pictureframesexpress.co.uk

EASYFRAME
GO DIGITAL
There are also digital photo frames out there if your framing needs are limited to displaying your work around the home. Look for ones with good connection options, in particular Wi-Fi or card slots, so it’s easy to update your frame with your latest shots. Also make sure that the resolution is as high as possible to make the most of your mono shots. You can also display slideshows of your shots on a tablet.
WHITEWALL
Ready
There’s
EasyFrame offers both standard size and custom size frames, with the latter made simple thanks to a box on the home page into which you can enter your measurements and get straight into customising. The frames are handmade in the United Kingdom and are dispatched within 1-3 days. There are plenty of categories to choose from, including metal, wood, box frames and more, and just as many mounts. The Help and Advice section covers all you need to know. www.easyframe.co.uk Sample
WhiteWall is a premium service for both printing and framing your photographs. They offer a wide variety of framing options, alongside other products such as acrylic and canvas prints. You have a lot of options to chose from, including the type of glass used, paper type, sizing (you can create a custom size) and more. WhiteWall ship internationally and offer a five-year guarantee They’re not the cheapest or fastest out there but you pay for a product that’s very high quality. www.whitewall.com

Custom frames
You can create your own bespoke frame and mount using the Custom option
be
to the site so that you can see how your image looks inside the chosen frame
A picture can
uploaded
made
the option to pick a ready made frame if you want to keep costs down and you can buy framing accessories too
ESSENTIAL
23
KIT
Price: £5000 / $5,995
Leica Q2 Monochrom
Does the 47MP black-&-white-only full-frame sensor make this the perfect camera for monochrome?


The Leica Q2 Monochrom is a very unusual camera because it combines Leica’s Q2 full-frame compact camera with technology from its Monochrom series of black-and-white-only cameras. As a result, the Q2 Monochrom has a 47MP CMOS sensor with no colour filter array, so it is only capable of capturing black and white images.

Leica has paired the Q2 Monochrom’s sensor with its Maestro processing engine, enabling a sensitivity range of ISO 100100,000, as well as a maximum continuous shooting rate of 10fps. Although the Q2 Monochrom can only record black and white images, they can be recorded as JPEGs and/ or RAW files, and there are three colour tints (sepia, blue and selenium) that can be applied to JPEGs in two strengths. The strong setting is subtle, but we still favoured the low setting.
As it’s a compact camera, the Q2 Monochrom has a fixed lens – the same Leica Summilux 28mm f/1.7 ASPH as on the Q2. This is nicely balanced on the camera and has a good ‘walkabout’ focal length. However, the camera can crop in to a framing equivalent of 35mmm, 50mm or 75mm, reducing the image size to 30MP, 14.7MP and 6.6MP respectively. Helpfully, if you record RAW and JPEG images simultaneously, the JPEGs are permanently cropped but the RAW files retain the information from the whole sensor and can be ‘uncropped’ in RAW editing software. Although it doesn’t have the windows required by a rangefinder, the Q2 Monochrom could slip among Leica’s digital M-series cameras and not stand out. It echoes their rectangular shape, curved edges and highclass looks. And it’s not just looks – its
x3 © Angela Nicholson 24 MASTER B&W PHOTOGRAPHY
FEATURES
THREE LENS RINGS
In addition to the manual focus and aperture rings, the Q2 Monochrom has a third ring that enables the closest focus to be reduced from 30cm to 17cm.


TRADITIONAL EXPOSURE CONTROL
Exposure is set using the shutter speed dial and the aperture ring, so the camera can be used in Program, Aperture Priority, Shutter Priority or Manual mode.
MANUAL FOCUS
The manual focus ring has to be unlocked by pressing a small adjacent button before it can be rotated. Distance and depth-of-field scales enable hyperfocal distance and zone focusing.
CONTRAST DETECTION
The contrast detection AF system has 225 AF points, which can be selected using the navigation pad or with a quick tap on the screen. Face detection is also available in the Q2 Monochrom.
CROP SETTINGS
The lens has a focal length of 28mm, but there are crop settings equivalent to 35mm, 50mm and 75mm, reducing image size to 30MP, 14.7MP and 6.6MP.
MONOCHROMATIC VIDEO
It can shoot C4K (4,096 x 2,160) video at 24fps or 4K (3,840 x 2,160) at 30fps, and Full HD video at up to 120fps, but there’s no external mic port.
EXPOSURE CONTROL
build is very good too, made from metal with a delightful standard of finish. It’s also weatherproof to IP52.
Rather than an optical viewfinder, the Q2 Monochrom has a 3.68 million-pixel OLED electronic viewfinder – the same as the Q2. This gives a clear view with plenty of detail, which is handy when having to focus manually. The view can also magnify automatically when the manual focus ring is rotated, and focus peaking can be activated if you want it.
There’s also a three-inch, 1.04 million-dot touchscreen on the back of the camera. Like the viewfinder, this shows a good level of detail, but as it’s fixed on the back of the camera, it’s not as helpful for low or high-level compositions. Nevertheless, it’s responsive to touch, and it helps to make the Q2 Monochrom very intuitive to use. A press of the menu button, for example, brings up a status screen showing the focus, metering, drive, and self-timer modes, and any can be selected and adjusted via the screen. Pressing the menu button again brings up a
Right
Understated style Leica has kept the Q2 Monochrom clean and uncluttered – there’s not even a red badge


Left
Flat front
The flat front has a textured coating, but there are optional grips available to provide more purchase
Below
Solid build
The top plate is machined from aluminium, while the body is made of magnesium alloy
25
The enhanced resolution of the sensor ensures that images have plenty of detail across the frame, with RAW files in particular impressing
customisable list of ‘Favourite’ features, and further presses move through the main menu.
Like a Leica M-series camera, the Q2 Monochrom has traditional exposure controls, so the shutter speed is set via a dial on its top plate, and there’s an aperture ring on the lens. These have markings of ‘A’ for automatic, and when they are both set to ‘A’, the camera is in Program mode. Taking one off Auto puts the camera in Shutter Priority or Aperture Priority, while setting a specific aperture and shutter speed puts the camera in Manual mode.
Despite the M-like looks, the Q2 Monochrom can focus automatically. This focusing system uses contrast detection and has 225 points that can be selected automatically by the camera, or by the photographer with a tap on the screen or via the navigation controls. While phase detection is generally favoured, the Q2 Monochrom’s focusing is good. Also, helped by the lens’s maximum aperture of f/1.7, it copes well with low light. It also does a decent job of tracking a moving subject, and the face detection is effective, though the design of the camera and the lens’s focal length don’t make it a natural choice for action or wildlife shots. However, it’s well-suited to street photography.
Thanks to its 47MP sensor, with every pixel being used to gather data without interpolation, the Q2 Monochrom is able to produce images with lots of sharp detail. The micro contrast in JPEGs looks a bit high, so as usual it’s best to shoot RAW files.
The lack of colour means there’s no chroma noise, only luminance noise, which is controlled well up to around ISO 25,000
The Q2 Monochrom’s Summilux 28mm f/1.7 ASPH lens is an excellent performer, controlling distortion, vignetting and flare extremely well
TALKING POINT… Monochrome sensor

Unlike most cameras, which have a colour filter array over the sensor to enable them to reproduce colour, the Q2 Monochrom has no coloured filters over its CMOS chip. This means that each pixel receives more light, which is good news for noise control. It also means that each photo site is used to gather brightness information, and unlike with a sensor that has an RGGB filter pattern, there’s no interpolation required. Consequently, a monochrome sensor can capture more detail.
The downside is that there’s no option to use the colour information for brightness and contrast adjustment, but the Q2 Monochrom’s sensor responds to coloured lens filters in the same way as black and white film, so they can be used at the shooting stage.
As the Q2 Monochrom doesn’t capture colour, there’s no colour noise, and the luminance noise is very well-controlled. Going higher than ISO 25,000, though, can result in finer details being lost and some muddy or slightly smudged shadows.
Working on a RAW file in Adobe Camera Raw reveals that the Q2 Monochrom captures a wide dynamic range, and it’s impressive how much detail can be pulled back from the highlights or revealed in the shadows.

Right Excellent
noise control
Left Great
lens
Above Sharp
detail
KEEP UP WITH THE LATEST RELEASES:
www.digitalcameraworld.com
26 x5 ©
MASTER B&W PHOTOGRAPHY
Angela Nicholson

100%
27 LEICA Q2 MONOCHROM
As the Q2 Monochrom doesn’t capture colour, there’s no colour noise, and the luminance noise is very well-controlled
BLACK & WHITE IMAGES SHOOT BETTER
Bring the magic of mono into your photography. Hints, tips and tutorials by
Niall Hampton, James Abbott and Adrian Davies
Timeless, gritty, truthful and classic are all common ways of describing black and white photography. Despite the advent of mass-produced colour film, which made everyone think black and white would fall out of fashion, even after nearly 200 years since Joseph Nicéphore Niépce made the first black and white photograph, mono remains as popular as ever. Perhaps even more so, given the resurgence of film photography in recent years.
Of course, one of the great advantages of digital photography is that you can capture colour and black and white images on a whim, switching between colour and black and white is as easy as diving into a menu. It’s definitely much easier than having to change a roll of film – although both mediums are rewarding.
Here, we’ll reveal some hints and tips for shooting better black and white shots, helping you to create majestic moments in monochrome.

© Getty 28 MASTER B&W PHOTOGRAPHY
WHAT YOU’LL LEARN


PART 5 Get creative with HDR infra-red
PART 4
Converting colour images to black and white
PART 3
Setting up your camera for black and white
PART 2 Tonal variations found in black and white
PART 1
29
Train your eyes to see in black and white
SHOOT BETTER BLACK & WHITE
How to see in black & white
Look out for these elements when framing up your shots

You’ll be able to shoot better black and white images if you have an eye for what works best in the medium. Examine the portfolio of any renowned black and white photographer, past or present, and you’ll soon spot recurring elements in their photographic approach. With the distraction of colour removed, shape, form, pattern and texture take on added significance in black and white photography, and can all be used to add impact (we’ll look at the role played by tone on page 32.)
1 Shape
Shape describes the appearance of a subject in two dimensions. Identifying the shape of subjects, and knowing how best to arrange them in your images, will really help to improve your photography. Try arranging shapes to emphasise their most interesting aspects, or create an intriguing composition of different ones.

Things to look out for:
1 Leading edges
2 Contrasting tones
2 Form
This describes the three-dimensional appearance of a subject, and how its various parts are arranged. How the subject is lit, and where light and shade intersect, provide depth cues. Here, the petals of the rose lead the eye into the centre of the image.


Things to look out for:
1 Sense of depth
2 Tonal variation
1
COLOUR COLOUR
BLACK & WHITE 1 2
BLACK & WHITE
1 2
© Getty © Getty 30 MASTER B&W PHOTOGRAPHY
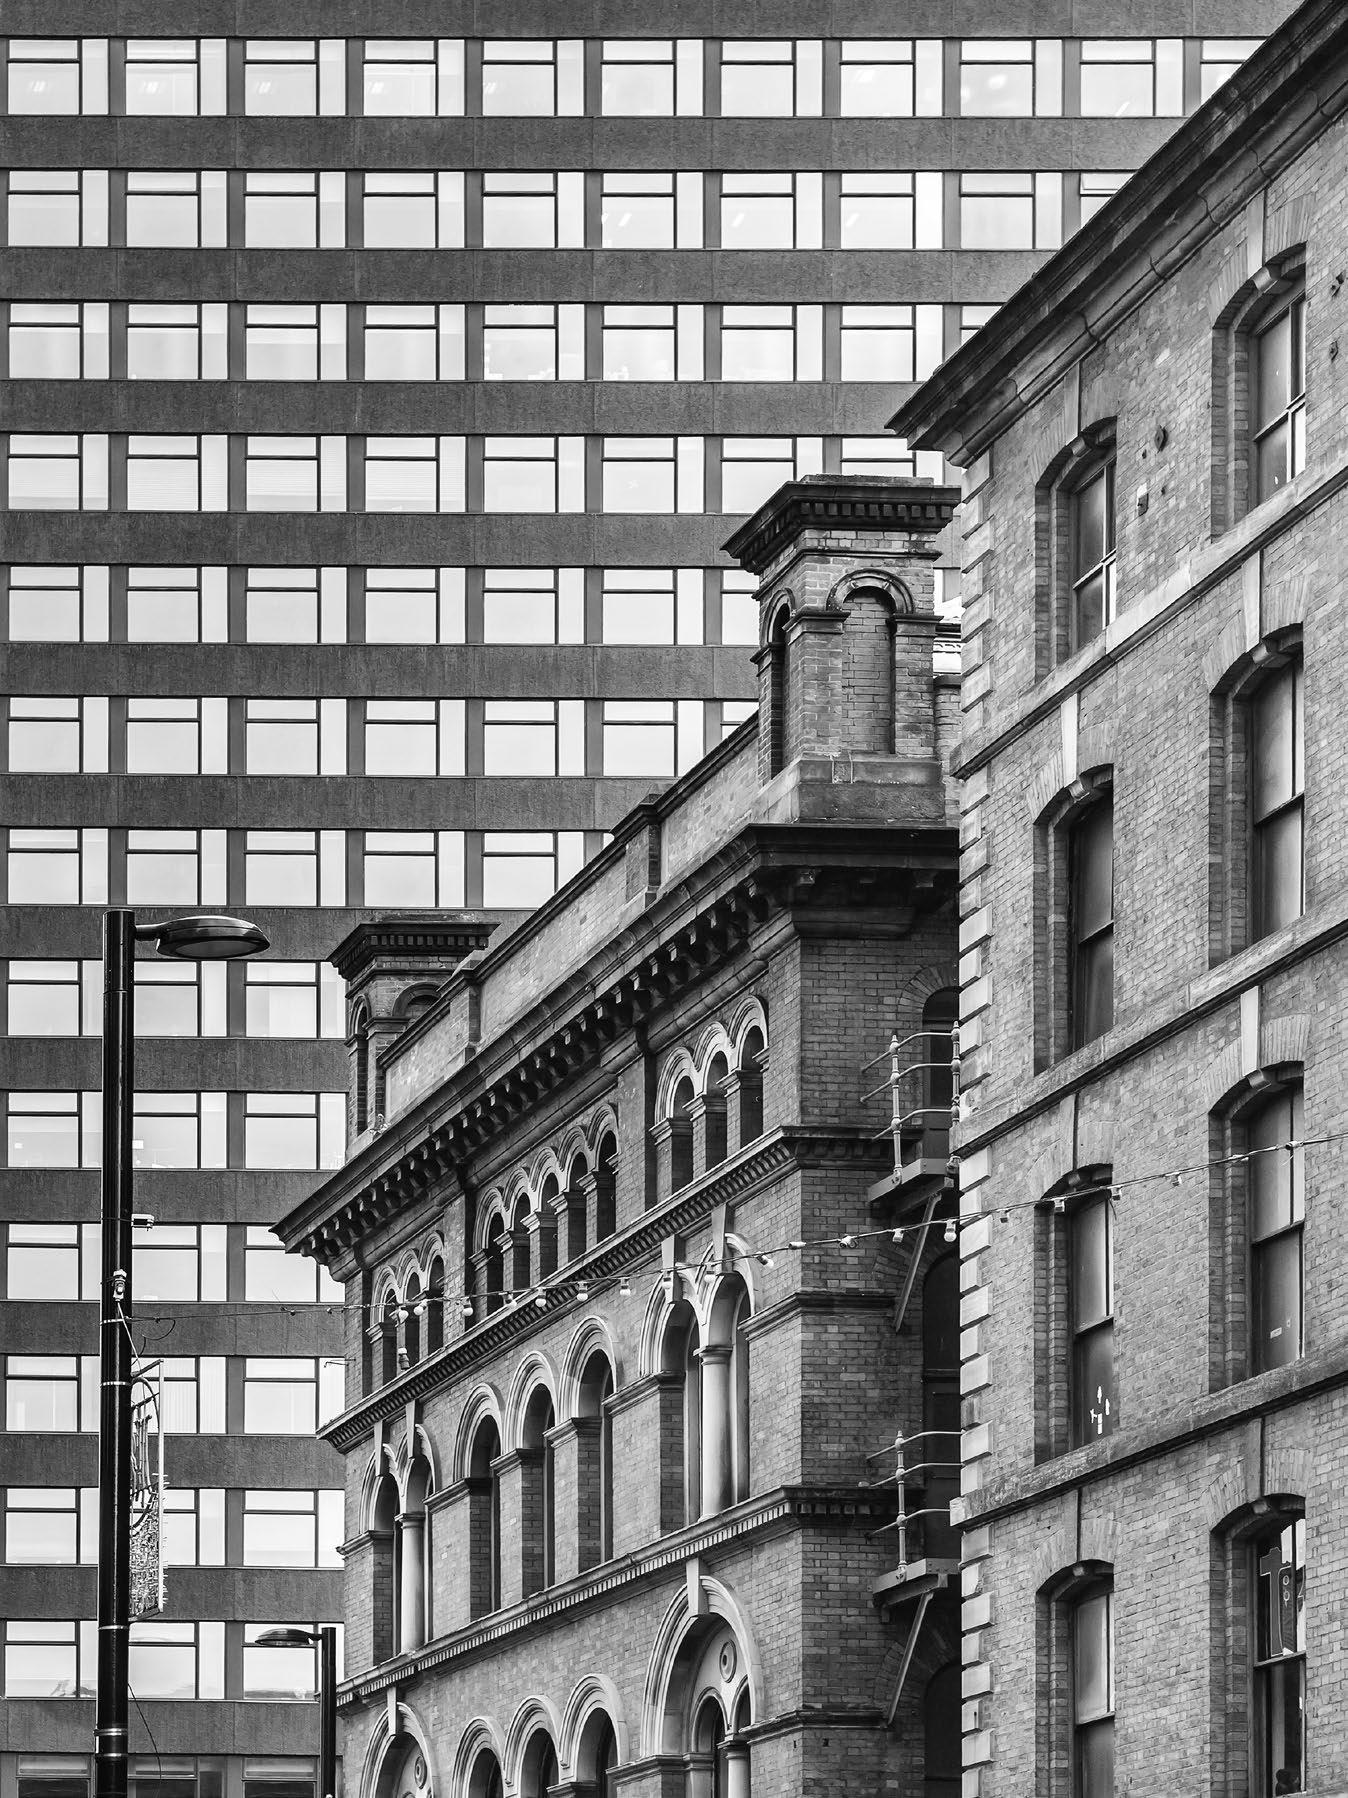
3 Pattern
The distribution and repetition of shapes into patterns – whether in natural or built environments – help us make sense of everyday life. In this example of man-made patterns, taken in a Manchester street, two contrasting buildings butt up together in an interesting juxtaposition. It’s a striking enough image in colour, but strip away the red brick and the sand-coloured ornamentation around the windows of the Victorian building, to bring it tonally closer to the Brutalist 1960s office block, and the clash of architectural styles looks even more pronounced than it did in colour.

Things to look out for:
1 Uniformity of shapes
2 Sequencing of shapes
3 Different types of shape
4 Texture
Whether smooth or uneven, this quality describes the tactile sense of an object and invites us to reach out and touch it. In colour, this ancient Roman column features all the ageing and weathering one would expect to see, but the black and white version feels better suited to the subject.


Things to look out for:
1 Smoothness or roughness of the surface
2 Variation of texture
3 Tonal distribution
COLOUR
COLOUR
BLACK & WHITE
2 3 4 1 2 3 © Getty © Getty 31
BLACK & WHITE
SHOOT BETTER BLACK & WHITE
Considering tonal range 2

Step beyond the average and use tone to give your black and white images added impact, using these examples as inspiration


An average scene in average lighting conditions (above right) will contain a range of different tones, from shadows and midtones to bright highlights. A scene like this will have a brightness value of 18% grey – which is also the value that your camera’s light meter
is calibrated to, so that consistent exposures with balanced tones can be achieved. Due to lighting conditions, some scenes will feature different tonal variations, so tone becomes something that can be considered for creative effect in the final image.
Think about tonal value while considering shape, form, pattern and texture, and combine them all to determine your creative vision for a black and white image. Below we outline the common tonal variations found in black and white; use these looks for inspiration.
High-key
An image made up mainly of light bright tones and white is known as ‘high-key’. It’s a popular technique in studio photography.
High contrast
With no midtones between the brightest highlight and the deepest shadow, this image has a look that’s ideal for presenting extremes.
Low contrast
Midtones dominate this misty landscape scene. The lack of contrast and extreme dark tones lends a sense of tranquillity.

Low-key
Conversely, an image composed of predominantly heavy dark tones and black is known as ‘low-key’. In portraits, it creates a sense of mystery.


x6 © Getty 32 MASTER B&W PHOTOGRAPHY
How to set up your camera for black & white 3
Discover the settings and presets you need to shoot with mono in mind

While it’s perfectly possible to shoot just in black and white on a digital camera, we recommend taking a different path: capture in colour and convert later. This will give you greater flexibility: if the final black and white image doesn’t work out quite how you saw it, you’ve still got a colour version. You can’t put the colour information back into a black and white image, but you’ll always get black and white from colour. Shoot in raw for maximum detail (below).
FILE FORMATS
Shoot in raw and JPEG simultaneously to capture the maximum amount of image detail for post-processing. The formats below are all supported by Adobe in its editing applications:

.CR2 Canon .RAF Fujifilm .NEF Nikon .ORF Olympus .RW2 Panasonic .PEF Pentax (or .DNG) .ARW Sony
1 ISO Choose a value to give you as much image quality as possible; this will be handy during processing or conversion of images.
2 Exposure mode Choose according to the shooting situation – but if you’ve got time to think about what you’re doing, use Manual.
3 White Balance
For the widest range, select a WB preset rather than Auto WB. If one colour dominates the scene, try another preset.
4 Live View
Confirm that a scene will work in black and white by selecting the Mono Picture Style, then view the image on the rear screen.
Getty
This mono conversion from a colour image shows how good the end result can be.
1 2 3 4 33
PHYSICAL FILTERS
Modify your images incamera by using filters you already own. The circular screw-in type is arguably the easiest to use, as it’s less of an encumbrance than a filter adapter, although the latter format makes changing individual filters on the fly a bit easier.
PICTURE STYLES
If you want to use the in-camera black and white mode (for a Live View preview, for example), head for your camera’s creative image modes. Select Monochrome and all images will be captured in black and white.
POLARISING FILTER

A polariser will make blue skies more vivid, and heighten the dramatic impact of many landscape shots.
RED FILTER
Attach one of these to make blue skies appear darker, and to make foliage look crisper and brighter.
GREEN FILTER
Grass, foliage and vegetation will be depicted more vividly than normal. Skin tones and lips will appear muted.
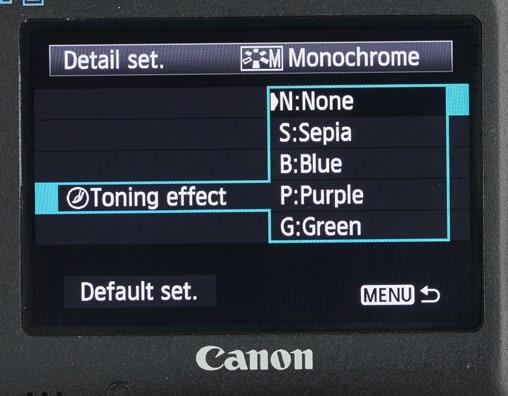
DIGITAL FILTERS
In addition to controls for sharpness and contrast, the Monochrome Picture Styles mode gives you the option of adding four filter effects in-camera (or later, in editing software). Many cameras also offer a toning effect.


1 Go to Picture Styles Access the Picture Styles menu, or use the Creative Mode button (if fitted to your camera) as a shortcut.
2 SELECT MONO Scroll through and select Monochrome. A warning in the viewfinder confirms you’re shooting in mono.
3 PREVIEW THE SHOT One boon of using this setting is that you can use Live View to see how your image will work in black and white.
1 FILTER SELECTION Call up the Monochrome Picture Styles menu and select Yellow, Orange, Red or Green in ‘Filter Effect’.
2 CHOOSE YOUR FILTER
You can also adjust the Sharpness and Contrast. To boost the filter’s effect, dial in some extra Contrast.
3 TRY THE TONING EFFECT Try creating a mono image in a particular tone. The Canon EOS 5D III has Sepia, Blue, Purple or Green.
34 MASTER B&W PHOTOGRAPHY
Enhance your images in post-processing 4

James Abbott outlines two ways to convert your shots to mono


As we’ve seen, shooting in colour and converting to black and white afterwards gives you more flexibility than working solely in mono. And you’ll come to appreciate the extra information in raw files during editing. We’ve put together two tutorials to cover the two most popular image-editing packages
– there’s more than one way to go about mono conversions, but these techniques are easy to learn and master.
If you want to take things further, then try Silver Efex Pro, part of DxO’s Nik Collection (which we mention on p21). This works as a plugin within Photoshop and Lightroom, and
recreates black and white film and darkroom effects. Nik Collection 5 is the latest release, and contains eight plug-ins that will unlock your full photographic potential when editing. Find out more at www.nikcollection.dxo. com and claim a free trial for 30 days – you don’t need to provide a payment method.
Adjustment Layers

Great results in the quickest time
Edit like a pro in Photoshop
Achieve punchy black and white effects
There are several ways to convert colour images to black and white in Photoshop, but one that produces fantastic results in the quickest time is by using a Gradient Map Adjustment Layer. It may not offer the most control out of all the options, but you certainly won’t be disappointed.


1 Apply a Gradient Map Click on the Create New Fill Or Adjustment Layer icon, which is a half-black half-white circle at the bottom of the Layers panel, and select Gradient Map. Double-click the gradient when the dialog box opens. When the Gradient Editor opens, select ‘Black, White’ and click OK.

2 Use Levels to boost contrast If you’d like to increase the contrast of the image further, create a Levels Adjustment Layer; when the dialog box opens, set the white point to 10, the black point to 245 and the midtones/brightness to 1.15 to lighten the image after the contrast boost, then click OK.
3 Use Levels to reduce contrast The Gradient Map conversion technique naturally produces a high-contrast result; if you’d like to reduce it slightly, you can use Levels again. Reset all the changes you made in the Levels Adjustment Layer in the previous step. Now drag the black Output Level to 25 to lighten blacks.
BEFORE
AFTER
35 GET BOLD WITHBLACK & WHITE SHOOT BETTER BLACK
Edit like a pro in Lightroom


Take full control of mono conversions
If you shoot in raw you can get the best results possible by converting to black and white in Lightroom or Adobe Camera Raw (which use essentially the same tools). Working on the raw image data provides more room for manoeuvre, and there are eight colour channels to control exactly how the colours will be converted to greyscale.

USING LIGHTROOM’S BLACK & WHITE TREATMENT
Lightroom offers a sophisticated way to adjust tones based their original hues


4
Make basic adjustments Before converting an image to black and white in Lightroom, it’s best to correct white balance and process the image so it looks how you’d like in colour. Doing this is important, because it gives you a better starting point to work from once you convert to mono...


5 Convert to mono At the top of the Basic panel on the right, click on Black & White to convert to mono, then scroll down to Black & White Mix. Dragging to the left darkens a channel, while to the right lightens. For this image, Yellow and Orange were set to +18 to lighten foliage, and Blue to -47 to darken the sky.
FINISHING TOUCHES
6
Increase contrast Monochrome images can handle much more contrast than their colour counterparts, so at this stage you can increase the contrast slightly to help make the textures and shapes in the image stand out. Simply set the Tone Curve preset to Strong Contrast.

Adding a split tone is a great way to add subtle colours to the shadow and highlight areas of black and white images. It’s a classic darkroom technique that can be applied using the Split Tone panel in Lightroom, or by using a Gradient Map Adjustment Layer in Photoshop with the desired colours set.

AFTER BEFORE
36 MASTER B&W
PHOTOGRAPHY
Dodge & burn in Photoshop

Evoke darkroom methods to finesse the monochrome look in your shots

TRY THESE COOL MONO EFFECTS
Improve your black and white shots with these treatments


1 CYANOTYPE Add a Gradient Map Adjustment Layer and choose a colour from the Photographic Toning options. Adjust Opacity as required; to add contrast, use an S-curve on a Curves Adjustment Layer.
An essential tool in darkroom printing, dodging and burning involves selectively brightening (dodging) and darkening (burning) different areas of the image, to draw the viewer’s eye to certain points. We’ve performed this process in colour, before conversion into black and white.

DODGING
Open your image in Photoshop and select the Dodge tool (displayed as a racquet icon) from the Tools palette. Dodging works by painting a brush over desired areas, so first select the size of the brush you need. (It’s at the top left of the screen, just underneath the menu.) Next, select Shadows, Midtones or Highlights and the Exposure required, expressed as a
percentage. Then just paint the brush where the dodge effect is required on the image. To stop the image clipping, tick Protect Tones. In the image above, we’ve lifted the rocks in the foreground [1] out of shadow and have made the castle and mound [2] lighter.

BURNING
Burning is the opposite effect to Dodging, and the parameters you can select are the same. (The icon mimics using a hand in a real darkroom.) As before, select the part of the image you need to modify and paint in the corrections required. We’ve burned in some contrast to the sky [3] and have made the clouds darker above the horizon to the right of the image [4].
2 LITHO printing Use layers and Adjustment Layers to get this effect. It’s all about the contrast between strong shadows and soft highlights. Add some noise to the shadows, and tone to the midtones and highlights.
3
High key Why not take a predominantly light-toned image even further and push it to extremes? Add a Curves Adjustment Layer and raise the curve to lighten all the tones, without losing the highlight detail.
B&W CONVERSION 3 1 2 4
BEFORE
DODGE & BURN
37
SHOOT BETTER BLACK & WHITE
Get creative and try infrared HDR


The sensors in modern digital cameras and smartphones are sensitive not only to visible light, but also to invisible ultraviolet (UV) and infrared (IR). Allowing UV and IR to enter the camera for normal photography would lead to strange colours, so the manufacturers filter out the UV and IR at the time of manufacture by placing a UV- and IR-absorbing filter over the sensor, so that it is effectively only sensitive to visible light. It is possible to have this filter removed (or remove it yourself) and either replace it with an infrared transmitting filter inside the camera, or place an IR filter over the lens, giving a camera that will record IR images. This is expensive to carry out, however – and, in the case of an internal filter, renders the camera useless for normal photography.

You can also use a conventional unconverted camera for IR by placing an IR filter over the lens. This removes all the visible (and UV) light to only allow IR through. Because the camera still has the filter over the sensor to filter out the IR, exposure times will be long – in the region of 5-10 seconds or more at f/5.6. The results may not be as good as a converted IR camera, but certainly be strong enough to produce some interesting images!

Shooting infrared
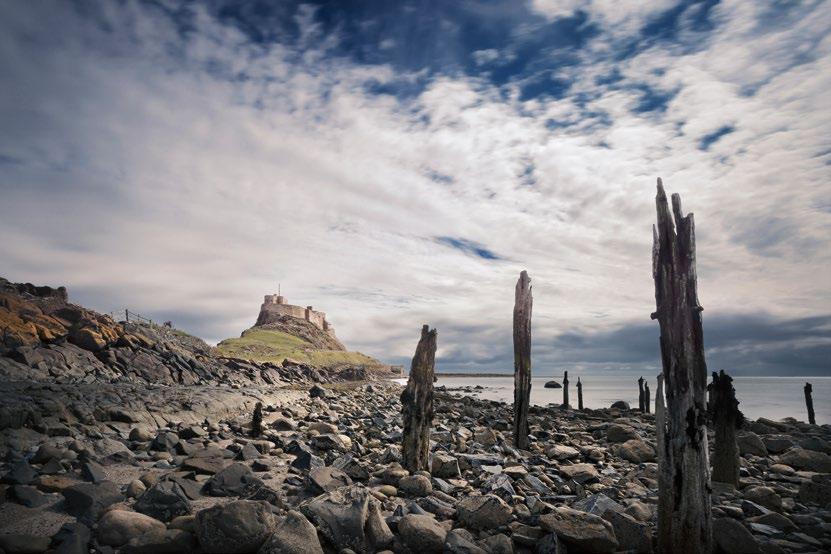
You will need a 720nm IR filter (720 indicating that the filter is transmitting IR wavelengths of 720 nanometres). Various IR filters are available such as the Hoya R72, or Cokin Infrared 720 (89B) A007 Square Filter, and various other types can be found on eBay. IR filters screw in to the front of the lens and cost from roughly £35 for smaller filter sizes, increasing in cost for bigger diameters. You only need the 720nm version unless you get a camera converted. Beware of using a thick IR filter on a wide-angle lens – you may get vignetting. IR filters are virtually opaque, so when you put one on the lens you will not be able to use the viewfinder to frame up. The Live View facility on many cameras may work – albeit with a rather dim image – so it is best to compose and focus, then place the filter on the lens before shooting. Whether you’re using a filter or a converted camera, it’s best to shoot on a bright day. If you do, the blue skies will be captured as sumptuous dark tones, while the photosynthesizing foliage will be recorded in white, almost snow-like hues.
1
Shoot your image with an IR filter

The scene was shot with a 720nm IR filter over the lens, and is shown here straight out of the camera. The exposure is 5 sec at f/5.6, ISO 400. Note the strong vignetting in the shot, created through the use of a thick IR filter on a wide-angle lens.
2Desaturate the image in Camera Raw Reducing the saturation of the colours in Camera Raw gives a pleasing result. One technique that IR landscape photographers often use is ‘channel swapping’, where the red and blue channels are swapped in Photoshop’s Channel Mixer facility, to retain a bluish sky, but with false colour vegetation.

5
BEFORE
38 MASTER B&W PHOTOGRAPHY
Adrian Davies reveals the gear and techniques you need to achieve a more otherworldly kind of image
Check your lens!
Edit in PhotoMatix Three images were shot at 2-stop intervals: one underexposed, one exposed normally and one overexposed. All three were then imported in the HDR program PhotoMatix, where a host of different options is available. This final shot was processed with the Creative option.


3
While all lenses transmit infrared light, some produce images with distinct ‘hot spots’ in the centre, as shown in the close-up inset above. There is no hard and fast rule that dictates which lens models do this, and you will need to test your lenses to see if any are affected. There are databases online showing how lenses perform: try www.lifepixel.com/lens-considerations/lens-hot-spottesting-database


AFTER
SHOOT BETTER BLACK & WHITE 39
TECHNIQUES
42 SHOOT MONO WITH MAXIMUM IMPACT
Get bold with your black and white imagery: learn how to shoot and shape the medium like a pro
54 GET DRAMATIC BLACK AND WHITE
Seeing and visualising scenes without colour isn’t as easy as it seems – but we’re here to help
66 CAPTURE ARTISTIC BLACK AND WHITE
Discover some rather different approaches for composition, framing and exposure in B&W
78
TAKE BETER LANDSCAPES
We focus on the forms, shapes, textures and depth throughout a scene, plus top editing tips
90 GET MORE FROM LIGHT AND SHADE
Embrace shadows, use graphic power and push the tonal range to intrigue viewers of your shots
102 MINDFUL PHOTOGRAPHY
Learn to take a more calm and still approach to photography with expert guide Paul Saunders

40
MASTER B&W PHOTOGRAPHY

41
© Paul Sanders
GET BOLD WITH BLACK& WHITE
Capturing the world in monochrome has been an obsession since photography was invented – and in the digital era we still love its powerful visual appeal. Find out how you can shoot and shape mono for maximum impact
By Jon Adams and Andrew James
We live in a colourful world but sometimes an explosion of hues within a photograph can be distracting. Strip it out and you’re left with a simpler, more direct visual narrative.
Shooting in black and white helps you harness light in a fresh, and frequently more appealing, way. You learn to see the shapes, patterns, textures and tones that make up your composition.
Any subject can work well in black and white, but over the next few pages we’ll look at how landscapes, portraits, wildlife, the urban environment, and still-life subjects, can all be transformed when you choose to embrace a bold approach for shooting in monochrome.
It’s also true that black and white photography owes a lot of its enduring
success to understanding how to bring out its beauty after the shot has been taken. In the past we’d hide in darkrooms, sloshing prints around in chemicals or dodging and burning by hand, but digital photography allows us to work openly and easily with raw files to really hone our craft.
There really has never been a better time to experiment with the timeless and artful power that lies behind creating brilliant black and white photos.
CONTENTS Portraits page 44 Landscapes 46 Fine-art wildlife 48 Architecture 50 Still-life 52 42 MASTER B&W PHOTOGRAPHY
Great black and white shots are all about shapes and contrast: the right balance of both allows even simple scenes to become dramatic mono compositions.

f/11 1/250 sec ISO 200
43 GET BOLD WITH BLACK & WHITE
© Gem Salmon/Getty
PORTRAITS Get gritty
Use natural light and a reflector for an edgy character image
With portrait photography you are normally trying to flatter your subject with your images, but there are times when getting gritty is the way to go. It’s really easy to achieve with black and white and a willing ‘character’ as your subject.
As a rule, this style of shooting is best suited to a more mature, male face, so have a think about who among your friends and family might fit the bill. It’s best to be honest that you are going for a photo with edge, rather than one that makes them look 10 years younger!
A focal length around the 70 to 100mm mark is perfect for a headand-shoulders composition – and if your lens allows you to shoot at f/2.8, the limited depth of field will look amazing. Remember that the eyes must be sharp, so that’s always where you focus. Using natural light, a silver reflector and a dark background, you’ll get a result that looks great even before you start to boost its grittiness in editing.
Craft a powerful portrait style
PRO SHOOTING ADVICE CONTROL THE LIGHT

To control the light in a portrait, you can move your subject into better lighting, add light with flash or LED lights, or bounce natural illumination back with a reflector. While a white reflector is OK to use, a silver one will be perfect for this style of black and white: it reflects more light and gives you the added bite you want. For this character shot, we positioned the model in a doorway with a dark wall behind, and asked him to hold the reflector so it bounced daylight up at, and across, the face. This simple approach provides bright catchlights in the eyes and strong, stylised lighting for a mean and moody look that suits the subject. Although the model is holding the reflector himself, it’s only his head and shoulders that are in the frame, courtesy of the narrow field of view provided by an 85mm lens. Shooting at f/2.8 gives us great clarity within the plane of focus, but pleasing diffusion back towards the model’s ears.
Use the Clarity and Texture sliders in Lightroom or Camera Raw to add impact to your mono images


While most of the work in your black and white character portrait is being done by the lighting style you’re using, you are still going to need a few image-editing techniques to add more impact.
Whether you use Lightroom or Camera Raw for your processing, you’ll find all the tools you need in the Basic Panel. The most important two sliders are found under the heading of Presence, and it’s the Texture and Clarity sliders that we’re going to concentrate on.
Normally you need to be careful with both these controls, as pushing them too far can make an image look over-processed – but as we are creating a hyper-real mono portrait, you can be quite gung-ho. As you increase both sliders, you’ll immediately see the effect, with a strong contrast and detail boost adding bite.
With a gritty mono portrait, there are times when including some surroundings will give the shot context. For these images of a Cuban tobacco farmer, a wide-angle lens was used. A wide-angle isn’t traditionally a good lens for portraits because it distorts features, but it can work well for an environmental shot of a gritty subject. Get close to your subject, remembering to focus on the closer eye, and watch how the background elements add to the composition. Don’t be afraid to shoot in both horizontal and vertical formats.


1
The basics In Lightroom’s Develop Module, click on Black & White or press V to go mono. Take the Whites slider right and Blacks left, just to make sure you are using all the tonal range. Pulling Highlights back helps keep all the detail you need.
2 Add definition It’s time to really make the shot gritty with the sliders under the Presence heading. Push both Texture and Clarity as far as you want, and the Dehaze slider can be pushed to the right for extra contrast, too.
x2 © Andrew James 44 MASTER B&W PHOTOGRAPHY
Add context

1/800 sec ISO 100
and full of
head-and-
in
and white.
f/2.8
Simple, direct
detail, a simple
shoulders portrait looks great
black
45 GET BOLD WITH BLACK & WHITE
© Andrew James
LANDSCAPES Timeless art from nature
Take a step back from vibrant natural colours and reveal shape and contrast without distraction

If the idea of a landscape shot is to show the world just as we see it, then black and white may seem an odd choice! Of course, the monochrome roots of photography denied us colour as a choice for a long time, but it’s more than technical limitations that makes the black and white landscape fit into a category of its own. Many of the most famous landscape shots ever captured are in black and white, and pioneers like Ansel Adams are fondly remembered for their contribution to the genre – even though he actually shot nearly as much in colour as he did in mono!
When you break down a photograph into what it actually consists of, it’s an arrangement of shapes in a frame. These shapes are formed by nothing more than light and dark areas in different places, so everything you see is a pattern made up of different levels of contrast. Add colour to the mix, and the interplay between light and dark gets a little lost and confused. But the purity of black and white cuts through to reveal lines and forms, with none of the distractions that colour might bring.
PRO SHOOTING ADVICE THINK IN BLACK AND WHITE AS YOU COMPOSE

When you line up a potential black and white landscape, you’re looking to arrange the shapes that form your scene in a balanced way, and need to concentrate on the contrast that’s present, rather than any balance offered by colour differences. A simple but effective way to assess the contrast is to close one eye and squint your viewing eye so the scene is simplified into what’s light and what’s dark.
Layers of depth are also important for mono scenics, so bring foreground detail close to the lens to draw in the eye, and make sure it leads through to a good backdrop. If the foreground and background share similar mono tones, you’ll need to separate them, with some midground, otherwise they will blend into each other.
From colour to black and white
Convert your landscape shots to black and white directly from raw to get the highest-quality mono renditions


The process of making a mono conversion in Camera Raw or Lightroom is straightforward. The aim is to get detail from foreground to background. This example is tricky, as the dynamic range in the scene is huge, but in black and white we can pull back the detail in both the shadows and highlights from a single exposure.
1 Go mono and balance up Under Profile, choose Adobe Monochrome. In the Basic Panel, push the Shadows slider right and pull the Highlights slider left to start balancing the contrast and revealing more detail. If you find you have to push Shadows to +100, then move the Blacks slider to the left to avoid washing out the contrast. This process will start to even up the darker and brighter tones.
2 Add grads for control
With the overall range of the shot more balanced, now select the Graduated Filter Tool and drag a grad over the sky to cover the brighter areas of the image. Reduce Exposure, boost Shadows and pull Highlights within the grad to further adjust the effect. Now add another grad to the dark foreground, increasing Exposure and tweaking the other sliders to reveal detail.

f/11 1/125 sec ISO 100
46 MASTER B&W PHOTOGRAPHY
© Jon Adams
WATCH THE VIDEO!
Jon Adams takes you through the mono process step-by-step www.digitalcamera world.com/dc248
PRO SHOOTING ADVICE USE MONO PICTURE SETTINGS WITH RAW


If you have difficulty visualising how the scene in front of you will look in black and white, you can set up your camera to deliver monochrome results. This can be really helpful, as you can still capture all the data in a full-colour raw file, ready for editing, but see the shot in mono on your camera’s screen. Just make sure you shoot in raw format rather than JPEG, so you can still access all the colour channel data to make a precise mono conversion in your raw conversion software.
On a Nikon model, in the Photo Shooting menu, select Set Picture Control and choose Monochrome from the list. On a Canon camera, select the Picture Styles menu, and choose Monochrome (M) from the options. Other makes have similar options.
Pro shot

47
BOLD WITH BLACK
The elegant shape of this mountainous background was first established, then the foreground detail was found in the frozen lake. The lake itself was used to separate the two.
GET
& WHITE
WILDLIFE Fine-art black and white


Combine interesting details with bold contrasts to create dramatic and inspiring images from the natural world
Wildlife photography is highly effective when it appears in black and white and with a careful combination of shooting and editing, you can create beautiful wildlife images with a fine-art feel. The natural textures and tonal variety within the fur, feathers and scales of the animal kingdom lend themselves well to monochrome. Take away the distraction of colour and the patterns of an animal and its environment become more obvious. Black and white gives a fresh and artful twist to your wildlife. It adds an emotional directness that isn’t always as apparent in colour. While you can take any wildlife shot and convert it to monochrome, it really pays to think about which of your subjects, and the environments they are found in, will work well with colour stripped out. While shooting, look for tonal separation between the subject and its surroundings, and make sure that you capture as much of that interesting textural detail as possible. Be careful not to overexpose your image, especially in light areas of fur or feather. If necessary, use negative exposure compensation to retain that important textural detail.
PRO SHOOTING ADVICE THINK ‘BACKGROUND’
You need a backdrop that looks natural and creates a tonal contrast or complement with your subject. That’s not always easy to achieve in the natural world – and if you are shooting at a zoo or wildlife park, it’s even harder! Avoid anything that looks man-made; if you can’t, look for a background that’s tonally even, so it’s much less distracting.
Both images below were taken at a zoo. On the left the man-made wall gives the game away, but the right image looks natural enough to have been shot in the wild.
Edit a mono image by painting tones


Paint your contrast where you want it with non-destructive layering techniques in Photoshop
1
Edit your raw file Choose a wildlife image you think is going to work well: something with excellent texture and good tonal contrast throughout. In your raw conversion software, turn the image black and white and do your basic editing. The most important thing at this stage is to ensure that no highlight details are overexposed, so if there is a gap on the far right of your histogram, that’s OK.
2 Darken the image Take your image into Photoshop. Open Photoshop’s Layers Panel via Window > Layers, then click Create New Fill Or Adjustment Layer at the bottom and pick Curves from the list. Pull the curve down from the middle so that the whole image darkens. At this stage, we’re interested in creating the darkest point of the image, which is the area above the hare.
3 Paint with contrast Select the Brush Tool and choose a very soft-edge brush. Start with Opacity set to 100% and paint over the area you want to be the brightest part of the image – in our case this is the hare’s face. Now work around the rest of the image, changing the opacity of the brush to suit and paint back in the Background layer to create the overall balance of tonal contrast that you like.


48 MASTER B&W PHOTOGRAPHY
x2 © Jon Adams
Pro shot
The strong contrast between this mountain hare in its winter coat and the darker heather makes a great black and white image that we’ve been able to perfect in Photoshop.

f/8 1/500 sec ISO 800
49 GET BOLD WITH BLACK & WHITE
© Andrew James
ARCHITECTURE The urban jungle
Capture man-made structures in all their tonal glory

Architectural photography
is often seen as a highly specialised discipline, but it’s one of the most accessible forms of photography, and is readily available – indoors and out, day and night.
Lens choices tend to involve shorter, wide-angle focal lengths because of restricted space and large subjects, but architectural details can be just as satisfying, so a medium-to-long telephoto zoom is a good choice, too.

For mono architectural shots, the high contrast of direct sunlight can be your friend or your foe, depending on which way the building is facing, and what else is around to cast shadows across it.
Picking the right time of day will help (morning for east-facing and afternoon for west-facing buildings), but don’t ignore flat, overcast days, as the soft light from cloud cover will reduce overall contrast and even up the lighting.
PRO ADVICE INDOORS SHOOTING
Ask any interior photographer, and they’ll tell you that one of the chief problems of shooting interiors is balancing contrast. The reason for this is that daylight streaming through the windows is much brighter than the indoor illumination, and you can’t expose for one without under- (or over-) exposing the other.
The best solution to this perennial challenge is to bracket your shot using the Auto Exposure Bracketing feature (AEB) on your camera. This will let you take several frames at different exposures, which you can then blend into a high-dynamic-range (HDR) image, bringing out the detail from both extremes. See Photo Answers on page 98 for help with HDR images.
Pro shot
This skyscraper shot uses the distortion present in an ultrawide-angle lens to exaggerate the convergence of the lines towards the centre of the frame.
Balancing the light
After shooting three exposures (two stops under, metered value, two stops over), the three frames of this highcontrast interior were blended together to give an HDR image that balances the under- and overexposed areas to give smooth, even tones.

Get the most out of architecture shoots
Don’t just consider the wide-angle view with buildings – the devil is in the detail with black and white!
With building shots, the parts can carry just as much impact as the whole, so after finding the ‘big’ shot of an imposing structure, switch to a much longer lens to pick out scenes within the scene. From stonework on cathedrals to the intricate lattice of glass and steel on skyscrapers, every element serves up a mix of details with the same character as the whole.
1 Interior details To prevent the external daylight from burning out on this interior shot of a mill’s window, a three-shot HDR was processed to retain all the texture in the frame, glass panes and brickwork.

2Exterior studies The subtle, mottled tones of stonework and the symmetrical lines of architectural details are great subjects for black and white. Every town or city will have an abundance of opportunities.
 A medium-to-long telephoto zoom such as a 70300mm is a perfect partner to an ultra-wide lens for picking out details in buildings.
f/6.3 1/500 sec ISO 100
© Jon Adams © Getty
50 MASTER B&W PHOTOGRAPHY
© Jon Adams
PRO EDITING ADVICE CONTROL TONES WITH SELECTIVE COLOUR


When you convert your shots to mono, you turn anything that’s coloured into grey – but how bright or dark that grey tone is in the black and white mix can be controlled. A blue sky, for example, can be processed to appear as a near-white, very light grey through to a very dark grey that’s close to black, or any


Flat option
tone in-between. This is all achieved using the colour sliders in a raw converter like Camera Raw or Lightroom; or you can do it in Photoshop by creating an Adjustment Layer and selecting Black & White. Just move the sliders for each colour to set the tone as you see fit. Practice makes perfect, so try some options.
Punchy option
51
STILL-LIFE Four great mono treatments PRO KIT INDOOR

Boost contrast selectively and introduce colour toning effects
It sounds like a contradiction in terms to add colour to a black-and-white picture, but toning treatments are as old as photography itself and work to subtly change the mood and character of an image.

In the traditional darkroom, some toning effects were created by using a paper with a hint of amber warmth or blue coolness, but others involved mixing chemicals into the developing tray to colourise the entire print. The digital toning process is much simpler and easier, but in all instances, you need to shoot and post-process your image as a regular black and white shot first, to get the lighting and contrast captured the way you want it.
LIGHTING CHOICES
The simplest form of lighting for taking indoor still-life shots is window light, and this needs to be soft, so either use a north-facing window or pick a cloudy day, when the light is diffused. Recreating soft window light with a desk lamp or LED light is easy, too – and is often preferable, as you can do it at any time and angle the light to come from any direction. Just place a sheet of tracing paper (or white baking paper) over the light. This ‘trace frame’ softens the shadows cast by the light, emulating diffused daylight. Moving the trace frame further from the light increases the diffusion. Experiment with this, and with the position of the light, to get your shot.
Dodge and burn your image in Photoshop


Window light
LED lamp
Paint on your contrast exactly where you want it using two digital emulations of classic wet darkroom tools

1
Dodge the highlights Once you’ve made your mono conversion, copy the image with Ctrl/Cmd+J, then select the Dodge Tool. In the Options bar, set Range to Highlights and Exposure to 5%. Use a soft brush and play the tool over the brighter tones.
Burn the shadows Copy the image again (Ctrl/Cmd+J) and select the Burn Tool. Set Range to Shadows and Exposure to 5%. Play the brush over the darker tones. Vary the brush size with the square bracket keys [ and ] to suit the area you’re working on.
2
Assess the results If you go too far with either tool and lose detail, press Ctrl/ Cmd+Z and try again. To check your progress, switch the eye icons off and on in the Layers Panel to see how dodging and burning has affaected the base layers.
3
52 MASTER B&W
PHOTOGRAPHY
Original colour
Cyanotype
Which style for your image?
Transform the mood of your shots with a toning effect


Original
The original raw is always in colour, so convert it in Camera Raw by selecting Adobe Monochrome from the Profile box and adjusting the sliders to suit. Then click Open.

Black and white
The classic neutral mono tone with no colour cast is always the starting point, but the Dodge and Burn tools can be used to pep up contrast in specific areas.


Cyanotype
In the regular Photoshop interface, create a Hue/Saturation
Adjustment Layer. In the panel that
Sepia
opens, tick the Colorize box, then set Hue to around 220 and Saturation to around 35.
Sepia
In the Layers Panel, create a Hue/ Saturation Adjustment Layer. Tick Colorize then set Hue to around 30 and Saturation to around 25.
Split tone
With your mono shot on-screen in Photoshop, go to Filter > Camera Raw Filter. In the Color Grading panel, set Shadows to one colour and Highlights to another. Use complementary colours such as blue and yellow for the best effect.
Split-tone
Neutral B&W
All Images © Jon Adams 53
Dramatic
Black & White
Pro Jeremy Walker explores how to get more from monochrome photography when shooting landscapes, portraits and urban scenes
There is a tendency these days for photographers to ignore the noble and often subtle art of black and white photography and instead go for the super-saturated colours so liked by the social media and Instagram generation.
Black and white images are photography in its purest form. Colour can be a big distraction, your attention drawn by the vibrancy of an image, not the subject matter and its composition, tone, texture and details, but a large in-your-face splash of bright primary colour.
There is nothing wrong with colour, but black and white photography has an honesty to it that colour images just don’t. After all, you aren’t just reaching for the saturation slider to make the image pop.
Of course, there will be post-production trickery with black and white photography as there is with colour but you have to work that little bit harder in the first instance to actually ‘see’ the image.
You have to respond to shape, tone, texture and shadows, not colour. Seeing and visualising a black and white image is sometimes not a simple straightforward process. Knowing how to use your software

and how it – and you – will interpret your file is just as important as shooting the original scene. And besides, shooting the original scene can be tricky enough.
All location shoots have to be planned but there is far more to shooting a black and white landscape than just getting up for a sunrise or hanging around at the end of the day for a pretty sunset and a few pink clouds. Research into your subject and its location and how it will interact with the light and prevailing weather conditions become critical. Black and white location photography is not a walk in the park – but here’s how to get the most from it...
54 MASTER B&W PHOTOGRAPHY
DRAMATIC BLACK & WHITE

Jeremy Walker
Jeremy is one of the UK’s most respected landscape photographers, known for his eyecatching panoramas, moody black and white landscapes and dark, dramatic images of castles and ruins. He originally started his career as a studio photographer, and has been specialising in location imagery for over 25 years. He is the author of Landscape, his highly acclaimed first book and is in demand as a speaker, writer and workshop leader.

To see more of Jeremy’s work: www.jeremywalker.co.uk @jeremywalkerphotography
Peak drama Research your subject, its location and how it will interact with the light and prevailing weather conditions
images © Jeremy Walker
Pictured
All
55
General techniques and gear advice
Get started and explore new creative possibilities
There are many parallels between shooting black and white images and colour: the basic kit remains the same – camera, lenses and filters. Sunrise and sunset are both excellent times to shoot, although with black and white, the time frame for shooting is larger as you are less dependent on warm, golden light. Shooting in mono also means you will shoot less into a sunrise or sunset but more at 90° degrees to the sun, using cross-lighting, texture, shape and shadow to help tell the story of the scene you are shooting.

As for subject matter, you should be searching for images with simple lines and shapes. Abstracts work well in mono as does
losing detail in the shadows. After all, who says you can’t have pure blacks in an image? Look for subject matter that in itself is already dramatic, such as ruined churches or castles, and time your shoot to have menacing, brooding storm clouds threatening the buildings or landscape below.
Post-production will play an important role in how your final image will appear and knowing your software and how it will handle your file is just as important as the shooting process. Photoshop and Lightroom are most people’s defaults, but you should also check out DXO’s Silver Efex Pro, which is a superb tool for the black and white enthusiast.
Above Dark horses
Images with simple lines work well in black and white. Don’t worry about losing detail in the shadows – after all, who says you can’t have pure blacks in an image?

56 MASTER B&W PHOTOGRAPHY
Below
Catching rays
Look for subject matter that is already dramatic, such as this lighthouse. Time your shoot to have menacing storm clouds threatening the landscape below


Jeremy’s kit for shooting landscapes
Whatever brand and model of camera you have, keeping kit simple is often the best approach to capture unfussy images
1
LEICA M10-R
A 40MP, full-frame rangefinder camera. This is pure simplicity, with just an on/ off button, shutter speed dial and ISO dial on the top plate and a viewing screen and three buttons on the back. It’s also lovely and small.
2
LEICA 50MM F2
This small and compact ‘standard’ lens has just a 39mm screw thread on the front. It’s a stunningly sharp lens – ideal for many landscape situations and especially good for stitched panoramas.
3
ZEISS 28MM F2.8
It’s my alternative to the 35mm lens. I like the look and feel of a landscape shot with a 28mm lens. If weight is at a premium, I will sometimes replace the 35mm with the 28mm.
4
SCREW-IN CABLE RELEASE
Old-fashioned by today’s standards, this cable works perfectly and is not affected by battery power, or the lack of. The shutter on the M10-R is super-soft, but the cable reduces clumsy fingers from wobbling the camera.
5
LEICA 21MM F3.4
This isn’t the fastest 21mm lens on the planet, but the optical quality is stunning. It is surprisingly small, making it ideal for long walks and when camera bag space is at a premium. It also takes the same size graduated filters as the rest of the system.
6
LEICA 35MM F2
Small and stunning and, again, great for stitched panoramas. It’s also perfect for that ‘not too wide’ look when shooting single frame landscapes and is regarded by many as the perfect lens for ‘street’ shooting.
7
ZEISS 85MM F4
An awesome portrait lens, but equally as good shooting landscapes when you need to slightly crop in to a scene. It’s ideal for stitched panoramas and its size lends itself to being a permanent feature in the camera bag.
8
SPARE SD CARDS
It is rare to fill a 64GB memory card on a landscape shoot or even after a few days of location work, but it is always reassuring to carry around a spare, just in case.
9
SPARE BATTERIES
Electronic cameras can be power hungry and, let’s face it, we all review our images far too much. Two spare batteries and one in the camera will last for a long day’s shooting, even in the cold weather.

10
LEE FILTERS SEVEN5 FILTER HOLDER AND .6 AND .9 MEDIUM GRADUATED FILTERS
This small and compact filter system is ideal for a lightweight landscape set up. Sometimes a LEE polariser or Big Stopper may be carried as well, depending on what I’m shooting.
1 2 3 6 8 9 10 10 4 5 7 57
Creative exposures
Push tones to the edge of the camera’s dynamic range for dramatic effect
How many times have you heard the oftrepeated mantra ‘expose to the right’? Get the histogram to the right-hand side of its box without causing any clipping or overexposure and make sure you don’t ‘underexpose’ or lose detail in the shadows.
For me, one of the joys of shooting black and white images, whether landscapes, urban scenes or portraits, is having deep rich blacks, areas of no detail whatsoever. Dark areas in an image and deep shadows can have a huge impact on the look and feel of an image.
Shadows can help tell a story and create a mood, and you don’t have to include the detail in them if you don’t want to. You are the photographer, the artist, so make your own creative decisions as there is no right or wrong when it comes to artistic choice.
Capture long exposures over water


Jeremy shares his advice for creating smooth black and white images at the ocean’s edge

COMPOSE THE IMAGE
Find a suitable subject where the water is moving such as a river, waterfall or the sea. Make sure that within your image you have a subject that is static, so you will have a contrast between a moving subject, such as the water that will become blurred and ethereal, and a rock – or in this instance, an iceberg. Compose your image, focus and apply a neutral density graduated filter to control the exposure of the sky, if necessary. Shoot a test frame and check the exposure and make sure the image is in focus and sharp.
TEST EXPOSURE AND CHECK EVERYTHING
Apply the appropriate filter to increase the exposure, making it long enough for blur and motion to record. An exposure of a few seconds to several minutes will work but it depends on how fast the water is moving and how close you are to your subject. The industry standard for creating long exposures is LEE Filters’ ‘Big Stopper’ family of filters. These increase the length of exposure by six, ten or 15 stops. Attach your filter and recalculate the exposure, then do a test frame to make sure everything is working okay.
1
2
58 MASTER BLACK & WHITE B&W PHOTOGRAPHY
Left Filter tips Use filters to darken blue skies and boost the contrast between clouds and sky
3
ADJUST AND CHECK YOUR IMAGE AGAIN
If you are happy with stage two, go ahead and shoot. If not, make minor adjustments to the composition and exposure and re-shoot. Check the monitor after each image to make sure everything is fine. If your exposure is in the realm of minutes, you should apply in-camera noise reduction.
My final image in this sequence is not the one I originally envisaged, but as I started shooting, I felt it was so much stronger, especially once it was converted to black and white.

Above top Small detail
One of the joys of shooting black and white is having areas of no detail at all
Above Rock solid Shadows can help tell a story and create the mood, even without fine details


Add drama incamera by using a specialist B&W filter Accessories to

save you editing time
You don’t need to over-burden yourself with filters for landscape photography but there are a few

59
DRAMATIC BLACK & WHITE
People and portraits
When shooting faces, consider light and shade –and the direction and intensity of the natural light
Like their landscape counterparts, portraits and people images have a distinct look and feel to them when shot in black and white. With no colour to distract you, the image becomes all about the composition, the lighting and, most importantly, the expression of the person being photographed, whether that’s in the studio with a fashion model or on the street in real life.
With portraits, the lighting also plays a crucial role in forming the mood of the image, from high key, soft lighting to harsh spotlighting with lots of contrast. However, the type of lighting must be appropriate to the person being shot and their environment.
Bob the Gardener
In many ways, you should treat your people images as you do landscapes, the right viewpoint in the right light. If you do not shoot people and portraits on a regular basis and have no flash or studio lighting, use natural light, soft and flattering from a north-facing window or harsh and contrasty from a southfacing one on a sunny day.
The only piece of specialist kit I would want for shooting portraits, at least those where you can control things, would be a portable, foldable reflector. A 2m x 1m white or silver reflector for filling in the shadows will allow you to have a lot more control over the light and give you many more shooting options.
Which lens to use?
When to shoot a close-up or go wider with an environmental portrait

There is no definite answer to the question ‘how close to go?’ It depends on whom you are shooting, the mood and feel of the image and the result you are trying to achieve. The ‘photo rule book’ might say use a focal length of about 85mm to give you enough distance from your subject, but still be able to fill the frame with a head and shoulders composition, but why not use longer lenses with a shallow depth of field? Or wide lenses to allow detail in the background?
It may help tell the story of the sitter or, conversely, isolate them from an intrusive background.
Shoot in camera or convert later?
RAW files provide more control
In-camera generated monochrome JPEGs are generally high-quality but a RAW file will give you more control – subsequent post-production in Silver Efex Pro allows you a greater deal of variation. But for a simpler workflow, set your camera menu to monochrome JPEG and start shooting.

LIGHTING
Shot on a sunny but hazy day with the sun high and slightly to the subject’s right. Just out of shot, to the sitter’s left, there was a large foldable reflector with the soft white side toward the sitter, propped up against the garden shed. The reflector lifts the shadows, particularly the lower part of the shirt and the beans in the background.
HANDS
An important part of a portrait, hands can say so much about a person. By placing the gardener’s hands nearer to the camera than his face, the hands are exaggerated and enlarged, helping tell the story of what he does for a living.

60 MASTER B&W PHOTOGRAPHY
DRAMATIC BLACK & WHITE
CLOTHING AND PROPS
The gardener is wearing the appropriate clothing to tell the story of who he is and what he does – there’s no point in Bob wearing his Sunday best here. Ensure you have all the elements to allow you to tell the whole story, the same goes for props or tools. A traditional gardener may use a range of tools, so why not ask them to choose their favourite implement?

BACKGROUND
The background of beans and canes helps give the sitter some context –again, not much point placing him in a modern kitchen. The background helps tell the story of what he does and so, in this instance, make sure it is in focus. Using the bean plants as a background also helped hide some modern buildings, which would not have helped the image.
61
Urban tips
Urban is a word I like as it is so wide-ranging in its description. By the way, I hate the phrase ‘street’, which is usually random images of random people doing not much in particular. Rant over! Urban is an all-encompassing word that can include the built environment and the people who work or live there and the relationship between the two. Shooting urban images is perhaps a little more difficult than shooting landscapes, at least there is rarely anyone around to knock over your tripod when you shoot a landscape.
I shoot most of my urban images handheld and try to be free of the encumbrance of a tripod. You can be more anonymous without a tripod and modern cameras can be used at high ISOs with little noise. In fact, noise can add to the grittiness and mood of an image.
Another approach to urban shooting is to have a small camera bag, the less you look like a photographer, the better. Shooting tripod-free will also encourage you to search for quirky angles and perhaps try images you would not normally attempt if you are lugging a tripod and large heavy bag around.
Urban shooting can be similar to landscape shooting in many ways. You have to know where the sun is rising and where it tracks through the sky, what time of day it will light certain streets or buildings, where the sun reflects off one building to light another and where it will set so that you can use your time to its maximum.
Make monochrome magic from a town or city


Shooting steps for the city
Think gear, lighting and locations
1PACK THE RIGHT KIT
Know what you need in advance of going out on your shoot. Plan ahead so you don’t have to carry every single piece of kit you own. Go small, go lightweight, take the minimum amount of camera kit and cause the minimum amount of fuss.
Urban photography isn’t about showing off your latest camera, it’s about being unnoticed so you can shoot without drawing attention to yourself.
2 KNOW THE TERRITORY
Plan your shoot ahead of time by doing a reconnaissance mission or ‘recce’, if possible. You have to know the environment you are going to shoot in, including things like where the light is coming from and how long it will last, as light bouncing off buildings and windows can be transient. You may also need to find a vantage point where you can shoot from without being in the way or having security guards trying to move you on.
3
BE PATIENT
Shooting urban and architectural scenes requires time and effort. You may have to return for several attempts before you get the conditions and light you want or the right people to move through the scene at the right time. Of course, you may be lucky and have things just drop into place, so be prepared. Have a camera and lens to hand in case you walk around a corner and that elusive image is in front of you for a fleeting second or two.
62 MASTER B&W PHOTOGRAPHY
Left Star gazing
Look for the transient, such as shadows that last a few minutes or people moving through their architectural environment


Pro ideas for urban compositions
Subjects you might include when roaming the streets with your camera
Above
Discreet art
Urban photography is all about going unnoticed so that you can shoot discreetly without drawing attention to yourself

ARCHITECTURE
From new glass and steel edifices to elegant classical façades, the built environment is all around us. Shoot quirky angles and juxtapose new buildings against old. Don’t simply focus on the whole building, but use close-ups to highlight any details and patterns in the structure, and aim for simplicity, with clean lines and minimal fuss.

SHADOWS AND TEXTURES
Look for the transient. Shadows that last only a few minutes, highlights that reflect and illuminate whole buildings or even streets for a second or two. Use blur and motion to help tell a story, the movement of a vehicle as it passes by or people shot with slow shutter speeds moving through their architectural environment.
PEOPLE
People make the urban environment what it is and so why not shoot them as they interact with their built surroundings? Rush hour is the obvious place to start but parks and gardens offer little oases of quiet where workers go to relax. The lunchtime rush or the homeward-bound trudge at the end of the day also make for interesting subject matter.
63 DRAMATIC BLACK & WHITE
You can be more anonymous without a tripod – it encourages you to search for quirky angles and try images you perhaps would not normally attempt
Editing images

Everyone processes their work differently, but black and white work benefits from a specialist approach
There are many ways to process your images and create stunning black and whites. The best starting point is to shoot monochrome images but few of us can afford cameras like the stunning Leica Monochrom, so the next best route is to use specialist software.
Most people are familiar with Photoshop and Lightroom, both do an excellent job and give the user flexibility and choice. However, I believe that the best software currently on the market for converting your images to black and white is DXO’s Silver Efex Pro.

Right Silver service
The best software for converting images to black and white is DXO’s Silver Efex Pro, though Photoshop and Lightroom work well
Step-by-step
Silver Efex can be accessed through Photoshop and is an incredibly versatile tool with plenty of control for those who like to be in charge but it also has plenty of presets. If you use a particular preset all of the time, you run the risk of your work looking like everyone else’s who uses the same settings.
The best option is to use a combination of the presets, though you have to be careful. Silver Efex is a powerful tool but it can be aggressive with the files, so take care not to cause degradation to your image.
Here’s one way of editing your shots to get striking black and white images, using Camera RAW, Silver Efex Pro and Photoshop

1 Shoot the image Shoot an image but try and visualise it as a black and white, even though a RAW file will still contain all the colour information. Process the image in Adobe Camera RAW as you would normally but you can perhaps darken blue skies more than usual, as this will help them go black in the final image.
2 Open the image in Silver Efex Pro Open the image in the software you normally use to convert your images to black and white. Here, I have chosen Silver Efex Pro because of what it can do for an image. However, if you are more comfortable with other packages, such as Photoshop, Lightroom or Affinity, these work as well.
64 MASTER B&W PHOTOGRAPHY
Conclusion
Shooting in black and white might not be for everyone, but it is worth having a try. You could download software such as DXO’s Silver Efex on a free 30-day trial to see how you get on. Working with monochrome images concentrates the creative mind; the image has to work because of the composition, light, shadows and textures, and there are no pretty primary colours to distract you from the flaws in your basic technique. But get your mono technique up to scratch and black and white images, especially when printed on highquality papers, have an intrinsic quality that colour images just don’t have. Whether they are considered more ‘art’ because they are black and white, I’m not sure, but there is an undefinable quality to a superbly executed black and white image – so I urge you to ignore pushing the saturation slider to the right and give mono a go.

3
Make adjustments Adjust the image as desired. If you are just getting used to the software, it may be easier to start by selecting a preset option, or experiment with your own ideas as there are numerous options and controls to choose from. Make adjustments in small steps as the software can be quite aggressive.

4 Return to Photoshop Return the image to Photoshop for minor corrections, dodging and burning, dust-busting (depending on how you alter your image, dust spots may show up in Silver Efex Pro). Some ‘Halo’ artefacts may also be highlighted in areas of high contrast, you will need to remove these if you are making

65
DRAMATIC BLACK & WHITE
Capture artistic
Wait for me

Photography isn’t always about filling the frame –empty space also has its uses in artistic images
All images © Lee Frost
66 MASTER B&W PHOTOGRAPHY
Make ‘boring’ mono images a thing of the past and discover your inner artist


There are more photographers creating black and white images now than ever before. Producing good results is also easier than before thanks mainly to the convenience that digital imaging has introduced. There’s no need to stay up all night in your blacked-out bathroom, elbow-deep in smelly chemicals – just turn on your computer, open Silver Efex Pro and away you go!
So why is it that so many digitally generated black and white images are, for want of a better word, boring? As soon as you remove
colour from an image, it ceases to be realistic, which basically means you can throw caution to the wind and let your creative hair down. There’s no need to follow any so-called rules, no need to stick with convention. You have carte blanche to let your imagination run riot. Yet many of us seem to be afraid to try anything remotely artistic – until now that is! It’s time to turn over a new creative leaf and find the artist lurking deep inside you. Over the next few pages, we will explain how you can do this.
There are many ways to turn an average black and white image into a monochrome masterpiece, from the way you compose the shot and the light you shoot in, to the way you expose the image and ultimately how you edit it. There are also many shooting techniques to consider, from intentional camera movement and recording motion to creative use of depth of field, defocusing and the digital equivalent of traditional analogue techniques, such as pinhole and toy camera photography. Remember to experiment to find your style.
67
ADD FEELING
It’s difficult to define exactly what elevates an image from run of the mill to art. Feeling and emotion have a lot to do with it. If you stir something in the viewer, make them react – either positively or negatively – then you’re well on your way. Working in black and white can achieve that in itself simply because it allows us to take a step back from reality and throw off the shackles of familiarity, but you need to do more than simply remove colour to create an artistic black and white image. The quality of light can make a difference. Think about how light and weather affect your state of mind. When the sun’s shining and fluffy white clouds are drifting across the sky, the world is warm and welcoming and we feel positive. The opposite applies on a stormy day when the sky is as dark as hell and shafts of sunlight burst through inky clouds to light up the landscape like the fingers of a god. Such conditions make us feel threatened and uneasy.
emotion into your images is the first step to success
If you want to produce dramatic black and white images, bad weather wins hands down every time because it’s raw and emotive. Mist and fog work well too. Fog hides more than it reveals, adding a sense of mystery and suspense that brings out our insecurities –what’s hiding in the gloom? Mist on the other hand is dreamy and atmospheric, so it instils a lighter and more positive mood in the viewer.
The way you edit your images can also make a huge difference to the way the viewer responds to them. If you shoot in bad weather, it’s easy to create a menacing feel simply by darkening the tones and boosting contrast using levels and curves. A dark vignette around the edges of the image can also be a good way to create drama, drawing the viewer’s attention towards your main subject. Adding noise will create a nice textured effect, or you can mimic the characteristics of films using applications such as Silver Efex Pro – fast films such as Fuji Neopan 1600 and
Ilford Delta 3200 are good ones as they’re grainy. Don’t worry if some of the highlights blow out or some of the shadows block up. Remember, you’re trying to achieve emotion rather than technical perfection. The two rarely go hand in hand.
Of course, black and white images don’t have to evoke negative emotion: if you want to create a lighter, more delicate feel, go for a high-key effect. This treatment works well on images shot in misty conditions or on flat, overcast days when the tonal range of the image is more limited. There are high key presets in Silver Efex Pro and other similar applications – give them a try. Or just play around with levels and curves.
Experimentation is the key. Take creative risks – you can always backtrack if they don’t work. And use yourself as an emotional guinea pig. How does the image make you feel? Good? Bad? It doesn’t matter either way providing it makes you feel something.

Putting
Right Flatiron, New York This dark, dramatic effect was created during editing to add emotion to the image. The original image was shot on a flat, overcast day
right Cienfuegos, Cuba A telezoom lens has compressed perspective to crowd the elements in this scene and create a powerful black and white image 68 MASTER B&W PHOTOGRAPHY
Top
Edit for emotion How to transform a colour RAW file into a monochrome masterpiece
There are more ways to process a RAW file than there are to skin the proverbial cat, which is what makes the process so versatile and open to personal interpretation. Think of that file as a digital negative. It contains masses of tonal information, but what you do with it is up to you, guided by your own personal artistic vision. To give you an idea of what’s possible, here’s a quick step-by-step guide.
1 Open file
Open the RAW file in Adobe Camera Raw. This is it in its unedited form – bright and atmospheric. You could go either way with it – delicate and high key or dark and moody.
2 Make fixes
Before converting to B&W, make basic adjustments. Apply lens corrections and clarity and increase dehaze to boost contrast and add impact to the image.

3 Move to Silver Efex
Here’s the final image, full of drama and atmosphere. Would you be happy to hang it on your wall?
Pro
The image is opened in Photoshop and then in Silver Efex Pro 2. This is how it looks with no adjustments made. Select High Structure (Harsh) preset in Silver Efex Pro.
4 Tweak Move the Contrast slider right, the Brightness slider to the left. Burn Edges – All Edges (Soft) 2 preset is applied.

5 Open in Photoshop
The changes made in Silver Efex Pro are saved and the image opened in Photoshop again.


6 Tweak further
After flattening the layers, make a few final tweaks to get the desired look, such as boosting contrast using a Curves adjustment in Photoshop.
 Val d’Orcia, Tuscany
69 CAPTURE CREATIVELY
CHOOSE YOUR TECHNIQUE
While you’re shooting, think about how to make your work more artistic
Location and light are undoubtedly important when your quest is to create artistic black and white images. However, the techniques you use while shooting those images also play an important role because it helps to define the way your subject is recorded and the mood of the final image. It also allows you to put your own creative stamp on those images.
Capturing motion can make a big difference to impact and appeal as it adds an extra dimension that takes the image beyond the realms of a ‘straight’ photograph. Instead of merely freezing a moment, you’re recording

the passing of time in some way, whether it’s a fraction of a second or many minutes.
There are numerous ways to record motion. The most popular these days is by using one of the many ‘extreme’ neutral density (ND) filters available from Lee, Hitech, NiSi, Hoya and others, to give exposures of several minutes in broad daylight. Moving water ends up as smooth as silk, drifting clouds record as streaks of tone across the sky, while static elements remain pin-sharp and contrast dramatically. For the best results, try to keep the composition bold and simple. Cropping
the final image to a square can also enhance its artistic appeal.
Another option is to pan the camera while making an exposure. If everything in the scene is static you’ll end up with streaky abstracts – try it on beach and landscape scenes for horizontal pans, and woodland for vertical pans. If your main subject is moving you can keep it relatively sharp by panning at the same pace, while the background will come out streaky and blurred. This technique works brilliantly on most moving subjects. Experiment with different shutter speeds,
70 MASTER B&W PHOTOGRAPHY
Above Cuban cyclist
Keeping the camera steady and shooting at 1/15 sec caused the cyclist to blur as he passed by
from 1/15 sec, if your subject is moving relatively slowly, to 1/250 sec for a speeding car. And don’t worry if your moving subject ends up blurred too – this adds to the effect. A third option is to keep the camera still when shooting a moving subject, so it blurs while the background is sharp. Try it on things like a passing car, and vary the shutter speed from 1/125 sec down to 1/2 sec to set the blur. Crowds of people moving around in markets, on busy streets or spilling off trains also suits this treatment, and you can usually get away with using exposures of several seconds.

Motion studies
Create beautiful, long-exposure images with the help of a 10-stop ND filter


Love it or hate it, there’s no denying that the use of an ‘extreme’ ND filter – such as the Lee Filters ProGlass range – to enable long exposures can produce some pretty stunning images. Those images are also immediately elevated into the ‘fine art’ category simply because they take the humble black and white photograph to a different level. Never tried it? Well, what are you waiting for?
1 Choose your location
The coast is ideal for long-exposure images as you always have motion in the sea. Also, it’s easy to find static elements such as rocks, jetties and groynes to contrast with the movement of the sea.
3 Calculate exposure
Calculate the exposure using an app or exposure chart, then insert the ND filter into the slot nearest the lens. Set the camera to Bulb and trip the shutter with a remote release.
5 Download and process
Download the RAW files, select the images you want and process them initially in Lightroom or Photoshop. Select the sky and make it more dramatic using levels or curves.
2 Set up and test Set up your camera and tripod, carefully compose the scene and align an ND grad if necessary. Set the focus to manual, then take a test shot to check the exposure before fitting your ND filter.
4 Check and retake
Check the image. If it’s under or overexposed, adjust the exposure and retake. If it looks OK, stop the lens down one stop and take another shot, doubling the exposure.
6 Convert to black & white Convert the colour image to black & white. You can do it in Photoshop or Lightroom, or use an app such as Silver Efex Pro. Enlarge and check for sensor blemishes.
Dunstanburgh drama


These before and after images show the difference a long exposure and careful editing can make to a scene

71 CAPTURE CREATIVELY
TRY ARTISTIC APPROACHES
Photographs tend to be considered more artistic when they don’t actually look like conventional photographs. This certainly seems to be the case when it comes to selling prints. Non-photographers are more likely to splash out when they have no idea how a photograph was created – because they wouldn’t be able to take one similar themselves. Infrared images definitely fall into that category. They have an eeriness that immediately adds an artistic feel to every shot you take.
The best way to shoot infrared is by getting a camera converted professionally – if you have an old DSLR gathering dust, it would be ideal. Advanced Camera Services (advancedcameraservices.co.uk) are the best-known in the UK and charge around £300 for IR conversion. You can also pick up converted cameras on eBay. The cheaper alternative is to use an infrared transmitting filter, such as a Hoya R72, on the lens of a normal digital camera. You’ll get similar results,
but the exposure times are much longer so a tripod is required, and you can’t see through the filter as it’s visually opaque.
Scenes containing foliage are ideal for IR photography as they really show the effect – woodland, cemeteries, old castles and derelict cottages covered in undergrowth are perfect. You also get the best effect in sunny conditions, but overcast or stormy weather also work well. When you process your IR images, add a duplicate layer, apply Diffuse Glow to it from the Photoshop filters gallery, then drop the opacity of the layer to 15-20 per cent to add a nice glow to the highlights.
Shooting through filters and screens is a great way to add a creative twist to images. You can fashion your own diffusion filters from pieces of plastic – rub it over with sandpaper
Below left
Cobbles and curves

Shooting with your lens at its widest aperture is a simple but effective technique
to create a frosted effect, smear a small amount of petroleum jelly (Vaseline) on the surface, or spray with hairspray. Breathing on the lens to create a misty effect also works well, though you need to shoot quickly as it clears in seconds.
Experiment with the way you focus your lens. Forget about front-to-back sharpness. Shoot at maximum aperture to reduce depth of field to a minimum so only part of the subject or scene records in sharp focus. The longer the focal length of the lens and the closer your subject is to the camera, the less depth of field you get.
Alternatively, switch to manual focus then shoot with the lens intentionally defocused. The more you do this, the less identifiable your subject will be, so stick to bold, simple shapes.
Below top
Electric guitar

Minimising depth of field instantly adds a artistic feel to an image, whatever the subject
Below bottom
Soft-focus flowers
A diffusion filter on the camera lens was used to create this delicate soft-focus effect

Still looking for artistic inspiration? Maybe these ideas will get your creative juices flowing
72 MASTER B&W PHOTOGRAPHY
The old-fashioned look Transform your digital images by adding analogue effects


One problem with digital images is that they’re a little too perfect – pin-sharp, noise-free, full of detail. That’s great when you want to produce technically flawless images, but artistically they can appear cold and clinical. One method for avoiding this is to mimic the type of results produced by old film cameras and traditional techniques such as wetplate and tintype, complete with all their imperfections. You can spend hours doing this in Photoshop, or you could just use an application such as Analog Efex Pro 2 from the Nik Collection (nikcollection.dxo.com).
1 Open the Image
Open your black & white image in Analog Efex Pro 2, via the Filters menu in Photoshop (Filter>Nik Collection>Analog Efex Pro 2). A default preset will be applied, but you can change that.
2 Check your options
You can see the options here
– Classic Camera, Vintage Camera, Wet Plate and more, plus Light Leaks, Dirt and Scratches, Film types, Frames – your best bet is to experiment and see what you like.
3 Try a preset
This is with the Classic Camera 9 preset applied. It’s transformed the original image into something much more dark and ominous, with a distinct darkening of the image edges and a cool tone.
4 Something different
Vintage Camera 1 adds a thick black film border to the image and boosts contrast a little. In this case B&W Neutral has also been selected from and preset 2 applied.
5
Old techniques
The Wet Plate presets create some interesting effects, with parts of the image rendered out of focus and imperfections added to mimic the fact that real Wet Plate images were never perfect.
6 Add a border
There are lots of different frame presets that you can add to the image to give it an analogue look, from film edges to white borders and lightbox edges. They’re well worth experimenting with.
Montisi, Tuscany


The final image is worlds away from the original colour photograph and has a wonderful analogue feel to it


73 CAPTURE CREATIVELY
EXPLORE YOUR SMARTPHONE
The only camera you need is the one you have with you – and often that’s your smartphone. How many times have you spent ages setting up and taking a shot with your expensive digital camera, tripod and filters, then quickly grabbed a snap with your smartphone to post on social media and thought, “I don’t know why I bother with all this kit, the phone does a better job!”
It’s true. The cameras in the latest smartphones like the Apple iPhone XS, Samsung Galaxy S9, Huawei P20 Pro and Google Pixel 3 are amazing. OK, the sensor may be small compared to a ‘proper’ digital camera, but image quality is stunning, their ability to control contrast and exposure is astounding and you could easily make prints up to 16x20in and not realise the photographs had been taken with a phone. When did you last make a print bigger than that?
There’s also a plethora of apps you can download to your smartphone specifically for photography that enable you to create beautiful fine art images. Some, like
Hipstamatic, do all the editing for you, so you take a shot and seconds later it’s finished and ready to use – you simply choose a lens and film combination then start shooting. Others, such as Snapseed, VSCO and Enlight are designed to edit images that you have already taken.
You can also get apps to create multiple exposures like Photosplit and Superimpose X, or use Lens Distortions to add light and weather effects, Mextures for adding textures, grain and light leaks, and you can even get smartphone versions of Photoshop and Lightroom.
If you’d rather stick to apps purely designed for black and white photography, check out


Upper left Vinales, Cuba
An instant oldcamera look can be easily obtained straight from your phone with the help of clever apps
Upper middle Old car
The film and lens combos available from apps such as Hipstamatic let you create images that require no editing
great effects
Simply B&W, Dramatic B&W, Black & White Dramatic Camera, Monokrom B&W Photo Editor and others.


Some of these apps are free, others are not, but when you consider the level of technology you’re getting for 99p or £1.99, it’s staggering. The great thing about phone photography is that you always have your smartphone with you, so you’ll never miss an opportunity. They’re also quick and easy to use so you can point and shoot. This is incredibly liberating compared to carrying a heavy backpack of gear around. You can basically forget about the technical side of photography and focus solely on creating artistic images, which can only be a good thing.
Upper right Torn posters
The resolution of the latest smartphones means you can easily make large, exhibitionquality prints
Below left Quick art Various effects can be rapidly achieved with different apps and options –there is no limit to your creativity
Below middle On the street
Your phone is ideal for street photography because no one will take it seriously –except you
Below right Topless man
You can shoot portraits on your phone – a quick and simple way to capture people while on the move
The camera and software on your smartphone can create
74 MASTER B&W PHOTOGRAPHY
In-phone image editing
Using one of the many app available makes editing easy
Creating high-quality black and white images is child’s play without ever going near a computer, thanks to the many editing apps you can download to your smartphone. One of the most popular and versatile is Google Snapseed. To show you just how clever it is, here’s a quick step by step showing how to take a shot then edit it in-phone.
2 Select an image
Open Snapseed and select an image. This is a screengrab of the iPhone screen to show the options you’re presented with. Looks and Tools contain the main menus while Export lets you save and export the edited image.


3 View tools Click on Tools and you’ll see there are loads of controls to choose from for basic technical editing, and creative options such as Drama, Vintage, HDR and so on. In this case the first step is to crop the image to a square.
Creating high-quality black & white images is child’s play
5 Tune the image Next, Tune Image is selected from the Tools menu and shadows are adjusted by selecting Shadows then swiping the image. Film Grain is selected and grain added to enhance the analogue look.
6 Add a border
Finally, add a border. There are numerous options under Frames in the Tools menu. Here, 0ption 7 is chosen. The changes are then saved and the image exported to Photos on the iPhone.
1 Take a shot
Take a photo with your smartphone or select a shot previously taken from your phone photo collection. In this case the subject is a vase of plastic flowers on a hotel windowsill, photographed with an iPhone 6 on a wet, miserable day.


4 Explore B&W Once cropped, B&W is selected from the Tools menu and the various B&W presets explored. The one chosen for this image is H02, which adds a contrasty look to the image. It’s already much more interesting than the original.
Above Fine art flowers
Here’s the final image, created in just a few minutes by playing around with various presets in Snapseed
75 CAPTURE CREATIVELY
OPTICAL ILLUSIONS
Use low-tech camera attachments to give you black and white images with an arty feel

Since the digital revolution took the photographic world by storm, we’ve become obsessed with image quality. More megapixels, sharper lenses, heavier tripods – it has all become a little bit ridiculous and is in danger of overshadowing what photography should be about – creating meaningful images. Sharpness is important, obviously, but it’s not the be-all and end-all and should never be given priority over mood, atmosphere and character in an image.
One way to explore photography at its earliest roots is by creating pinhole images. Instead of a conventional lens, a bodycap is fitted to your camera body, which has a hole in the centre and a metal disc with a tiny pinhole in it placed over that drilled hole. The pinhole acts as both the lens and the aperture, and it produces images that have a characteristic softness.
Digital pinhole photography suits a range of subjects, from landscapes and architecture to portraits and still life. It’s also much easier than using an analogue pinhole camera as you can see what you’re doing using LiveView, which makes composition much easier, plus you can assess your images immediately and make any changes to help improve the final result.
Exposures are usually long when shooting with a pinhole, so mount your camera on a sturdy tripod and use a remote release. If you want to keep the exposures brief to avoid subject blur, increase your DSLR’s ISO to 3200 or 6400. Your camera’s TTL metering
should give reasonably accurate exposures, but use the exposure compensation to correct any error if necessary.
You can’t focus with a pinhole but you don’t need to – a pinhole is so small it gives you extensive depth of field, so everything will be sharp from a few centimetres to infinity.
For another artistic option, have you ever heard of a Holga ‘toy’ camera? If not, you don’t know what you’re missing! They’re basically cheap, plastic, medium-format film cameras that were mass-produced so that workingclass Chinese folk could afford to take family photographs – at a time when 120 black & white was the most widely available film in China. To keep costs down they were made as simply and crudely as possible, so light leaks are common and the simple 60mm f/8 lens produces images that are sharp in the centre but soft and vignetted at the edges due to its poor-quality optics. It’s these quirks that make them a popular choice among many creative photographers.
If you don’t fancy using film (this is a digital mag after all) you can buy a toy camera lens and use it on your DSLR. Holga lenses in common mounts such as Canon and Nikon cost around £20/$25. Diana lenses are more pricey at £39/$49.
Obviously, there’s no autofocusing – you need to focus manually using focus zones on the lens – but the images that are produced have a wonderful fine art quality about them, and they look really fantastic printed, mounted and framed.
Make your own pinhole Transform your digital images by adding analogue effects
1
Get a can Enjoy a can of fizzy drink, then when you’re done cut out a 1x1cm piece of aluminium from the can with a pair of scissors and flatten it out.
Make a dent Place the piece of can on a hard surface. Using a ballpoint pen, press down on the centre of it to make a small dent in its surface.
2
3 File away With wet-anddry paper or a fine nail file, gently rub down the protrusion caused by the dent until there’s just a thin layer of metal left.


Pierce Carefully push the point of a needle through the thin part of the metal, making sure the point only just passes through to make a tiny hole.
4
Pinhole Solutions in Birmingham (pinholesolutions.co.uk) manufacture laser-cut pinholes. You can either buy one for £17.50 then drill a hole in a bodycap and tape the pinhole over the hole, or make your own from scratch. Here’s how.
76 MASTER B&W PHOTOGRAPHY
One way to explore photography at its earliest roots is by creating pinhole images


5

Twist Place the needle point through the back of the hole and twist it gently to get rid of any hole imperfections. The smaller the hole the better.
6 Drill Drill a neat
A homemade pinhole cap The finished article, ready to use. Who needs an expensive lens when you have a pinhole bodycap
 hole in the centre of a plastic bodycap 5-6mm in diameter, and tape the pinhole inside the body cap using black tape so it’s light-tight.
Tuscan lion
hole in the centre of a plastic bodycap 5-6mm in diameter, and tape the pinhole inside the body cap using black tape so it’s light-tight.
Tuscan lion
77
This sculpture was photographed using a pinhole bodycap on a DSLR. The image has an attractive softness that is characteristic of pinhole photography
CAPTURE CREATIVELY
Black and white beauty
By choosing the right perspective, composition and using intelligent processing techniques, traditional landscape scenes can be transformed into monochromatic masterpieces

Shoot
landsc and black
Create stunning monochrome scenes by mastering exposure control and textural balance

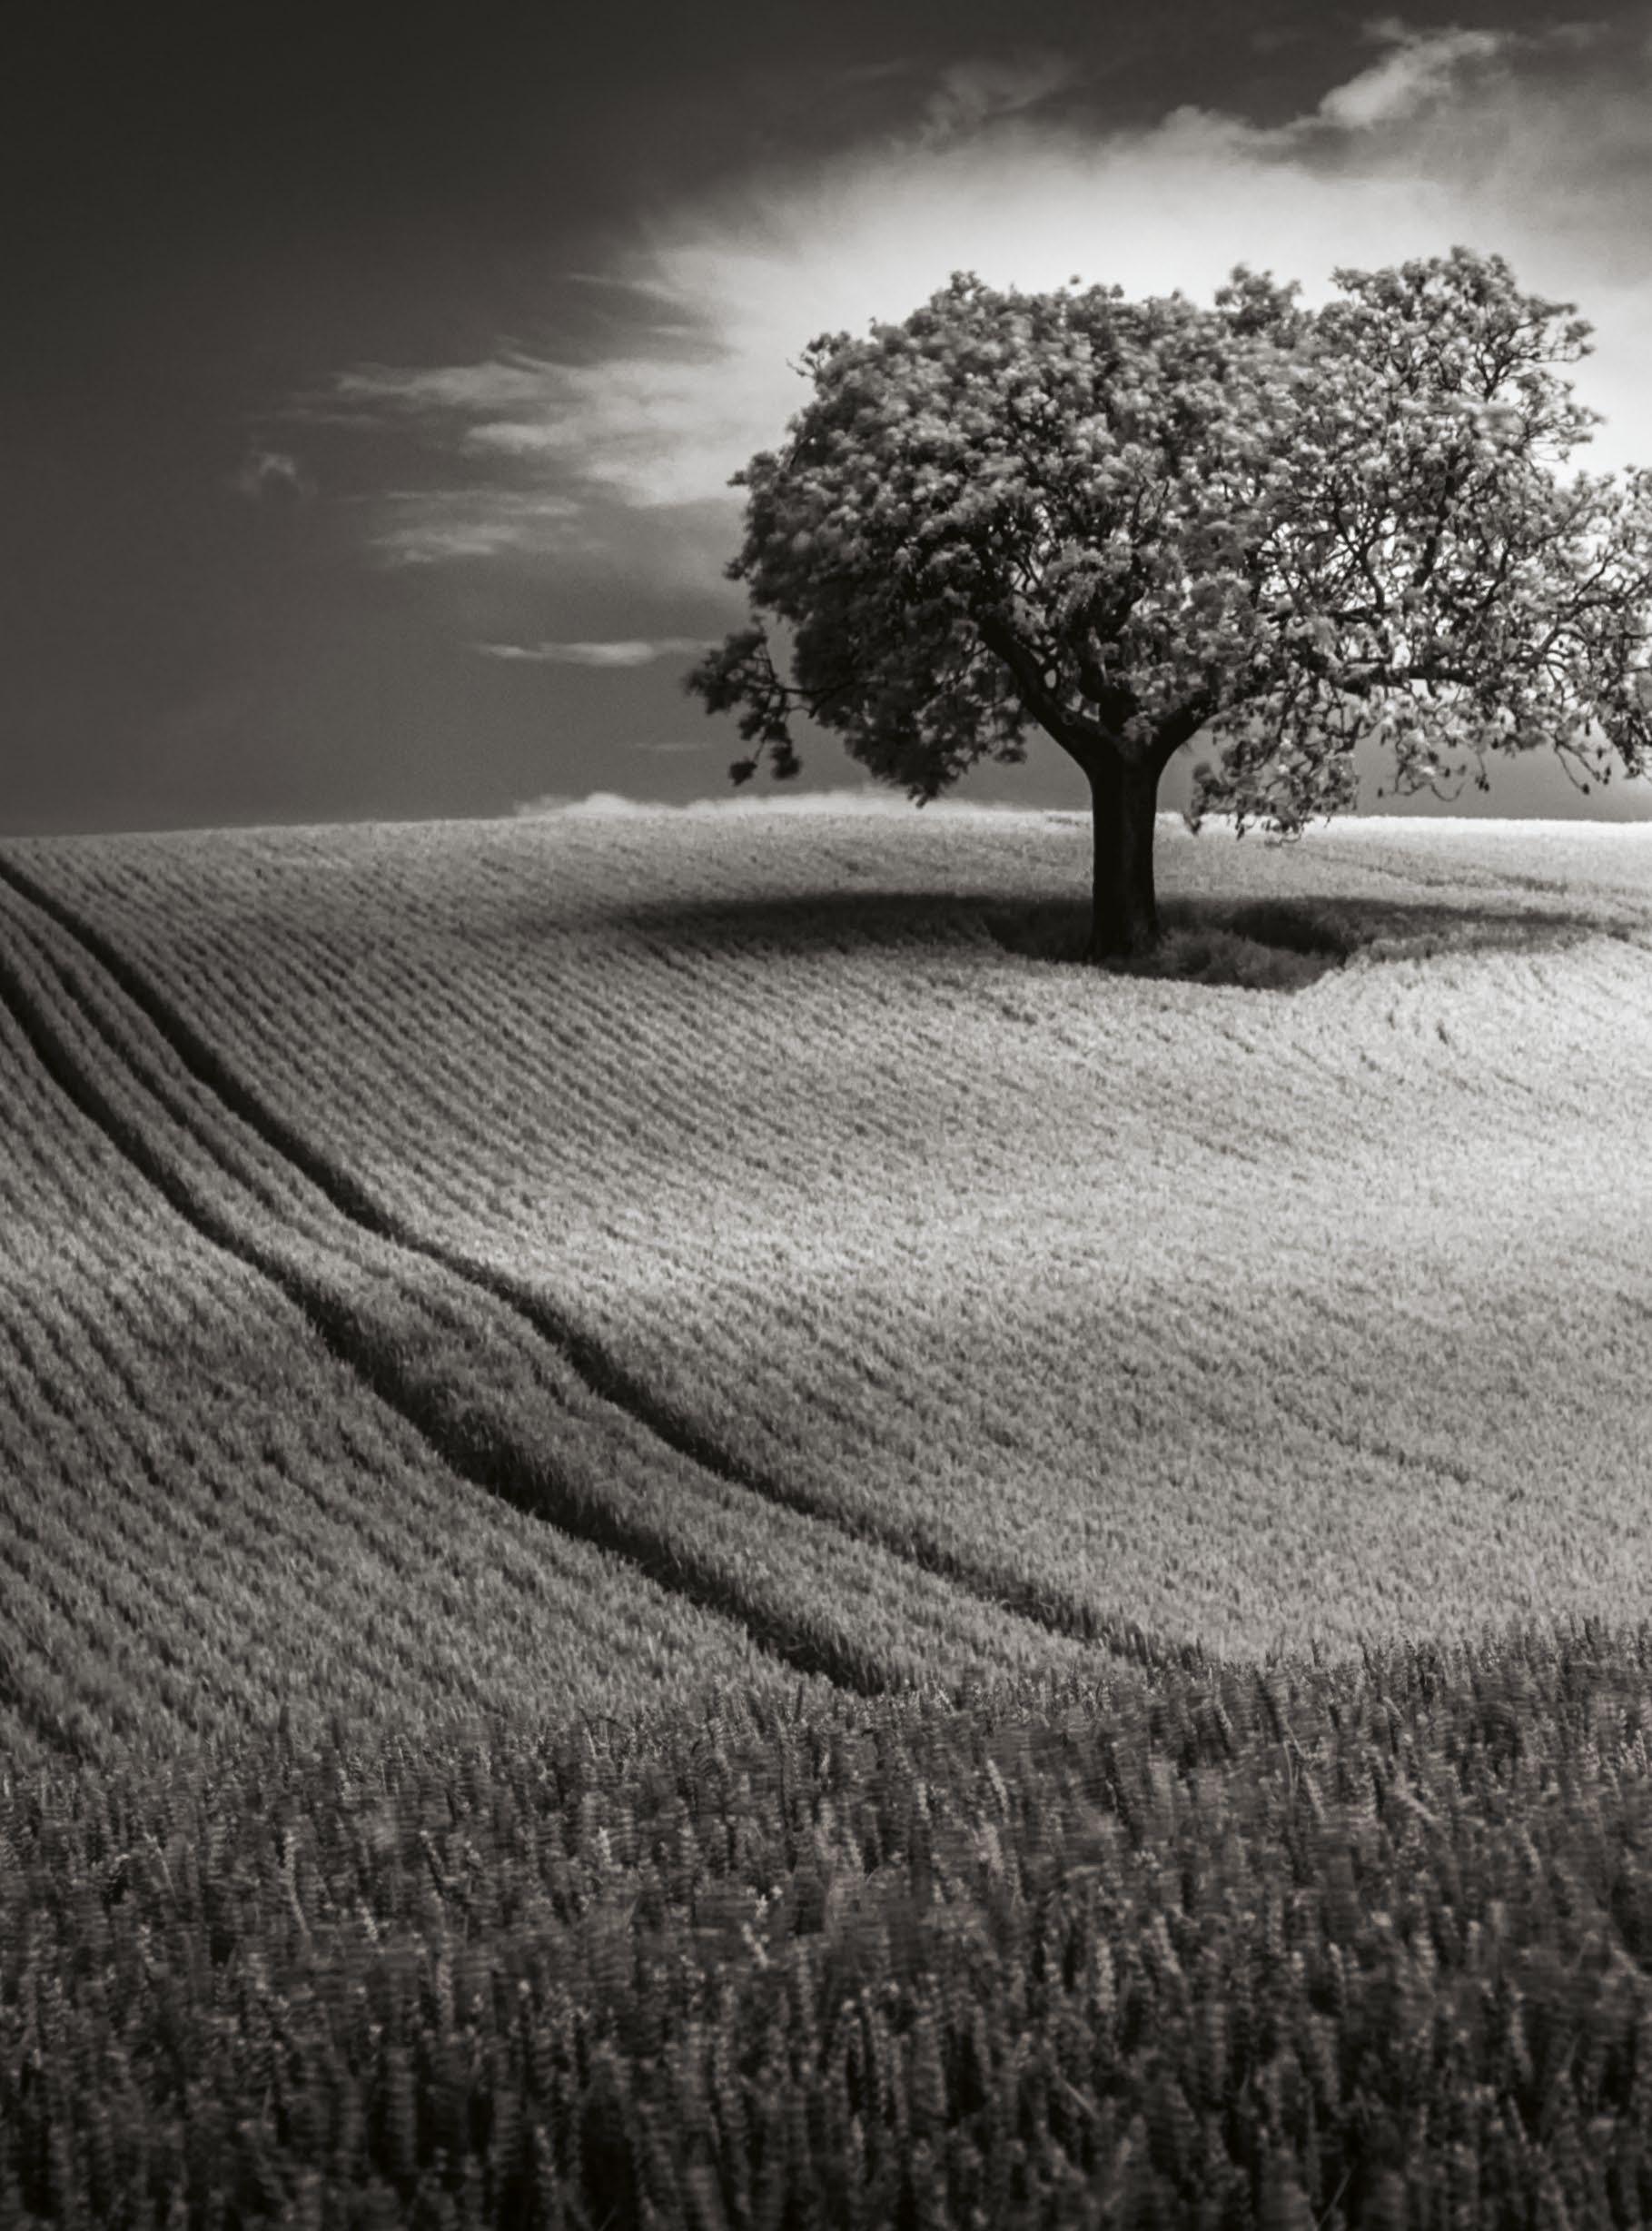
There is an undeniable irony that black and white photography is one of the most popular genres of the medium today. Despite the advances in photographic technology and colour reproduction processes, photographers the world over still choose to either shoot in
monochrome immediately or convert their colour digital images to black and white later in software.
Not only have black and white films maintained a significant presence on the market, but entire companies are based on products solely used to convert images to
monochrome, giving photographs a classic filmic quality. Software packages such as Silver Efex Pro from the Nik Collection by DxO are carefully crafted to apply film simulation filters to your shots, working to recreate the tonality and texture of wellknown film stock.
© Justin Minns
78 MASTER B&W PHOTOGRAPHY
apes white
It can be difficult to identify the exact qualities of black and white images that audiences identify with. But of all the areas of photography to benefit, landscape is a common recipient of the black and white treatment. The range of brightness values in scenic images lends itself to colourless

rendition, as this enables the viewer to focus on the most critical components of landscapes – texture and depth.

Removal of colour is not a get out of jail free card, however, and while it can be used as a creative technique to add drama and focus attention, desaturation cannot be
seen as a quick remedy for a bad shot. In order to create mono masterpieces we must first identify which scenes are receptive to conversion, and how best to approach this.
Here we’ll explore the best routes to identify landscape subjects and tailor image styles for maximum effect.
79 LANDSCAPES
Good contrast
Identify suitable scenes
Not every landscape works in monochrome. Recognise which subjects and lighting conditions offer the greatest potential

When black and white film was the only photographic medium available and every image created was devoid of colour, the viewer had their expectations set by these limitations. And while the photographer had to be aware of the effects of shooting a scene without the ability to reproduce colour and worked to maintain impact, they had the familiarity of monochrome in their favour.
In today’s modern age of advanced digital technology, where cameras are able
to capture even the most subtle of colour gradation and HD TVs display breathtaking contrast and saturation, things are very different. Audiences expect strong, life-like colour images, as even camera phones are able to reproduce impressive colour gamuts. If we are going to intentionally remove this chromatic information to produce a black and white image, we have to be certain there is enough interesting detail remaining to justify the existence of the shot.
This is the main area of confusion among new photographers. A successful monochrome photo is more than simply a digital file with the colour removed – to ‘sell’ the impact of a colourless scene we have to pick ones with appropriate tonality and shoot with the intention of converting it in processing. So what works well in black and white? A good example is a scene with extensive contrast, such as those found during the midday sun. This is far from the ideal time to
LOCAL CONTRAST White clouds in a deep blue sky show great contrast when a red filter is used LOW-FREQUENCY DETAIL A mono conversion can give greater separation and purpose to otherwise bland detail like cut grass or sand
80 MASTER B&W PHOTOGRAPHY
TONAL CONTRAST
Bright highlights and dark shadows are emphasised as features by removing colour
FOCUS ON FORM
Strong directional light creates defined gradients that suit the graphic properties of monochrome
COLOUR VARIANCE
Scenes containing a good range of colours are more likely to exhibit contrast in the converted image
Harsh lighting
shoot a standard landscape, as colour is often muted and uncomfortably cool, with a high kelvin value in the shadows. But it’s an ideal opportunity for a monochrome shot, as this will focus the viewer on the detail and form of landscape elements, without the distraction of intrusive hues. In any scene where you feel the colour is failing to add any value, thinking in terms of creating a black and white reproduction is a possible solution.
Although it may seem counter-intuitive in a monochrome workflow, it is critical to assess colour range. The colour visible in a scene will continue to dictate the tonality of your image after conversion, which is a vital consideration for predicting the contrast of the final image. Two colours that appear different in a colour shot can seem similar in monochrome, producing a flat shot if left unmodified.


OUT OF RANGE
In situations where dynamic range is exceeded, use this to your advantage for graphic impact
Focus the viewer on the detail and form of landscape elements
Stormy scenes
DRAMATIC LIGHTING
Passing storms often produce striking directional light complemented by the textural focus of monochrome

MUTED COLOUR
Rainy conditions can produce low colour saturation and contrast – it is often better to remove this completely
TEXTURED SKY
Where there’s cloud detail, a monochrome treatment can focus attention on tonal variations
©Peter Fenech x2 ©Laurent Antony
LANDSCAPES
Shoot low key
Use dark tones to your advantage for moody, atmospheric landscape scenes

Low-key lighting has been favoured for its dramatic style in photography and cinema for decades. Closely associated with film noir, low-key images focus viewer attention on one area of the frame by limiting contextual detail. They introduce a sense of isolation and limit the feeling that the scene continues beyond the edges of the frame.


Low-key effects produce strong contrast, with a prevalence of deep shadows. This can be ideal for landscapes, where we want to emphasise intense light sources and highlight detail in textured surfaces. With care, the low-key formula can be used to produce a theatrical look to create the appearance of a set or a highly controlled environment, which is unusual in a natural location.
As photographers, our job is to control where our viewers should look. We take a busy scene and find the elements that are most photogenic, placing these centre stage in our composition. Low-key lighting moderates the dominance of individual zones and objects in the frame. By using strong lighting we can throw less-important areas into shadow for both practical and artistic purposes.
To do this we need a deep understanding of exposure measurement and the way in which our camera interprets light in different scenes. Low-key images have a bias towards shadows, so we should enhance how darker tones are rendered, being mindful of overexposure. Overexposure in this context doesn’t mean loss of highlight detail, but rather a lack of dense blacks caused by the camera pulling detail out of the deepest shadow areas. This would produce a scene with reduced drama and an awkward lack of contrast.
Below
Light direction
In images like this one the light is striking the landscape at an angle, picking out texture and shape without lifting too many shadows – similar to some traditional low-key lighting ratios
Right Shimmering
Exposing the shot to the left to hold dark shadows, photographer Justin Minns knew this shot of Saxtead Green Mill, bathed in morning sidelight, would look good in monotone
Expose for low key Lower your exposure for dramatic shadows and isolated image features
1 Compose your image We need to set the scene for the dramatic low-key style. Zoom in to exclude extraneous bright spots, such as dappled light filtering through trees, and place the main subject so that it will stand out against the dark surroundings.
2 Switch to Spot Use Spot Metering mode to bias the exposure towards a small area of the scene and prevent the camera from brightening the image to reveal background detail. This tells the camera you intend to create an atypical exposure.

3 Meter from highlights Place the active AF point over the brightest area to take a meter reading that will set up a darker atmosphere. Hold down exposure lock (AE Lock) and refocus the scene, or enter the measured settings in Manual mode.

82 MASTER B&W PHOTOGRAPHY
©Laurent Antony
4 Drop the brightness In P, A or S modes use exposure compensation to darken the frame until you have a subject that stands out from an underlit background. In M mode, stop down the aperture or increase shutter speed to reduce brightness.
5 Adjust for function Adjust the aperture or shutter speed for further desired effects. For example, if you’d like a long exposure, prioritise shutter speed while varying other settings to maintain the low-key look. ISO can stay at 100 if tripod-mounted.


6 Check the histogram Keep an eye on the distribution of tones by referring to the histogram. Some clipping may occur, but this is expected – the majority of the tones should be bunched at the left side of the graph as there is a prevalence of shadows.


 © Justin Minns
83
LOW KEY HISTOGRAM
LANDSCAPES
Create high key images

Make the most of highlights to shoot bright and airy minimalist scenes

When it comes to black and white images there is a significant difference in the most effective style for each scene. One approach does not fit all conditions, and just as with the choice to convert to monochrome or leave it in colour, the style of black and white exposure and processing must be tailored for the scene currently being studied.

As such, low-key lighting will not fit all types of landscape or lighting. In these cases we can try adjusting our low-key approach to make exposure more appropriate for the scene, or alternatively we can instead consider inverting the settings and trying our hand at high-key lighting.
Just as low key uses shadows to best effect, the high-key approach exploits the highlights. Originally used as a method of reducing contrast on a set or location to avoid tones falling outside of the dynamic range of the filmstock, high-key images can almost be considered overlit, since they remove shadows almost entirely.
In the natural landscape we can introduce this effect by biasing the exposure towards the
upper midtones and highlights. In some cases this may even result in the loss of retrievable details in the brightest highlights. While this is something we are widely taught to avoid at all costs, for our purposes here it can be advantageous. A bright white background adds a ‘blank canvas’ aspect that works to increase the visibility of other landscape features.
The key concept when attempting a style such as this is to clearly communicate your intent, especially when shooting a subject that is often approached in a highly formulaic way, such as a landscape. If your shot is to appear overexposed this must be your goal from the outset, and it must be evident that it is an intentional creative decision, not a miscalculation in exposure.
By pushing the shadow/highlight balance to the extremes we can give our images a bright lifestyle-type atmosphere. This can greatly benefit minimalist scenes or juxtapose those that usually display strong colour and detail, producing a surprising and intriguing tonality to a shot.
Understand the zone system
The classic exposure assessment scale applied to modern digital imaging
It is useful to understand the relationship between brightness and detail, as described by the zone system. Ansel Adams’s original, iconic system warned photographers to avoid zones 0 and X, as these were pure black and white respectively, and still applies today. It was more difficult to recover shadow detail

than highlights in film – the opposite to digital photography. We should now be more cautious of tones falling in zone IX, as these are most at risk of falling outside the dynamic range of the camera. For dramatic monochrome landscapes, try utilising the lower zones (I and II) for deep blacks, while safely retaining highlights.

84 MASTER B&W PHOTOGRAPHY
HIGH KEY HISTOGRAM
HIGH & LOW KEY
Look for aspects that could spoil a high or low-key effect. If you want a shadow-heavy scene, avoid unintentional bright highlights in the background. Likewise, don’t attempt a bright, airy image if there are deep shadows present.
Left Easy on the eye
The brightness of this image compliments the minimalist style of the scene and allows us to focus on the texture rather than the shape or colour of the subject
Below Light on shadows
This image has lowdensity shadows to create a bright frame. The photographer took advantage of snow and a blank sky for an effective highkey approach

How to capture high-key shots
Push highlights for a skewed distribution of tonal values
1 Use a tripod As you will likely be using lengthened exposures to create a brighter feel, it is essential that you support your camera to minimise blur. It is especially important to use a heavy-duty model if you’re shooting near moving water.
2 Meter from the shadows
The characteristic feature of high-key images is the low-density shadows. While this may be created using flash in a studio, we can produce a similar look by getting the camera to shift all tones ‘to the right’ – towards the highlights.
3 Observe clipping Turn on the highlight alerts on your camera to visualise blown highlight detail. Try to keep this to a minimum if possible, though in some cases this is desirable for a bleached look. Ensure that no clipping occurs over key subject areas in either instance.
4 Push to the extremes
Increase exposure until you reach the point where you would usually stop when exposing ‘to the right’, then increase shutter speed or aperture further until the brightest highlights clip. As long as these are in negative space, the effect will seem desirable.
5 Adjust framing If using blown highlights as a feature – in some cases this can be widespread, depending on location and subject – vary the composition to experiment with the balance of tones. Use a blown sky as a background element, for example, mimicking the classic studio look.
6 Watch the midtones The aim of high-key photography is to control the density of the shadows, so be mindful of what is happening to the midtones. If they’re pushed too far towards the highlights, they can lose impact and contribute towards a flat image – use negative exposure compensation if needed.

©
Justin Minns
85 LANDSCAPES
© Peter Fenech
Use special effects
One of the most important things novices learn about photography is that an effect or style is not reason enough for an image to exist. Any exposure, colour, lighting or composition choice should enhance the impact of a carefully selected and positioned subject, rather than becoming the main focus of the image in its own right. If the photographer approaches a shot with the intention of making the rule of thirds, a long exposure or a colour effect the subject of the composition, then the resulting photograph will likely fail to capture the imagination.
In a similar way, black and white conversions (or the use of a camera’s monochrome picture style) must also be thought of as a means to an end, rather than the main purpose of any shot. A great way
Exposure, lighting and contrast choices all enrich atmosphere


to add value to a monochrome frame is to introduce other photographic effects to the mix, which may help justify the photographer’s choice to create a black and white image. The lack of colour may then feel less jarring to the viewer, who will be encouraged to look past it as a defining feature of the composition and think of the monochrome nature of the frame as its native state. In essence we need to make modern audiences temporarily forget they are used to seeing brightly coloured photographs, so we can steer them to notice the aspects that encouraged us to make the image in the first place.
Once we have removed the colour from a scene, we can experiment with lighting ratios and contrast in ways that do not work successfully when colour information can
‘contaminate’ the balance. If we underexpose to create an ultra-high-contrast image, for example, this may increase colour saturation to unattractive extremes. In a black and white landscape, meanwhile, we only have luminance information present.
Try varying your position relative to the light source and working to enhance the most effective characteristics of a monochrome image – the cinematic feel, filmic texture and less-familiar tonal rendition, as dictated by the range of colours present.
Above Urban forms
Coastal landscapes and urban environments are two of the most conducive to ultra-long exposures, as they contain static elements in close proximity to moving features, such as water or clouds
86 f/11 90 sec ISO 200 MASTER B&W PHOTOGRAPHY
Shoot in-camera black and white
It is often advised that all major image treatments are left to the processing stage, but while this does give full control over all parameters, shooting black and white images in-camera gives you instant feedback. You no longer have to imagine what the colour image will look like after conversion, as you have an instant preview. Since monochrome picture styles must be applied to JPEGs, consider shooting both RAW and JPEG, so you have a ‘finished’ black and white file and a RAW for software conversion – the best of both worlds.

Create ultra-long exposures


Eliminate people from the landscape and create otherworldly scenes
1 Find your composition Begin working handheld, experimenting with focal lengths and perspectives to find the frame that best suits the scene and will emphasise the properties of long exposure.
2 Deactivate Long Exposure NR
While this form of noise reduction is the most effective, it will double the duration of the creation each image, so turn off NR for the benefit of speed.
3
Set focus Calculate aperture and preset focus. This is important if the front of your lens barrel rotates during focusing, as we will be attaching filters later that must be precisely positioned.


5 Attach correct filters Use a 10-stop ND filter for a long-exposure black and white look, or try a 2-8 stop variable ND for better control over the exposure time. An ND grad will help hold sky detail.

Left Creative flare
Vary your position to the sun to introduce lighting effects and alter shadow position. While colour is often the main draw, this image was made at sunset, creating a light-focused monochrome shot ©Peter Fenech
87 LANDSCAPES
x2 © Laurent Antony
Process mono landscapes
Enhance the best qualities of your images

Any successful digital photographer working at a professional level understands the importance of bespoke image processing. No two images benefit from identical editing settings, and when working with genres as different as colour and monochrome photography it is even more crucial to identify how and why the processing recipes differ.
As we are working without colour, white balance correction is an area we can be less concerned about, but this doesn’t mean that colour can be ignored entirely. Depending on those present in the landscape, it will often be necessary to adjust contrast via the HSL panel in Lightroom or Camera Raw and the dedicated Black and White controls in Photoshop. These can also be used for
creative effect, to alter the balance of tones based on the distribution of colour values throughout the frame. The element that is of paramount importance when processing a monochrome file, after the basic conversion is complete, is the distribution of light and shadow, since these are all we are left with once the colour has been stripped. Dodging and burning on a local scale is a powerful method of contouring shape and form within the landscape. In a coloured scene the viewer’s eye is drawn to both areas of strong colour contrast and extremes of brightness. As the latter takes almost total control in a mono shot, with the exception of varying focus, the process of directing attention is simplified at the processing stage.
Left Flat tones (before) The misty winter conditions had potential, but in this colour image there is little in the way of contrast or depth


Right Instant impact (after) More than mere desaturation, the monochrome conversion process has added unique contrast to this shot, transforming a drab scene into an intriguing, otherworldly image
Perfect your monochrome conversion Use localised editing procedures across both


1 Convert to monochrome In Lightroom click on the Black and White tab in the Treatment panel, which will do a basic mono conversion. In Photoshop consider setting the standard black/white foreground and background colours (D) and add a Gradient Map Adjustment Layer for good default contrast.
Set Blacks and Whites If working in RAW, add contrast by setting the Black and White points. Hold down Option/Alt while dragging and stop just before clipping occurs. Next, increase Contrast and adjust the Highlights and Shadows sliders until satisfied. Here we want to keep all tones in range.
2
3 Adjust HSL Manage the relative balance of each colour by using the sliders in the B&W Panel in Lightroom (named HSL/Color when Colour Treatment is selected). Move each slider to brighten or darken colours –here lowering red darkened the path, and increasing yellow brightened the foliage.


88 MASTER B&W PHOTOGRAPHY
©Peter Fenech
RAW and Photoshop workflows


4 Dodge and burn Use the dedicated Dodge and Burn tools in Photoshop or manipulate the highlights and shadows using the Adjustment Brush in Lightroom (K). Subtly brighten highlight areas and darken the shadows to introduce local contrast and better outline the form of subjects.
5 Customise colour theme Try working with colour toning to add bias to the shadows and highlights for a stylised look. Here the Split Toning control has been used to slightly warm the highlight areas and add a cool tone to the shadows. This gives a richness to the tonality of the scene.
6 Add texture If your image is destined for print it will pick up some of the texture of the paper, but if the file will be used primarily for screen viewing you can try adding some fine grain noise or a pattern overlay. This will help to give the landscape a more classical, filmic quality.

89
World in mono
A black and white treatment presents scenes in a novel way, so that even well-photographed subjects have new meaning

 © Nina Papiorek
90 MASTER B&W PHOTOGRAPHY
shade Light &
Learn how to get more from light and shadow in your scenes to produce images with added depth and intrigue
Black and white photography remains one of the most popular genres in photography. Around the world, photographers demonstrate a nearuniversal appreciation for the power of simplicity, light and shadow – the fundamentals of any good image. While colour imaging can produce an accurate, life-like recreation of the world around us, black and white is able to transcend the natural to produce a unique, visceral representation of what our senses encountered. This may be due in part to the fact that, whether you are using a camera to study a scene or your own eyes, you are effectively seeing in monochrome. Both only ‘see’ light and shade – bright and dark. The sensor in a digital camera and the retina of your eye work by detecting differences in light intensity, gathering this information into a luminosity map, an arrangement of points of
varying brightness – a black and white image. All of the colour information has to be added later, albeit seemingly instantly from our perspective, via the use of chemical pigments in the human visual system, or via the image processor of a digital camera.
Monochrome photography therefore offers the truest reproduction of detail and enables us to explore shape and form in a way that is difficult with the interference of colour. Our brains are tuned to notice colour first, so when it’s present we have to take extra care to eliminate distracting hues, or colours that clash in unattractive ways. Black and white is arguably a simpler medium and can free us to better examine contrasts of shape.
Here we take a look at some of the pro methods for using monochrome to create images that stand out and demand multiple views.

91
See in monochrome1
Find scenes that will benefit from black and white


The most important thing to remember about black and white photography is that a lack of colour is not a reason in itself to shoot an image. Yes, monochrome can be viewed as a novelty, helped in no small part by the abundance of photo filters in apps such as Instagram, but conversion is not a cheap trick or a get-out-of-jail-free card. There needs to be enough about a scene to provide interest in the first place. If you’re going to present the world without colour, you need to work even harder to hold the viewer’s eye. When setting up a shot, look at the colours that are present and understand how these will work together as shades. A blue sky will provide a contrasty backdrop when a red filter is applied, for example, which will also make flowers stand out against green foliage. Look for colours that will contrast in brightness, for more dramatic mono images.

x2 © Genny Sian
92 MASTER B&W PHOTOGRAPHY
© Noriaki Kimura
Shoot for the edit
Think ahead when shooting to achieve the best final results
For digital photographers it is almost certain that black and white conversion will happen at the editing stage rather than in-camera. Since most pro and enthusiast photographers shoot RAWs, black and white presets will not be applied, so must be added later with software. Because of this, it helps to keep in mind an idea of how you’ll process your image. Once you know what style of image you want as a final product you can tailor your shooting to match. If you want to create a high-key image then you can adjust your exposure accordingly. If you want to have a strong sky presence, then bracketing your shots or using an ND Grad filter will mean that your file is already halfway towards the finished image. Applying opposing edits to the shooting style will always create difficulties and result in less impactful shots.
Left Monochrome mindset
The very best black and white images are ones that have been shot with conversion in mind. The photographer can then better assess the scene based on tonal range, detail and exposure

Bottom left
The correct subject
Scenes that are heavy on texture or repeating patterns work well as monochrome images, as the mono treatment effectively represents the simplicity of these finer details
Below
Rough and smooth
This landscape scene displays contrasts of both light and texture. The longer exposure has reduced the water to a silky blur, which makes the texture of the rocks stand out

3 Contrast the texture
Separate image zones with patterns
Colour and brightness contrasts are a key part of photography, and many people choose to focus on these to introduce depth to images. However, in black and white photography you’re left only with the luminosity, but it can still be a great source of drama. You can also introduce a secondary dimension and visual counterpoint by using contrasting textures. Lengthen the exposure to blur any moving elements, such as water, to provide a smooth counterbalance to sharp rocks or trees in the surrounding environment. If you’re shooting a stone wall, slow the shutter speed to add motion blur to a swaying tree – this will reintroduce any energy that has been lost through colour removal.
2
93 LIGHT & SHADOW
Fill the range
Push tones to the extremes for tonal depth

In the digital age we can become preoccupied with keeping the tones in our images within the histogram scale. Digital capture can be quite unforgiving of highlight detail in particular, and clipping can easily occur if we don’t keep an eye on the exposure. However, handling this can lead to the opposite problem – a lack of contrast. We need to make sure we see true blacks and whites in our images to produce natural and dramatic tonality. While you might want to avoid 255 Whites and a Blacks value of 0 –indicating solid, featureless areas – don’t allow overexposure of shadows, or whites to turn grey.
Use graphic power
Put strong lines and shapes to good use
With the removal of colour, our eyes automatically start to pay closer attention to shape and form. Colour is a dominating characteristic, and we can often fail to notice the harmony or dissonance between shapes in a scene when looking at a colour image. For dramatic black and white shots, look for lines and curves to subtly (or not so subtly) divide up your frame. A common pro trick is to contrast right-angles with soft arcs – useful in architecture shots – or intersecting lines, to create strong boundaries of tonality. A bright area quickly transitioning to near-black is a magnetic visual tool and can create wonderful minimalist studies.
Above Wide range In this image Noriaki uses true blacks and whites to highlight the graphic properties of the subject matter, telling us to focus on the shapes rather than the texture 4 5
94 MASTER B&W PHOTOGRAPHY
© Noriaki Kimura
TIMELESS QUALITY
CLOUDLESS SKY
A clear sky can ruin a sunset, but here light fall-off is the focus, while we can still infer the low sun.
Classic style
While the buildings are identifiable, the lack of colour hides modern light sources and makes the decade ambiguous.

NEUTRALITY
There are no colour clashes, so we can simply see light and dark, with no interference of unsightly casts.
UNIFORM LIGHTING
All the lighting works together –there is reduced variance between natural and artificial sources.
© Nina Papiorek 95 LIGHT & SHADOW
Control the frame Set boundaries with frame shape and orientation

A photo is a portal to the scene captured within it. The sides of the frame isolate the content visible in the viewfinder, and give it a new context. It is therefore important to choose the dimensions of this frame carefully, as it can significantly alter how the subject is depicted. For simple scenes, ensure any minimalist intent is clear, which involves regulating how much negative space is present. This is why square images work well for these kinds of composition. When you want to focus on the differences between texture and light in the foreground and background, a 3:2 portrait format is ideal. Meanwhile, try using 4:3 or 5:4 when you already have a good balance of interest in all areas of the scene, and want to show the foreground and background in relatively equal measure.


6
© Genny Sian
x2 ©
96 MASTER B&W PHOTOGRAPHY
Nina Papiorek
Top left Spot metering
Switching metering mode enables us to alter how the camera interprets a scene. Spot Metering mode will make it easier to capture a full tonal range, as values won’t be ‘standardised’
Above Light to dark
Left Repeated boundaries
Look for variances in exposure, such as sharply angled structures, creating extreme brightness differences. Here the light creates a bright and dark side to each pillar, defining a pattern

Use light gradients
Direct the viewer’s eye with the transition between light and dark
7 LIGHT & SHADOW
As well as the usual compositional tools, such as leading lines, black and white images benefit from the clear variation of light. In a monochrome image the gradient from a bright area to a dark zone is far more recognisable and can be a source of direction within the frame. Be on the lookout for light sources that can be positioned to set up a path for the eye to follow, which will always be from dark to light. If you need your viewer to scan along a street, place a light source near the area of importance, which will ensure that your audience focuses on the subject, while also noting the secondary details in the frame.

In this image there is a clear gradient from deep shadows to bright highlights. In harmony with the composition, this sets up a clear direction for the eye to move 97
Commit to the process
Don’t merge genres unless you have a good reason to do so
Modern editing techniques make it easier to apply special effects, colour toning and chroma-based selections to our work. However, this often leads photographers to forget the reason they wanted to make a monochrome image in the first place. While these special effects can add an extra dimension and make images less predictable, they can easily begin to make the creator look indecisive.
Colour splash effects rarely add narrative and often look cheap. The eye will be instantly drawn to the coloured area, missing any other detail you might want the viewer to see, and the unnatural contrast will likely be unpleasant. Either make your shot colour or black and white, not both!

Appeal to the senses
Appeal to your viewer’s other senses by focusing on details that imply the feel, temperature and smell of a scene

8
98 MASTER B&W PHOTOGRAPHY
© Noriaki Kimura
Keep it simple Black and white shots usually have a minimalist feel, so playing up to this characteristic is a recipe for dramatic, descriptive compositions © Genny Sian
Apply in-camera processing
Create black and white images in-camera with custom mono presets


1 RAW+JPEG Any in-camera presets or image styles will usually not be applied to RAW files, so you will need to shoot JPEGs for a finished image straight out of the camera. To provide peace of mind, consider also shooting RAW copies so that you can apply software edits to those if needed.
2 Select black & white Modern cameras have multiple black and white image style options, from basic presets to in-camera filter options. Choose which is best for the subject you are shooting and the mood you intend to create. Remember that simple is often best, so only choose creative ones if necessary.
3 Adjust parameters Further tailor the look of your shot by adjusting the hue, contrast and toning. Since you want to create a finished image and bypass external software, you must control these aesthetics at the pre-shooting stage. Shoot, review and adjust settings further if needed.


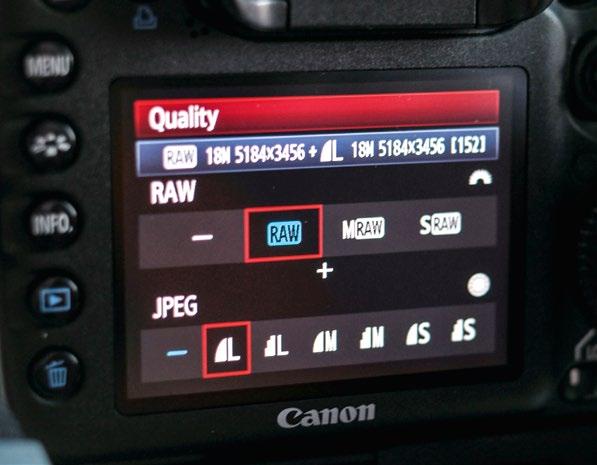
U
9 99 LIGHT & SHADOW
Right Stark composition
To emphasise graphic properties, commit to bold framing options to make the most of symmetry and patterns in a scene.
This can also make it easier to contrast elements against each other
The reveal Use side lighting
Add depth using variations in contrast and detail

Another way of adding contrast to monochrome shots and creating a sense of depth is to selectively hide and reveal sharp detail. This can be done using shallow depth of field, but where possible, mist, fog and even heat haze can be used to set up a texture gradient. More detail will be visible in the foreground and will gradually reduce deeper into the picture. The perfect example of this is a forest path fading into a misty background. It’s a common technique to lead the eye.
Ensure separation between image elements
When an image is devoid of colours to separate objects they can easily blend into each other if care is not taken with exposure. In order to reintroduce this separation, look for side or edge lighting to highlight the boundaries between objects and avoid areas of seemingly empty space. This is particularly important in low-key scenes, where there is a prevalence of dark tones. Use low sunlight or an off-camera flash to control lighting and maintain shape and form.
10 11 ©
100 MASTER B&W PHOTOGRAPHY
Nina Papiorek
Process your shots
Work out a standardised editing process for monochrome shots


1 Contrasty conversion A quick way to convert an image to monochrome and add some contrast is to use a Gradient Map. In Photoshop, hit the D key to set default foreground and background colours, then click on the Gradient Map Layer icon.


2 Adjust detail Duplicate the background and open the Camera Raw filter. Adjust the Clarity slider to control midtone contrast. In this case the slider was moved to the left to soften high-frequency detail in the frame, for a more relaxing image with fewer distractions.
3 Customise curves Add a Curves Adjustment layer, then play with the shadows and highlights. Since there was already mist in the air in this shot, the blacks were lifted slightly and the shadows deepened for contrast – a modified S-curve.

4 Dodge and burn For localised control use the Dodge tool to subtly brighten the upper midtones and highlights, to make the image glow. Add back some of the deeper shadows lost during the curves adjustment using the Burn tool.
5 Crop to taste While the taller frame fitted the subject here, there was a bit too much foreground, so the decision was made to crop to 3:4 from the native 2:3 ratio. This concentrated the attention on the upward direction of the composition.
BEFORE AFTER
Right Simple form
Here the drab weather created an underwhelming colour image. By converting to monochrome the shot became more about the vertical forms
12 101 LIGHT AND SHADE 101 LIGHT & SHADOW
© Peter Fenech
Mindful
photography
Mindful photography encourages you to take the time to pause and reconnect with the world and beauty around you

 Pictured Finding peace
MASTER B&W PHOTOGRAPHY 102
All images © Paul Sanders
Explore Paul Sanders’ still and calm approach to taking and making pictures

We all lead busy, fast-paced lives attached to our phones, and the seemingly endless deluge of emails, texts, images and adverts that bombard our lives, added to the demands of work and family, can leave us feeling that there is no time left in the day for us, let alone having the chance to notice the small moments of beauty that occur each day.
Mindful photography is an acknowledgment of the unique beauty in everyday, ordinary subjects, not being judgemental or being too tied to preconceived ideas. For me, it is viewing everything with awe and wonder, from dew on grass to magnificent landscapes.
The very essence is to ‘see’ the world through your own eyes, noticing what makes you pause to take in the moment. This involves slowing down, making time for yourself: tuning out the random noise from the rest of the world and tuning in to what the world has to reveal to you.
I started my mindful photography practice about four years ago. It is a meditation on beauty. It is opening your eyes to possibilities and accepting the things you are presented with. It’s not about likes, gear, settings or prizes, but about being, and enjoying what you see without judgment or agenda.
Paul Sanders

Paul has been a professional photographer since 1984, and in 1991 moved into newspapers. By 2004 he was Picture Editor at The Times, looking through 20,000 images a day. In 2011 he’d had enough and became a landscape photographer to reconnect with the world. He is passionate about the power photography has to help people overcome anxiety, and to positively adjust their outlook on life. He set up Still, which offers people a new way to use photography to express themselves and explore the world.
www.discoverstill.com
103 MINDFULNESS
Mindful photo techniques

Here’s a few simple practices that will get you started

Like any new technique, you need to practice and accept that you are learning. Begin with these simple exercises, one a day for a few minutes. You don’t even need to leave home to do them.
The thing
Find an object at home that you take for granted and is almost invisible to you. Spend time with it, noting the way it is made, what it feels like, the shape, texture and colour. Finally, produce a series of images of it.


A picture with words
When something catches your eye, write down the things you notice in a notebook, using pen or pencil. Writing by hand is a mindful practice in itself – the connection of hand to pen to paper demands attention. Couple that with noticing, and you have a full awareness exercise.

Seeing red
Choose a colour. Using your phone or a camera with just one lens, photograph only that colour, or how that colour is represented around you. You will start noticing that colour for days. Look at the shades or tones as well as shape of the colour. See if you can find 100 examples.
MASTER B&W PHOTOGRAPHY 104
Mindful equipment
Some of the kit you could benefit from

Slowing down
Mindfulness is defined by Jon Kabat-Zinn (who helped to introduce mindful practices to Europe and North America) as “paying attention, in a particular way, on purpose, in the present moment and without judgement.”
This definition also applies to photography. Apart from the judgement side, it’s easy to blame things for not being right; light, location, gear, weather – the list is endless. With mindful photography, the approach is slightly different. It involves arriving at a location, spending time adjusting, using all your senses to feel the subject, becoming aware of the subtleties that are being shown to you.
I constantly journal about my day, what I see and how I feel. It helps me hone into images, so consider taking a notebook with you along on shoots too.
Stillness and patience are at the heart of mindful photography
The more time you spend without using a camera the more you’ll start to really see. Seeing is different to looking, which is how many people approach photography. They look for a subject, judging things as not good enough or poor. Seeing is about accepting and embracing the unique beauty of something, and appreciating that the imperfections are what make the moment special and authentic. Acceptance and non-judgement are the key ingredients, but not striving also plays a huge part: the harder you try the less you see, the more closed off you become, and a general feeling of disappointment can close in.
Keep an open mind, walk slowly, touch the leaves, feel the sun or wind on your face, smell the rain or vegetation, taste the salt from the sea on the breeze – photography is visceral not technical.
When something catches your eye, pause and start to look at it, enjoy just being with it. Ask yourself what stopped you, what caught your eye – is it a small detail or a part of something larger?
Take your time, don’t rush off judging yourself as crazy or the subject as rubbish – as Minor White said, “Be still with yourself until the object of attention reveals its presence to you.”
 NOTEBOOK AND FOUNTAIN PEN
UMBRELLA
Probably the most important piece of kit, it shelters you and the camera from the sun, rain or wind, enabling you to sit in its protection.
WARM JACKET, HAT AND GLOVES
NOTEBOOK AND FOUNTAIN PEN
UMBRELLA
Probably the most important piece of kit, it shelters you and the camera from the sun, rain or wind, enabling you to sit in its protection.
WARM JACKET, HAT AND GLOVES
When you are being patient and staying still for any length of time the cold will nag at your body until you give in and go home. Be prepared and always keep warm.
POETRY BOOK
105
(At present ThePoetryPharmacyby William Sieghart). You may find, as I do, that reading poetry about the area you’re photographing heightens your awareness and the experience.
Connect with your subject
Learn how to engage with your present experience and carefully observe your relationship to it
Every second of every day we are presented with visual gifts, we just don’t notice them because of the demands on our time. Allowing yourself time to notice the beauty that surrounds you is a wonderful gift. The key is to browse the place you are in, whether that’s the kitchen, garden, office, train or wonderful location; all have gifts to give. We tend to write much of our awareness off during the day as
just a transit from place to place, rather than living in the moment and engaging with that time and making it special.
I find myself seeing pictures when I am queuing at the supermarket, waiting for pizza, sitting on the train, in towns and cities, as well as in the more classical locations. Everywhere has a possibility if we open our minds. Noticing how beautiful or unique things are is
the only key. It involves being in the present moment, not dwelling on things that have happened or may happen, appreciating what you are with, what is in front of you. Think about who made it, why it appeals to you.
Try not to think of it in terms of a photo, just enjoy the simple beauty presented. After a short time you may feel moved to photograph whatever has caught your eye. Allow yourself
 TITLE: GLEN COE
LOCATION: GLEN COE, SCOTLAND
TITLE: GLEN COE
LOCATION: GLEN COE, SCOTLAND
MASTER B&W PHOTOGRAPHY 106
I love weather, as it reveals mood and can help tell the story of where you are. After reading the history of Glen Coe, the murder and treachery that happened there, I felt the weather and mountains really reflected that dark mood. While the rain poured and the wind howled, the experience was incredible. I remember feeling so alive and part of the landscape while photographing the valley.
that time, just you and the subject, no distractions, just quiet, and be aware that something is happening between you and the object of your attention.
One piece of advice is to forget about the camera settings and the idea of correct exposure. The only thing to work towards is how the moment feels – leave the technical stuff aside for the enjoyment of the moment. One of the reasons I use Fujifilm mirrorless cameras is that I see on the EVF exactly what I want the image to look and feel like as I press the button. This allows me the distance from the technical to stay connected to the subject.

TITLE: ROTTING PEARS LOCATION: HOME, KENT

I had watched the hornets eating the pears on our tree for a few days, noticing how they ate in circles, going around the inside of the fruit, the rotting fruit falling to the lawn below a week or so later. The simple beauty of the pear with a hole in it really drew me in, then I saw another and they just cried out to be photographed. I set them up on my studio table and photographed them simply in a blacked-out room with the tiniest amount of light from a lightbox masked with cardboard. Still life allows so much time to really connect with a subject. The smell of these pears was like cider, but the textures were incredible.
TITLE: GLASS HALF FULL LOCATION: PRAGUE
I noticed this water bottle and glasses outside a cafe in Prague. I was waiting for clients and just kept looking at the glasses and bottle. I felt it saying “photograph me”, so I did, I was utterly captivated by it. The simple arrangement of glasses next to the bottle just filled me, and I became aware of the gentle reflections and curves –something beautiful in the most mundane of objects.

f/3.2 1/320 sec ISO 320 f/3.2 1/320 sec ISO 320 f/3.2 1/320 sec ISO 320 107 MINDFULNESS
Find the right location for your mindful journey Appreciate
For mindful photography you don’t need to travel, there are no good or bad locations, there’s no such thing as good or bad light, there is only where you are and the opportunities gifted to you. If you take away the expectation and pressure of having to make great images, you’ll find that your curiosity will lead to some wonderful shots.
My favourite location is my home –specifically within ten kilometres of it. I really don’t need to travel around looking for pictures when I am presented with things every day. We all live in the most incredible places – cities, towns, villages, open countryside – and yet we all fail to appreciate what is on our doorstep. We take our homes for granted, but the wealth of beauty around and inside them is incredible. From a pile of washing to the light working its way across a wall, there is something in every room. Outside is another level. There are trees, rail lines, hedges; everything calls out at different times for attention. I rarely research locations, I just go and enjoy what is there on the day.
your space


Urban environments offer so much opportunity: reflections, shadows, graphic shapes, hard and soft contrast, incredible light and drama. But often we are too busy heading to work to notice what is offered, especially in the evening when we are trying to get home. Take the train in to work early and walk slowly to the office noting what you see – it will be the best walk of your day. Next time, take your camera – travel light, then get into the habit of doing the same walk every day, and notice the subtle changes, the seasons changing the angle of the light. You’ll be amazed.
I am calmest by the water. I naturally gravitate towards it: coasts, rivers and lakes make me feel rested. Most of the waterside images I make are long exposures. This technique lends itself very well to mindful photography because it exudes calm. Head nearby instead of travelling to well-visited locations. By going to seldom-visited locations you are finding your own way. The key is to enjoy the time in nature – only two hours outdoors is proven to have huge health benefits!

Subjects and scenes to look for Home is where the heart is, so why not start there

There is no such thing as an ideal location to practise mindful photography, but starting at home is as good a place as any. Our homes have so many overlooked and unappreciated areas of beauty that aren’t noticed, and you will be amazed how much you can see and how connected or tuned in you are. From the light and shadows playing on the wall to the steamed-up mirror in the bathroom, the floor, flowers in the garden, the view from the window or of your house from the road, there are moments of beauty everywhere.

Home Urban Waterside
MASTER B&W PHOTOGRAPHY 108
Embrace the weather
Weather adds mood and emotion, and reveals a different kind of beauty to the landscape

The changing weather can reveal beauty in subjects that might otherwise be plain. It can reflect your own moods or emotions. I find that I see more when the weather matches my emotions, allowing me to amplify my mood and receive something truly beautiful. When it rains don’t run for cover. Grab your umbrella and watch the life-giving force fall from the skies and inspire you.
Holy Island, Northumberland
Driving across to Holy Island in the pouring rain, I stopped the car on the causeway just to watch, as the rain seemed backlit, the wind kept catching it and making it drift and swirl, so I just started photographing the patterns and shapes in the rain. I was totally soaked after a short time but exhilarated. I love the way the rainfall mirrors the shape of the castle.

109 MINDFULNESS
There are trees, rail lines, hedges; everything calls out at different times for attention
Creative considerations
How to use camera techniques and settings to create calming scenes
Mindful photography is showing what you experience in a very authentic way. People often interpret this as not allowing creativity, but the beauty we see is created by someone or something, so I encourage you to use your skills to match experience with expression. The key is to see the world with wonder and awe – as a child sees it with innocence and curiosity – but then apply your experience as a photographer to bring the images to life as you perceive them.
In-camera movement, multiple exposures, and long exposures all yield differing


Capture what you see
Use different creative techniques and effects to better represent the mood and moment you are experiencing at that location

expressions, emotions, and translations of a moment. The same is true when using film simulations or shooting in monochrome.
Symmetry is very calming to me. It gives my mind order, while reflections reveal a hidden beauty or unseen, surprising symmetry. Long exposures can make images calming or meditative, while multiple exposure can reveal an abstract vision that is unique.
Often I deliberately over or underexpose, not worrying about blocked blacks or featureless whites. If that’s how I see the moment then that’s how I photograph it.

I usually shoot with limited depth of field, f/2.8 or f/4, selectively focusing to bring attention to what I see and am captivated by.
It is important to try not to put yourself in a box that states “I only do long exposure” or “I only shoot in colour”. Allow yourself to experience all genres of photography, class it as seeing more of what is around you.
If you see the world as a blur, defocus the lens. The wonderful thing about mindful photography is that it can’t be wrong: if the image reflects what you see or feel then it is true to the moment.
MASTER B&W PHOTOGRAPHY 110
Slow it down
Using long exposures to create a calming image is a simple technique to master


A mindful approach to any technique is to understand what you need to do, learn it and practice it. Worrying about the technique or trying to guess the exposure doesn’t allow you to stay connected to the subject. I always use the same workflow for every shot – I can do it with my eyes closed. It is important to be present and aware of everything you do at every stage of the process.
1
2 Compose Set your composition, paying attention to what you want in the frame. Look at the edges of the frame to avoid unwanted clutter. Try to use the whole frame, but remember to leave space for your subject to breathe.
CALCULATE EXPOSURES
Working out the correct exposure is simple. I use the free Lee Filters app, but there are others available for a small fee. Take the exposure from step 4, dial the shutter speed into your app, apply the filter you’re using – in our case a ten-stop – and read off the new time.


3 Expose I always set up without any filters, as this allows me to understand how it feels before I start. Take a test exposure without filters, aiming to open up the shadow areas and let the highlights blow.
4 Filter Add a graduated filter to control highlights (usually in the sky). I use the Lee system because it gives total control over the placement of the graduation –normally a medium transition with around two stops of neutral density will be enough. Check and remember your exposure.
5 Focus Focus the camera on the main part of your subject. Once you have focused, turn the autofocus off. Often when using a tenstop or 15-stop filter the autofocus will hunt as you press the button, so turning it off maintains the focus point.


6 Exposure time. Work out the correct exposure with your ten-stop filter and don’t adjust the aperture or touch the focus. You can also use the apps to time the exposure if you don’t have a built-in timer. Set the camera to B or Bulb mode, release the shutter using a cable release and lock the release. Unlock after the time the app calculated has passed. Always check your aperture is the same as the initial exposure – often changing to Bulb mode does not copy across the aperture settings especially on Canon cameras.
 Get set up Mount your camera on a tripod, then attach a filter holder and cable release, and check your battery is charged. Turn the long-exposure noise reduction off in the camera’s menu.
Before After 111 MINDFULNESS
Being reflective
Make your work reflect what you experience

I’ve mentioned the benefits of a beginner’s mind, but using your technical experience helps a lot in being able to translate what you feel and see into what you produce at the printing stage. Using simple techniques, such as under or overexposure, enables you to create mood and drama.
The most useful thing for me is to write down how I feel about the place, myself and what I am observing around me. This is important because it might be a few weeks before I process my images, and it helps to be able to re-engage with the feelings I had at the time.
Always photograph your subject with a print in mind. Don’t imagine it on screen, imagine it on paper, so you can feel the weight of the paper and better immerse yourself in the moment. Printing is a very mindful way to get back into your images, the print should mirror your moment: tone density, colour, movement all should be present. I print nearly every image I like. I only use one paper too (Fotospeed Platinum Cotton), as it suits my style best.
Monochrome or colour?
Why and how to convert your images to monochrome

I shoot mainly in black and white – I only shoot colour on my iPhone. Colour distracts me, I find it irritating as sometimes colour overrides content. That said, I do see colour, but I always translate it into tones of grey. I have my camera set to the monochrome setting and the aspect ratio I plan to print the final image in. I find that this makes processing and visualising easier. In-camera I shoot RAW and JPEG, and often I use the JPEG pretty much straight from the camera with only minor adjustments. If I need to get more from the file I use the RAW and my Lightroom presets to bring out the emotion, beauty or simplicity I experienced.

MASTER B&W PHOTOGRAPHY 112
Above
Reflect your mood
Using something as simple as under or overexposure can help recreate a unique mood or feeling you are having


Below Drama
Dark tones in a photo add a powerful sense of drama to a scene, capturing the feeling of the weather and conditions you’re experiencing

113 MINDFULNESS
PROJECTS
DIGITAL INFRARED
Get insight into creating successful infrared images using a converted DSLR. These shooting and editing steps will help you to create an otherwordly effect.
122 BLUE HOUR TO BLACK & WHITE
Shoot dramatic long exposure cityscapes and then turn them into monochrome magic, using a simple black and white conversion in Adobe Lightroom.
128 GRITTY MONO PORTRAITS
Learn how to capture a moody black and white portrait with a simple lighting setup. You’ll need a black backdrop, flashgun – and a willing model, of course.
134 FINE ART LANDSCAPES
Create a black and white scenic shot with a vintage style. The absence of color invites viewers to use their other senses and appreciate the elements.

140 HOME STUDIO PORTRAITS
Portrait photography isn’t always about complicated lighting. Here’s how to create dramatically lit portraits at home using a single light setup.
114 116
“The absence of color invites viewers to use other senses”

115 © Peter Fenech

116 MASTER B&W PHOTOGRAPHY
EXPLORE DIGITAL INFRARED
Produce images that look out of this world
Back in the good old days of analogue photography, producing successful infrared images was a royal pain in the butt to say the least. Thankfully, digital infrared is much quicker, easier, and in some ways more effective.

The best way to produce digital infrared images is by getting a camera modified so it records infrared light as well as visible light (see boxout). If you have an old DSLR gathering dust, send that away and breathe a new lease of life into it. A 6-12MP model will be fine, so don’t worry if it’s a good few years old.
What makes infrared so interesting is that it records mainly infrared radiation, which is beyond human vision, so you end up with some weird and wonderful effects – blue skies and water go very dark, while foliage comes out ghostly white. The best conditions for infrared – bright sunshine, blue skies –are also the least effective for conventional creative photography, so you can keep shooting and producing great IR images when you’d normally pack up and head home. Dull days work well too, so overcast weather needn’t stop play.
This tutorial offers a basic insight into creating successful infrared images using a converted DSLR. As you’ll see, it’s child’s play, so even on your first attempt at the technique you’ll produce results that are out of this world.
Castle
Old buildings, such as castles, churches and cottages make great infrared subjects – especially when they’re covered in creepers or surrounded by foliage, which shows off the IR effect brilliantly
Difficulty level: Intermediate
Time taken: 1 hour
What you’ll need
Infrared converted camera
Wide-angle zoom lens Lens hood
Bodiam
All images © Lee Frost
Tripod
117
(optional)
Shooting steps
1 Get yourself ready Choose a location and get set up. With a modified infrared camera you don’t need any additional filters to record IR images. A tripod is handy but not essential. Stop your lens down to f11 or f16 to maximise depth of field and set the ISO to 100 or 200.

2Take an infrared shot If you take an infrared shot with your modified camera straight ‘out of the box’ the images may come out bright red, because the camera doesn’t know it’s an infrared camera. You can remove the colour cast during post-production, but you are better off avoiding it altogether.


3 Create a custom white balance To avoid the red colour cast, you need to create a custom white balance for your modified camera. Check the camera’s instruction manual to find out how, but often it involves taking a shot of something like well-lit grass and getting the camera to base the white balance on that image.
4 Watch the exposure Shooting with the custom white balance set makes a big difference to the look of the image. However, as seen here, underexposure is common with infrared cameras, so be prepared to dial-in up to +2 stops or more of exposure in compensation, to produce well-exposed images.
5Take the final shot Once you’ve got the exposure sorted, take your final shot. Here, aperture priority exposure mode was used, and an exposure of 1/100sec at f11 on ISO 200. The lens was a 1635mm zoom at 16mm on a modified full-frame Canon EOS 5D Mk I. A lens hood was used to avoid flare.
6 Look for other angles Once you’ve bagged a great shot, explore the same subject or scene from different angles to see what else you can come up with. These shots were taken in harsh summer sunlight, which wouldn’t have been great for conventional photography but is ideal for infrared.
1 3 4 5 6 2 118 MASTER B&W PHOTOGRAPHY
INCLUDE FOLIAGE
THE RIGHT WEATHER
Although you can produce great infrared images on a dull day, bright sunshine and blue sky provide the best conditions.
WIDE-ANGLE LENS
Use a wide-angle lens or zoom to capture the scene and include plenty of sky and foliage – a 16-35mm zoom at 16mm on fullframe was used here for the main image.

Trees, grass and plant life show off the infrared effect brilliantly, so choose a scene that contains at least one of the three – ideally all three.

The setup
Infrared options
Convert a DSLR into an infrared camera, or buy an infrared filter and do it cheaply
There are two companies in the UK offering an infrared conversion service – Protech Repairs (protechrepairs.co.uk) in East Sussex and Advanced Camera Services (ACS) in Norfolk (advancedcameraservices.co.uk). Prices start at £210 with Protech and £300 with ACS when you supply the donor camera.
Both offer 720nm and 830nm filter conversions, while Protech also offers 590nm and 665nm. The higher the number, the more sensitive the filter is to the infrared. Most photographers go for either the 720nm or 830nm. The 830nm gives you black and white only images, while the 720nm (used for this tutorial) will record a bit of false colour. The 665nm filter gives you images that combine black and white and false colour, while the 590nm records only false colour.
A cheaper option is to use an infrared transmitting filter on an unmodified camera. Suitable filters include the Hoya R72, B+W 092 or 093 and Kood R72. Cokin also makes a P007 infrared filter for the P-system holder, and there are cheap screw-on options available from Amazon or eBay, such as the Green.L or the Neewer 760IR.
Infrared transmitting filters block out visible light so you can’t see through them. This means you must always use a tripod, compose the scene without the filter on the lens, focus manually rather than using autofocus, then, once you’re ready to take the shot, attach the filter. Because the filter is so dense, exposures will also be long – several seconds in bright sunlight at ISO 1600 isn’t uncommon, which makes a tripod essential and means that any subject movement, such as trees blowing in the wind, will result in blur. You can produce some fantastic results though, even with a cheap IR filter purchased online, so this option is well worth exploring.
119
Right Red alert
It takes just a few basic editing steps to turn the original RAW file into the final striking infrared image

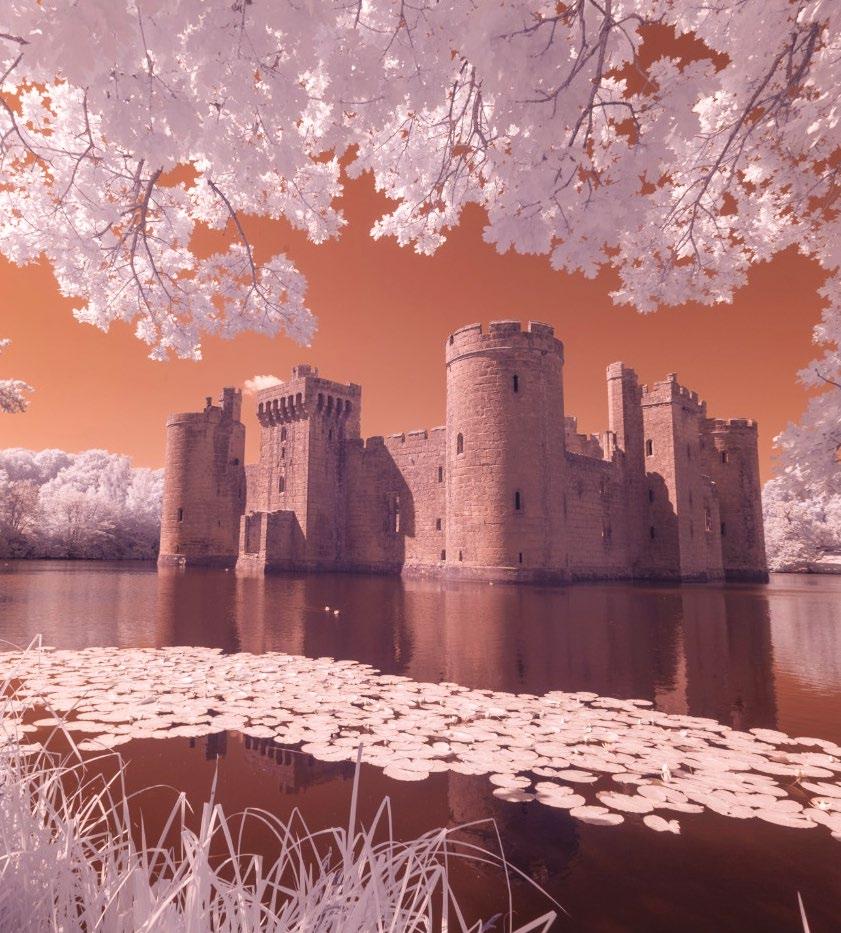
BEFORE
Edit the shot
1 Open RAW file Open the RAW file in Adobe Camera Raw. You will already be able to see the infrared effect clearly. Lens Corrections are then applied and the Auto tab checked. After this, the image should be opened in Photoshop.
2 Convert to black and white If you don’t want to keep the false colour, convert the image to B&W. You could use Silver Efex Pro, or, as here, Photoshop –Image>Adjustments>Black & White. The Red Filter option was also selected in this instance.
3 Correct converging verticals The sides of the castle are converging. To correct this convergence go to Select>All, then Edit>Transform>Distort and pull the top corners of the image up and out as shown. View>Show>Grid can help.


1 3 2 120 MASTER B&W PHOTOGRAPHY
4
Make adjustments If the image isn’t quite punchy enough, boost contrast using Levels or Curves. In this case, Auto Curves did the job. Also, clone out any sensor blemishes and distracting features, such as stray blades of grass.
5 Add Diffuse Glow To enhance the infrared effect, try adding some Diffuse Glow to the image. Create a duplicate layer – Layer>Duplicate Layer – then go to Filter>Filter Gallery and select Diffuse Glow. The default settings are fine.


6 Adjust opacity The Diffuse Glow added to the image here is far too strong, but all you have to do is adjust the opacity of the duplicate layer until you are happy with the effect – in this particular case, an opacity of 35% did the trick.

AFTER 4 5 6 121
Blue hour to black and white
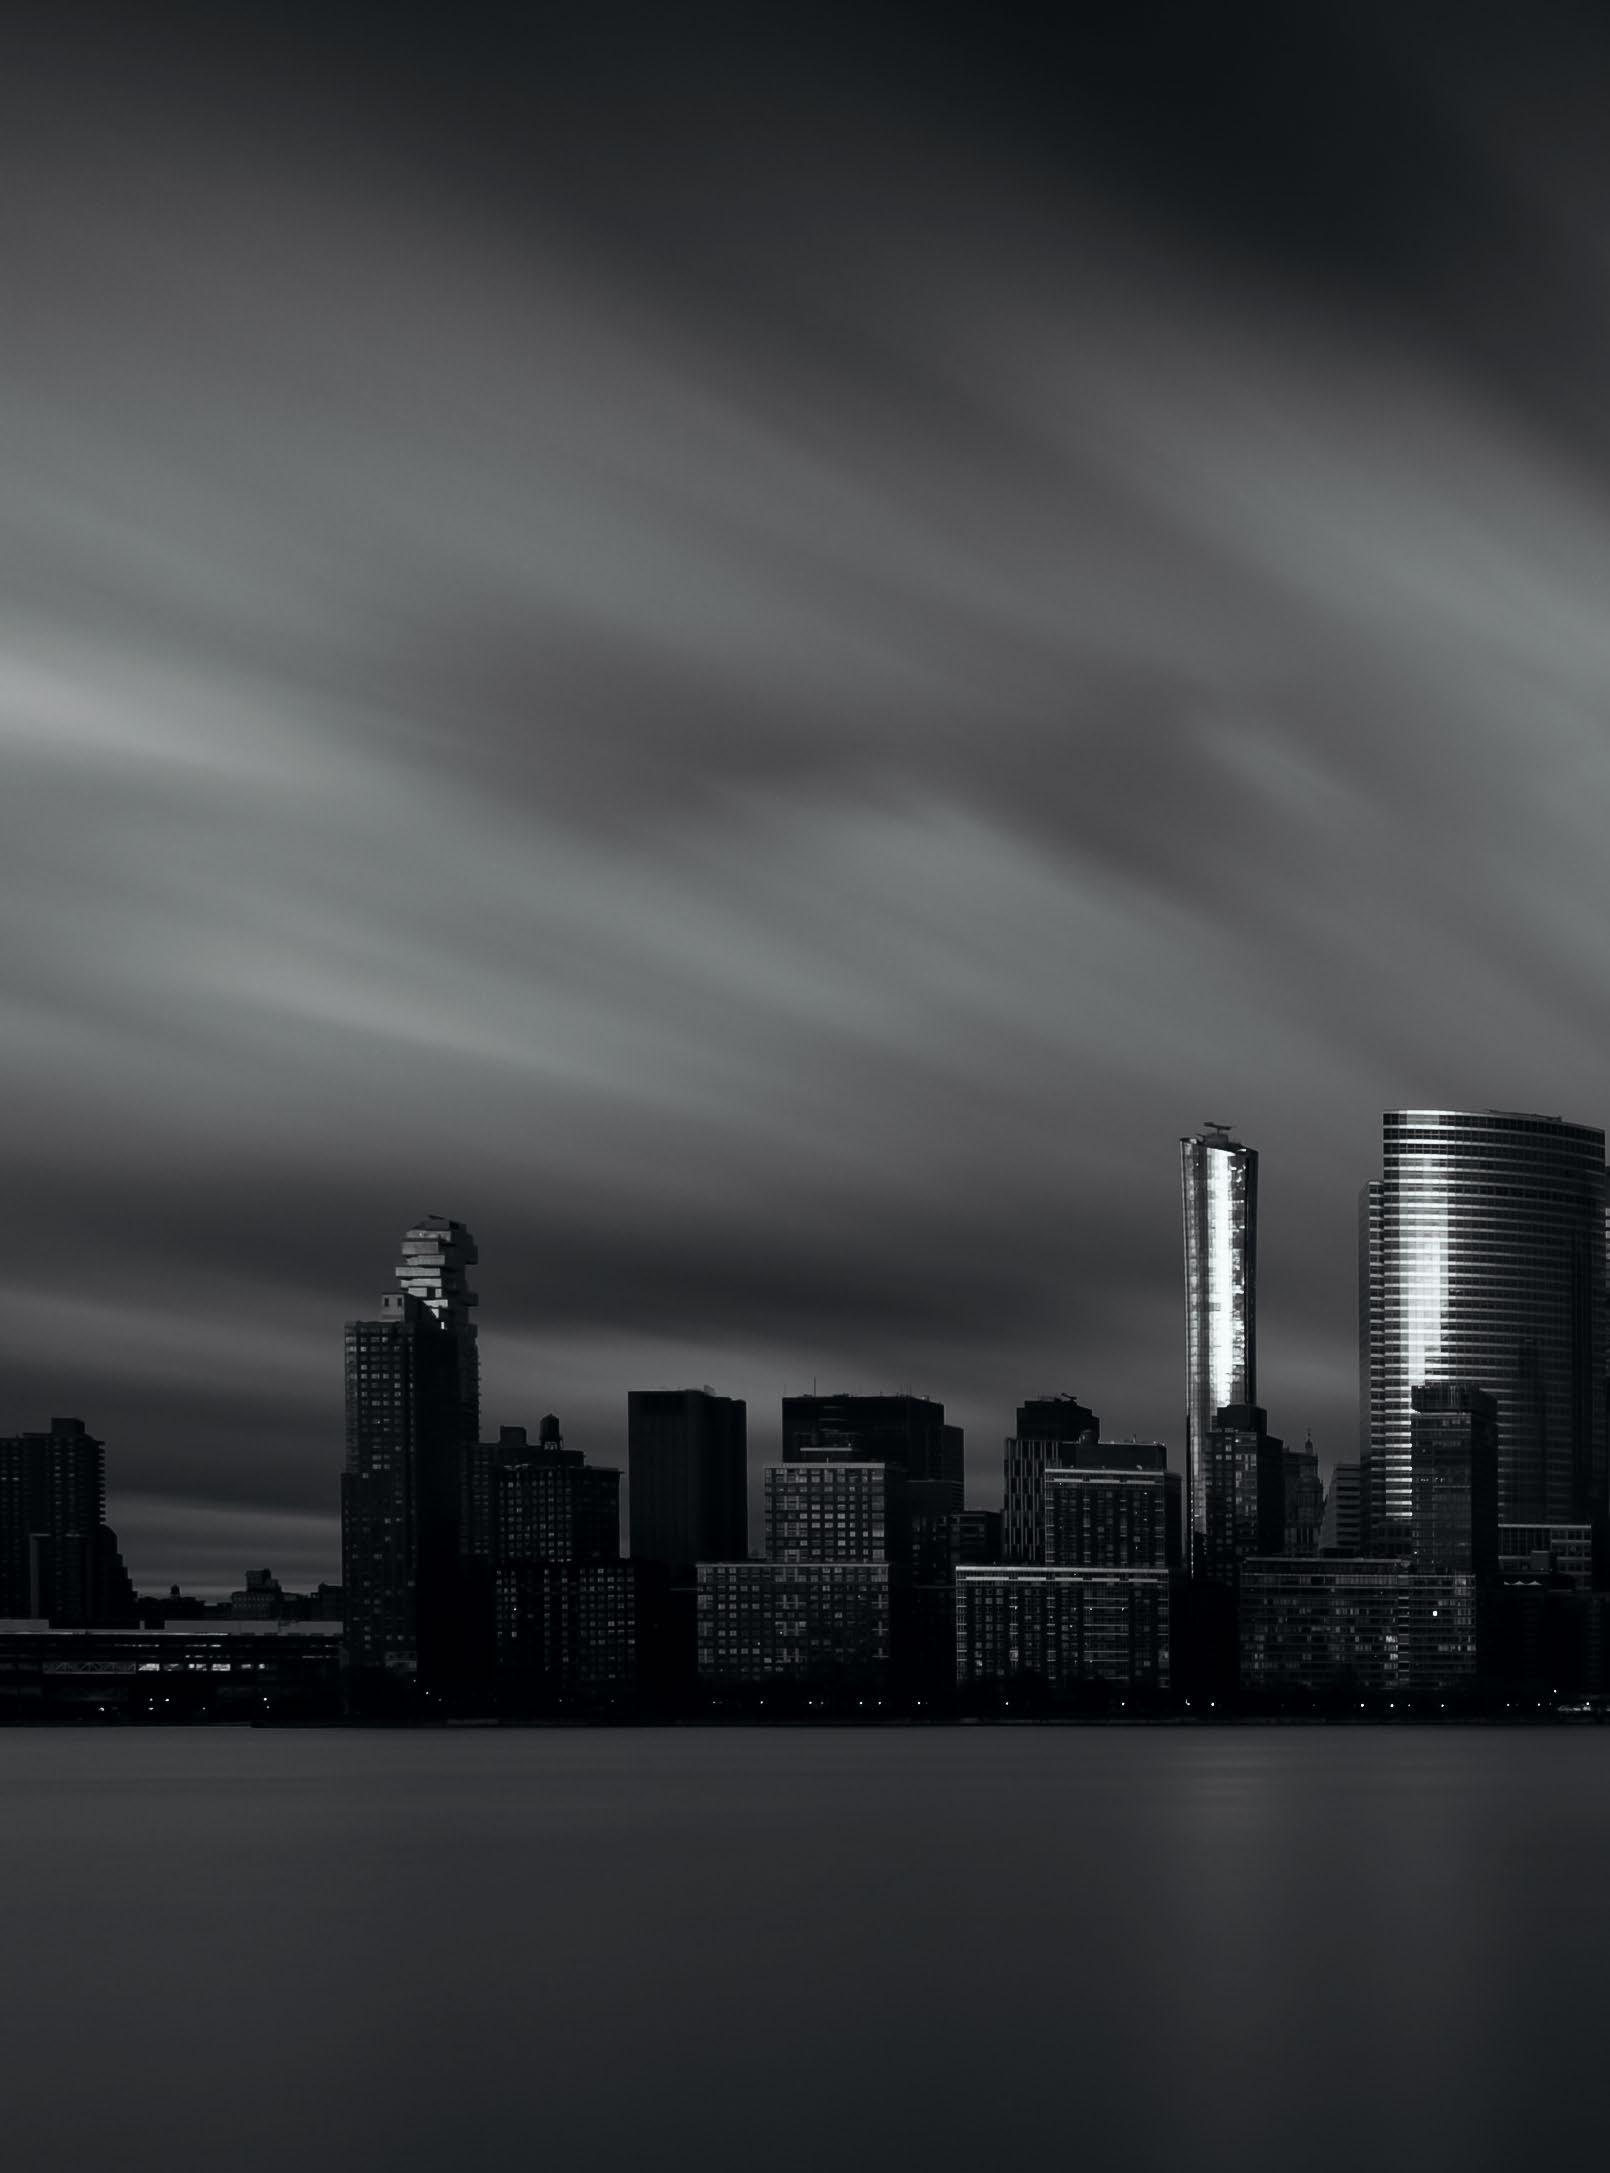
Difficulty level: Easy
Time taken: 90 mins
What you’ll need
DSLR or mirrorless camera
Wide-angle lens
Lightweight but sturdy tripod
Glass grad & ND filters
Lightroom & Photoshop or alternative software
All images © Helen Trust 122 MASTER
B&W PHOTOGRAPHY
Growing up in the countryside I’ve always enjoyed finding escapism in the hustle and bustle of the city. The shapes and patterns of building facades both old and new fascinate me. I also feel the city has a surreal side and finding a good location to step back and take in the vast space of the skyline can be therapeutic. Most city skylines are accessible from various vantage points and often involve water, either on a river bank, canal, lake front or ocean view. Add a big sky and transform it with long exposure
techniques for drama and atmosphere with light and shadow and you can turn a simple city skyline into fine art photography.

Adding a monochrome conversion can transform that image to the next level. Plan your location ahead of time and confirm accessibility and transport routes both early in the morning and late into the evening so you can experience a full range of light and shadows. Grab your camera, a sturdy tripod and a good glass filter kit and capture that city magic.

Helen Trust shows you how to shoot dramatic cityscapes and then turn them into monochrome magic with a simple black and white conversion
123
Shooting steps
1 Location preparation Whether it’s Paris, Venice or New York, plan in advance using the multitude of apps available. Know your transport links and accessibility (Citymapper and Google Maps), weather forecast, sunrise/sunset timings and positioning (TPE and PhotoPills).


2 Find some stability I chose to shoot this cityscape just minutes after sunset at blue hour, so due to low light levels and the lengthy long exposure using a sturdy tripod was essential. But we don’t always want to carry heavy tripods around a city with us so choose your kit wisely.
3 Prepare your composition Use a wide-angle lens to ensure a mix of negative space and skyline coverage. 16mm to 35mm range is ideal but be aware of lens distortion at the wider end – switch to live view and ensure there is enough sky to capture long exposure cloud movement, and check the horizon.
4 Exposure readings Capture maximum contrast from the highlights and lowlights in the scene. Attach your filter holder to your chosen lens. Select your focus point and take your exposure readings. I use Aperture Priority, f/11 and the lowest ISO possible to maintain sharpness throughout the scene and meter from the mid-tones. Finally, lock the focus point.
5Take your long exposure Move quickly – the light is changing all the time. Attach a cable release, and calculate your exposure time using an exposure chart or app from your filter manufacturer (I use Formatt Hitech Glass). Insert your grad (3-stop) and ND (10-stop) filters. Switch to Bulb and take the shot.
6 Check your histogram Always review the histogram before and after taking the shot to ensure you haven’t blown the highlights. Readjust and reshoot if necessary and if time and light allows. I often underexpose the shot to ensure maximum drama but be careful you don’t lose details.


1 3 4 5 6 2 124 MASTER B&W PHOTOGRAPHY
The setup
NEUTRAL DENSITY FILTERS
For perfect long exposures you need some high-quality glass filters. I’ve trialled a few brands but now only use Formatt Hitech due to their extreme clarity and zero colour cast. The filter holder is also perfect for minimising light leakage.
TRAVEL TRIPOD
It’s tough these days to balance stability with having lightweight gear and being inconspicuous. Do your research and find a tripod to meet your needs and budget for city and travel photography. I also use a lightweight ball head for ease and flexibility.
WIDE-ANGLE LENS
Use your best wide-angle lens. Opt for around 20mm to minimise lens distortion, ensuring plenty of sky and foreground space around your skyline.

LOTS OF DRAMATIC SKY
I know you can’t physically set this one up but great city skylines are widely accessible and easy to photograph but the right weather and directional cloud movement can give the image the edge so be patient with the light and the weather.
Aim for maximum contrast in the shot
Look for contrasting light to get the best black and white conversion
As we all know, sunrise and sunset is the best time for fabulous light. When taking cityscape shots look for the most dramatic light on the most prominent buildings, and if you are lucky enough to have all the elements of light, shadow and moving clouds in one place at the right time then use your long exposure techniques to really dramatise the image. Smoothing any water in the foreground and/or capturing directional movement in the sky adds drama and atmosphere which will all lead to a more exciting black and white image in post-production.

125
HOUR TO B&W
BLUE
Edit the shot

1 Lightroom lens corrections Open your RAW file in Lightroom and select Lens Corrections. To minimise the impact of using a wide-angle lens, check the ‘Remove Chromatic Aberration’ and ‘Enable Profile Corrections’ tick boxes.


2Transform function Use the Transform tool in Lightroom to straighten horizons and any remaining wide-angle distortion. Use the Guided feature and place your guidelines on the distorted buildings. Use the content aware fill to sort out the adjustment areas or simply crop.
3 Check the highlights and lowlights With high-contrast shots it’s easy to clip the highlights and shadows, but using the ‘Basic’ sliders and some selective radial filters on specific areas of the buildings you can correct this easily.


4 Black & White conversion Turn blue hour into black and white using the profile browser in the ‘Basic’ tools of Lightroom. I will often use Silver Efex Pro if I can’t find a preferred Lightroom profile as this offers a more dynamic choice.


5 Spot removal I know it’s incredibly dull, but lengthy long exposures can show spots or missing pixels on the image so in Photoshop I always zoom into at least 100% and scan the image for spots. Or, use the Camera Raw Filter tool to scan and remove.
6 Crop or not to crop I love a square crop in all aspects of my photography and to get a real sense of fine art in this shot I felt a square crop on the buildings with a hint of sky movement remaining works really well.
1 3 5 2 4 6
126 MASTER B&W PHOTOGRAPHY
“I always zoom in and scan for spots”


BEFORE AFTER Below After – final edit The final edit and black and white conversion Left Before – Manhattan blue hour The unedited RAW file of this classic New York city skyline 127 BLUE HOUR TO B&W
Shoot a gritty mono portrait
Learn how to capture a moody black and white portrait with this simple lighting setup

Difficulty level: Intermediate
Time taken: 1 day (max 8 hours)
As a photographer, light and shadow are the tools you’ll need to harness in order to capture your subject. Most portraiture photography is bright and full of light in order to clearly see the subject and capture them in a flattering manner. For the more dark and gritty approach, it’s less about light and more about the shadow. Here we’ll be doing the latter in order to create a simple but striking masculine mono portrait. At first glance it may appear that we’ve used two lights for this shot – a key light to the
right of the camera and a low powered light to the left – but this is not the case. Instead, to keep things nice and simple, we’ve opted for a one-light setup and then used a white reflector to bounce light back onto the subject to fill in some of the shadow. A reflector is such an inexpensive but useful piece of kit, and this technique is a great showcase for what you can achieve by using one. If you don’t own a ‘proper’ photographic reflector, then simply using a large piece of white card will work just as well.
Right Shadows and light
All you need to recreate this striking lighting effect is a single studio strobe or flashgun with small light modifier and a reflector to help add some fill light into the shadows
All images © Tom Carlton
What you’ll need
DSLR or CSC
Telephoto lens
A black sheet or backdrop
A flash or other bright light source
A reflector or large piece of white card
Adobe Photoshop
128 MASTER
B&W PHOTOGRAPHY

129
Shooting steps
1 Set the background In order to keep the background dark you will need to set up either a black studio backdrop, a large deflector (like we have), or even a black bedsheet, which will work just as well. It will also need to be placed far enough away so that the light from the flash doesn’t hit it.


2 Use an off-camera flash Switching off all of the room lights and using a studio strobe to provide a blast of flash will enable you to keep the background dark while keeping your subject well lit. A light modifier, such as a small beauty dish, is advised for keeping the light focused yet diffused.
3
Add in a reflector Now it’s time to place a large white reflector on the opposite side of the model’s position so that some of the light from the flash will bounce back onto your subject. This will fill in some of the shadows so that their body isn’t entirely lost to darkness.

4 Camera setup When shooting portraiture, it’s important to use a telephoto lens so that facial features don’t get distorted. We used a 135mm lens, but anything that is 85mm or longer should work. Just make sure the lens is nice and sharp, as this technique is all about drawing out details.
5 Get the light right The lighting wants to be positioned above, to the side and slightly behind where the model is going to be seated. We want the light to glance off the side of their face and slightly catch the chest but also the back of the shoulders so that their body will stand out.

6Take the shot Before even taking a single shot, make sure that the camera is shooting in RAW, as this is imperative to the editing technique we will be using later on to complete the effect. Now take a test shot, and then adjust the position of the strobe and/or your model if it’s required.

1 3 4 5 6 2 130 MASTER B&W PHOTOGRAPHY
The setup
BLACK BACKDROP
If you don’t have access to a black backdrop then you could always use a black bedsheet instead.
REFLECTOR
A white reflector is used to bounce some of the light back onto the subject to fill the shadows.
FLASH
One flash is all that’s needed for this technique. If you don’t have a flash then a bright desk lamp could also work.
Why a beauty dish is such a versatile light modifier Use a diffuser

As the name suggests, the beauty dish was originally designed for beauty portraiture and individual headshots. When attached to the front of a flash, the light is bounced around the metallic dish and onto the subject, creating a diffused effect. The resulting light is somewhere between that of a soft box and a bare flash. Some beauty dishes come with a plastic honeycomb grid, which can be snapped to the front in order to further channel the light and reduce its spread. We opted for a beauty dish with a grid for our portrait so that we had a pleasing soft light that was focused on our subject, and had a limited amount of light spill to keep the background in shadow.

131
SHOOT A GRITTY MONO PORTRAIT
Edit the shot
1 Convert to mono Start by opening the RAW image in Photoshop – this will bring up the Camera Raw interface. Next, locate the saturation slider and set it to -100 to drain all the colour from the photo.


2 Boost contrast and clarity Now, increase the contrast to +35 to boost the tones within the image. After that, increase the clarity slider to +75 to further boost the contrast, This will also sharpen details within the portrait.
3 Bring back the highlights Locate the highlights slider and begin to drag it slowly to the left until you notice the details in the brightest highlights start to reappear. A value of around -50 worked well for our shot.
4 Adjust the temperature Set the temperature to a value of 3,000 – this will emphasise textures within the skin. However, this may also darken the image slightly, so to counter this, increase the exposure to brighten it back.
5 Add a graduated filter The chest area in our photo is still too bright, so we’re going to pick the Graduated Filter tool, set the exposure to -0.70 and drag out a gradient across the area to darken it.
6 Sharpen to finish Press the Z key, then click on the Detail tab below the histogram. In the sharpening options, set the amount to 50, the radius to 3, the detail to 25 and the masking to 0.

Below Mono conversion
Our striking black and white conversion has been made entirely within the Camera RAW interface in


1 3 5 4 6 2 132 MASTER B&W PHOTOGRAPHY

BEFORE AFTER 133 XXXXXXXXXXX SHOOT A GRITTY MONO PORTRAIT
Difficulty level: Intermediate Time taken: 1.5 hours
Create a black and white scenic shot with a vintage style


monochrome landscapes Fine-art
134
MASTER B&W PHOTOGRAPHY
Landscape photography is a genre that benefits greatly from monochrome treatment. Black and white landscapes conjure up images of the work of Ansel Adams and others experimenting with photography in earlier days of the medium. While many landscape scenes are all about colour, there are occasions when monochrome is a better option for conveying the atmosphere of a location. Sometimes an absence of colour enables the viewer to appreciate the weather conditions that were present at the shoot, by calling on their other senses. A colourless image can encourage the audience to imagine
the texture of a rock, the cold air on their face, and the sound of water lapping at a shoreline. However, as we have explored elsewhere this issue, the best black and white images can only be achieved when the photographer commits to a monochrome way of thinking.

In this project we’ll explore how you should adjust your camera work to optimally distribute the tones when capturing a black and white image. Then we’ll consider a post-processing option that works to enhance the timeless feel of a landscape scene and helps to capture the natural atmosphere that the location has to offer. Let’s get going!
Timeless tonality
By capturing an image with black and white processing in mind, the optimal shadow density and highlight intensity can be captured in the field, making the conversion more successful
All images © Peter Fenech
What you’ll need
Camera with PASM control
Rugged tripod
ND filter
Software with curves function
135
Shooting steps


1 Explore the scene For this type of image you want a clean composition, so walk around the location to explore multiple angles. Alter the camera height and pitch to experiment with perspectives, and look for a clear fore, middle and background, with defined shapes.
2 Alter focal length Fine-tune the composition by altering either the focal length setting or the camera-subject distance. Look to arrange the elements to create a strong sense of direction, or to divide the frame into identifiable zones – an approach that suits contrasty monochrome images.
3 Slow things down For a subtle introduction of movement, add a neutral density filter to lengthen the exposure. Here a two-to-eight stop variable ND was attached to the front of the lens to precisely control the shutter speed, adding motion while retaining detail.


4 Control using aperture Adjust the shutter speed by setting the aperture in Aperture Priority mode. This enables you to alter the style of your image quickly, by adjusting two parameters simultaneously –motion blur and depth of field. This helps to find the balance between sharpness depth and water motion in the scene.

5
Use lowest ISO Early films were not very sensitive, so to emulate a similar shooting process set the lowest ISO possible. This helps to slow the exposure and create a fine grain, guiding the composition process. Take care of highlight clipping at extended low ISO settings, however.
Vary exposure For this image I want bright highlights to glow against dense shadows, for a more potent filmic quality. To achieve this, push the exposure as high as possible without blowing highlight detail – it is better to darken shadows than to brighten them. Metering in this shot has been done from the ocean surface.
6
1 3 4 5 6 2 136 MASTER B&W PHOTOGRAPHY
WIDE-ANGLE ZOOM
A zoom lens offers more framing options. A 15-30mm was used here to emphasise the foreground.

VARIABLE ND
Cut light by custom amounts to control the shutter speed as required for the scene in front of you.
The setup
Cropping options
Add to the impact of your shot by changing the aspect ratio
An often-overlooked image parameter is aspect ratio. Beyond simply being the shape of the sensor in the camera, the format of an image is an important choice for the photographer, and it can greatly impact the look and feel of a photo. While most sensors today have a native 3:2 aspect, for black and white images it can sometimes be more effective to crop to an extreme shape. A panoramic (extreme wide) frame can help the viewer focus on the horizon in a landscape and the horizontal layers radiating from it, while a square aspect can offer a minimalist view.

FULL-FRAME CAMERA
While not essential, a fullframe sensor offers better depth-of-field control, ideal for moments when shallower focus is desirable.
PRO TRIPOD AND BALL HEAD
A sturdy tripod with low-level capabilities in a range of environments is an advantage, while the ball head enables more dynamic framing.
137 MONO LANDSCAPES
Edit the shot
1 Standard adjustments Start by correcting any tonal imbalances and setting the black and white points. This will ensure a good amount of contrast before moving on to the monochrome conversion.
2
Mono conversion If working in Lightroom or Camera Raw, toggle the Black and White button to convert the image to monochrome. By default the image will likely be a little flat, so finalise the global tonal adjustments to ensure good overall contrast.


3
Curves Let’s introduce a faded look to enhance the misty atmosphere, while adding overall contrast. Lift the bottom of the curve up, while spacing the lower and upper midtones. Add a highlight ‘dip’ to hold sky detail.


4
Darken the sky A fog bank is partially obscuring the horizon, but above this there is some detail in the sky. To add back some structure here, the Gradient Filter tool (M) has been used to drag in a darker tone at the top of the composition and add weight.
5 Dodge and burn In Photoshop, use the Dodge and Burn tools to brighten areas of upper midtones, and darken some lower midtones. We’ve used the Adjustment brush (K) here to selectively add back some negative blacks and positive whites, to create some local contrast and shape the rock and sand.

6
Extract texture In a RAW editor, use the selective adjustment tools to introduce some clarity and texture. Here the Lightroom Adjustment brush proved useful for bringing out more of the beach patterns, with Clarity set to +33 and Texture at +24 on a soft brush.

The final shot is more like the atmosphere of the real scene. By shooting for mono conversion, a timeless style is achieved without

Right True atmosphere
1 3 5 2 4 6 138 MASTER B&W PHOTOGRAPHY


BEFORE AFTER 139 MONO LANDSCAPES
Capture striking portraits at home
Create dramatically lit portraits at home with this single-light setup


Difficulty level: Intermediate
Time taken: 1 day (max 8 hours)
In portrait photography, it’s not always about over-complicated lighting setups and having multiple strobes firing all at once. Sometimes keeping things simple is just as effective for capturing striking imagery. In this tutorial we’re going to be using a humble home-made light modifier teamed with a single light source in order to effectively draw focus to our subject.
In terms of setup, all you’ll need is a nice open space to shoot in, a DSLR or mirrorless, and a single light source. We’re going to be using a Godox V860II flashgun, however this technique could very easily be adapted for use with studio strobes, or even a bright desk lamp. The key to achieving this lighting effect is not necessarily the light itself, but rather the way in which we modify it in order to generate a perfect letterbox of light to pick out a specific part of the model’s face.
Right
Striking light
By using just a single light source and a home-made light modifier, you too can inject bags of drama with this incredibly simple but effective portrait technique – read on to find out how it’s done
© Tom Calton
What you’ll need
DSLR or mirrorless
50mm lens
A blank wall or backdrop
A flash or other bright light source
Small cardboard box
Craft knife
Sticky tape
Adobe Photoshop
MASTER B&W PHOTOGRAPHY 140

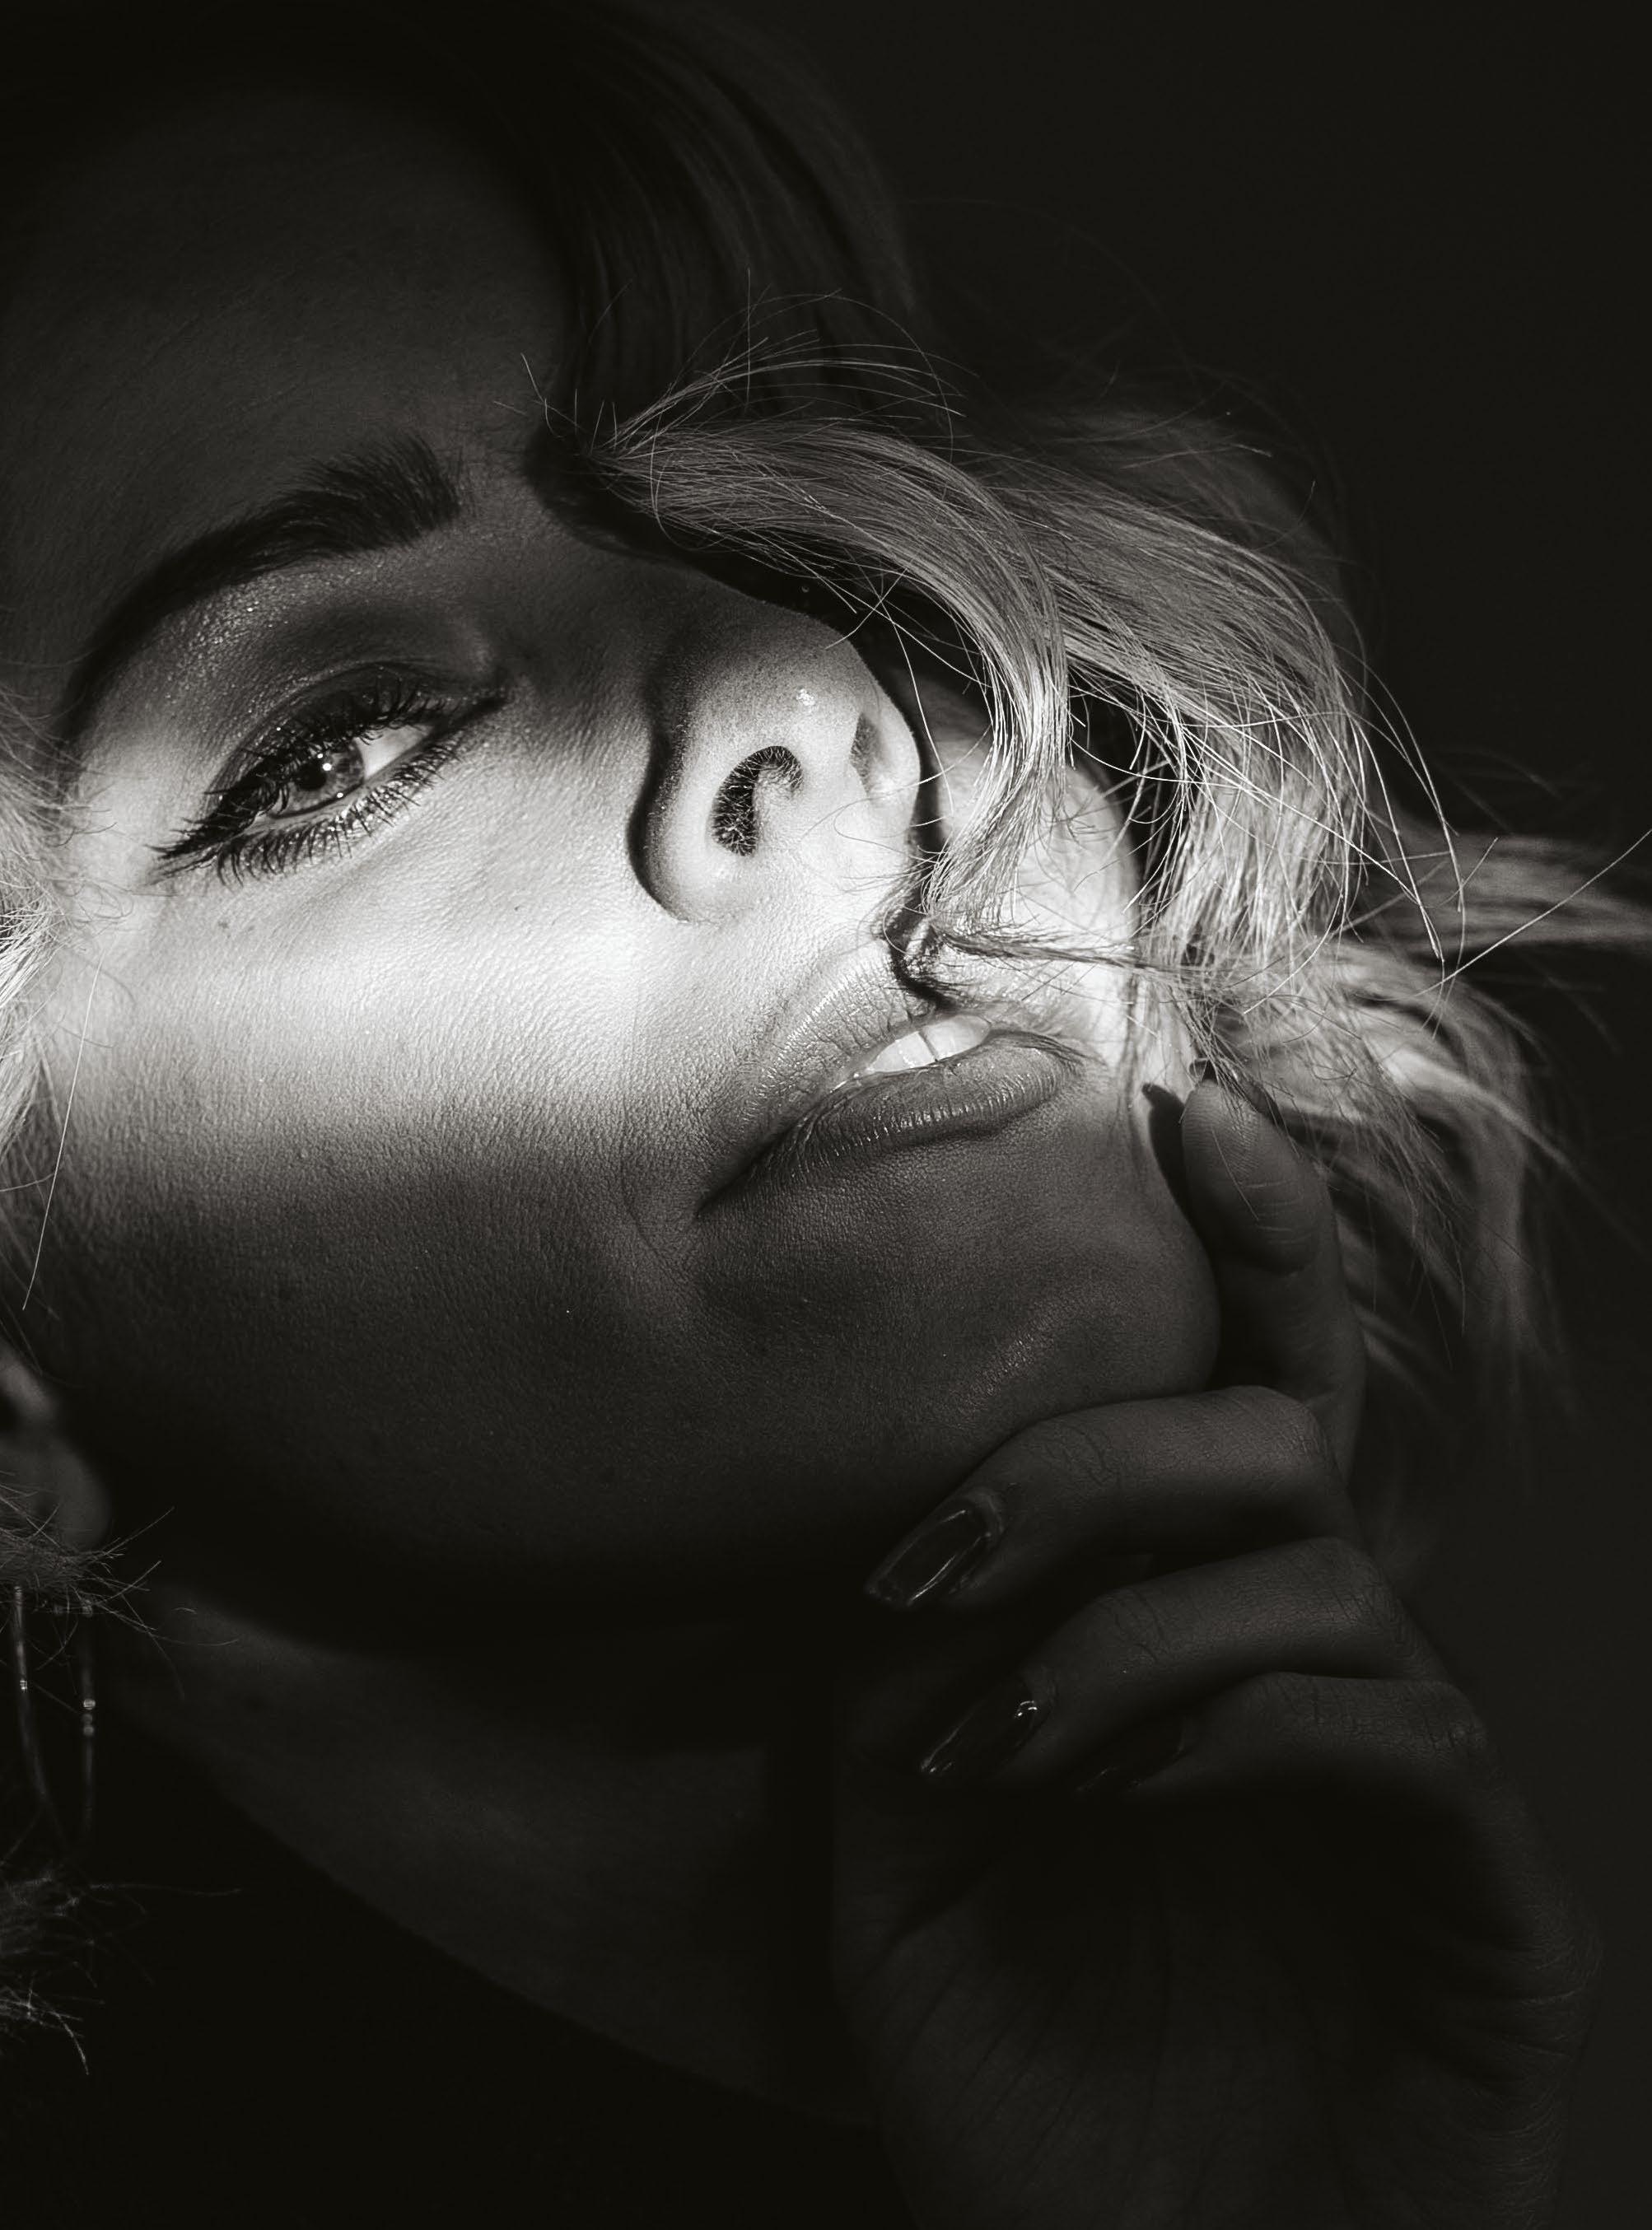
141
Shooting steps
1 Set the scene Find a nice open space to work in, ideally one that has a large white or neutral wall to shoot against that’s free from shelving or photo frames. Alternatively, you could use a white studio backdrop or plain bed sheet attached to the wall to give you the same effect.


2 Camera setup When capturing portraiture it’s important that you use the right kind of lens for the job. A lens with a focal length of 50mm or longer is ideal so that the facial features of your model aren’t distorted. Wide-angle lenses will distort the face and create an unrealistic appearance.


3 Lighting levels Whether you’re using a studio strobe, flashgun or a desk lamp, your light source needs to be bright enough to overpower the ambient light in the room. If your light isn’t bright enough, you may need to turn off all of the room lights and black out any external windows.

4 Modify the light In order to achieve a thin sliver of light, we’ll need to use a light modifier to narrow the spread of light. We opted to make a simple modifier ourselves using some cardboard, which mounted to the front of our speedlight. Find out how you can make your own on the next page.
5 Position your lighting With your light modifier attached and the model in place, move your light until it’s casting as desired over your model’s face. If the flash has a modelling light, use this to guide you. If it doesn’t, take a test shot and refine the position accordingly –repeat until correct.
6 Get the shot Before you start taking photos, make sure that you’re shooting in RAW format as this will give you more flexibility when it comes to editing later. Feel free to change the angle and height of the light for different effects and experiment further by highlighting different features of the face.
1 3 4 5 6 2 142 MASTER B&W PHOTOGRAPHY
The setup
WHITE BACKGROUND
Although we want the background to be dark, shooting against a white backdrop will allow enough separation between it and your subject so that you can still make out their features in the shadows
LIGHT SOURCE POSITION
In order to generate a crisp letterbox of light, you may find that you’ll need to position the light source closer to your subject then normal. Don’t be afraid to move it closer to your model once they’re in position
MODEL’S POSITION
To ensure that the background stays reasonably dark and isn’t accidentally lit by the light source, position your model at least 1-2 metres away from your backdrop
Why not have a go at making your own modifier? Get crafty
If you don’t have access to any professional light modifiers you can easily make one for your flashgun using a few household items. All you need is a suitably sized cardboard box, some thick black card, a craft knife and some sticky tape. Start by cutting a hole in one end of the box so that the head of your flashgun is able to squeeze snugly into it. Next, carefully cut a small slit in the black card – this will create the letterboxstyle lighting effect. Finally, cut a hole on the opposite end of the box and place the black card over it, securing it in place with tape. Place your light modifier over the end of your flash and you’re all set!


143 PORTRAITS AT HOME
Edit the shot
1 Convert to mono Start by opening your RAW image in Photoshop – this will bring up the Camera Raw interface. Now, set the Saturation slider to -100 to remove all colour and turn the image black and white.


2 Flatten the tones Increase the Blacks slider to +100, the Shadows to +100 and then decrease the Highlights slightly to around -25. This will broaden the dynamic range of the image before we start to boost the contrast.
3 Increase contrast Set the Clarity to +100 and the Contrast to +60 to add bags of depth to your mono conversion. If the whites in your photo look a little dull, increase the Exposure slider until they brighten.
4 Sharpen to finish Finally, switch over to the Detail tab (underneath the histogram) and then set the Amount to 50, the Radius to 3 and the Detail to 50. Make sure you save the image as a JPEG.
Below
Quick tweaks
Applying a simple editing technique in PS has given our image a high-contrast, black and white finish that further bolsters the dramatic lighting effect


1 3 4 2
144 MASTER B&W PHOTOGRAPHY
“Sometimes keeping things simple is just as effective for capturing striking imagery”


BEFORE AFTER 145 PORTRAITS AT HOME
INSPIRATION
148 WHY SHOTS WORK
What makes a great black and white photo? That’s what we’ll be asking of two popular shots

152 SHOOT LIKE A PRO: MONO PORTRAITS
Go behind the scenes with Canon ambassador Clive Booth as he takes photos of a dancer
162 SHOOT LIKE A PRO: STREET WISE
Discover the essentials of street photography when you’re taking photos in black and white
170 PRO INTERVIEW
Anouk Masson Krantz has spent over a decade exploring the USA’s cowboy culture
146

147 © Anouk Krantz
WHY SHOTS WORK
NAME:
DATE:
KIT:
WEBSITE:
The Pro: Benny Van den Bulke

Entrance
20 December 2016
Nikon D800E 12-24mm 4.5-5.6II DG HSM
www.bennybulke.com
f/6.3 1/60 sec ISO 800
“When you go to a cool location, always try to think outside of the box. Try out various angles and build it up from there. There is no such thing as bad light!”
GET CREATIVE
Architectural photography can seem quite a literal genre, with its focus on capturing shapes, lines and textures. However, it is sometimes desirable to break this up with unexpected features.
“The challenge here was definitely that this is an over-photographed location in Antwerp,” Benny explains. “To make an image that stands out from the masses, you need to be a bit creative and start thinking outside the box. Although this is obviously an architectural shot, it has some story attached to it. The person in the light is looking into the sky, as if it were a spotlight pointed at him.”
With a preference for black and white fine-art photography, Benny has become known for his street and architectural images. Influenced by his graphic design school background, his images are characterised by their crisp lines. Benny now runs one-onone and full-day workshops.
© Benny van den Bulke
FULL RANGE
In graphic urban images, ensuring you include a full tonal range can help to emphasise shape and form in a scene. Benny’s shot features both deep shadows and bright highlights, helping to bring out the shapes in the walkway. Sometimes this can be achieved through careful framing, including only those zones which add to this intended effect. This can compensate for different lighting. “With these light conditions, I wouldn’t change much in the image,” says Benny. “But with harsh light, it would have been a different image.”

MASTER B&W PHOTOGRAPHY 148
CENTRAL FRAMING
While it is often advised to follow the rule-ofthirds and other photographic devices, there are times when a centralised shot works best. Here, the positioning of the figure in the middle of the composition draws the eye straight into the shot, complementing the direction of the lines in the image. In detail-heavy shots like this, a spotlighting effect also helps to focus attention.


ISOLATED FEELING
In street scenes and architecture shots, a sense of isolation is effective, as it is not a commonly experienced feeling in a busy city. “Normally, I take unposed street shots but that day, there was low light and almost no one passed, so I asked a fellow photographer if he would stand in this place where there was some light,” says Benny. This helps to add a narrative aspect and engage the viewer.
149
WHY SHOTS WORK
TITLE:
DATE:
KIT:
2021
INSTAGRAM:
“Due to my interest in minimalism, I prefer to use simple and quiet combinations.”
Mostafa Nodeh
Mostafa Nodeh is a self-taught photographer based in Guilan, on Iran’s Caspian Sea coast. He is known for his captivating minimalist landscape photographs in black and white, which are inspired by conceptual photography and rooted in themes, ideas and symbolism.
COLOUR REDUCTION
The transformation from colour to a black-and-white image has a dramatic impact on the visual appearance. It means that the viewer isn’t distracted by bright colours and, instead, the focus is on the structure and texture. “One of the characteristics of a good photograph is its feeling and effect on the viewer,” says Mostafa. Here, this black-and-white image transports the viewer’s feelings and takes them into another world. With the colour almost fully reduced, the different elements in the photo are contrasted visually and the tree stands out even more.

FOCAL POINT
Mostafa opted for one of photography’s most common and effective methods for focusing on the main subject, the rule of thirds. Imagine two horizontal and vertical lines dividing the picture evenly into three parts and intersecting at a total of four points – the composition is often at its best when the subject hits one of these points. “I try to place the main subject of the photo as much as possible on the intersections, so that the composition captures attention, directing the viewer’s gaze to the subject,” Mostafa says.
@nodehphoto
Canon EOS 7D
Canon EF-S 18-135mm Tripod
The Poem of Silence
f/10 1/400 sec ISO 100
© nodehphoto
MASTER B&W PHOTOGRAPHY 150
NEGATIVE SPACE
In terms of its size, the tree is the smallest element in the photograph, but it is also the most significant. It is enhanced by the wide background, which provides a negative space that artfully highlights the tree. “The combination of clouds in the background makes this a simple monotone photo,” Mostafa says. The structures of the clouds are reflected in the outer elements of the tree, creating an interesting interplay, while the extensive background gives the overall image a surreal effect.

AUSTERE SIMPLICITY
The photograph radiates a sense of calm and opens up an expanded view of an image that no longer seems to be quite real. “To me, minimalist photography is an art, in the same way that artists learn how to omit the extra elements that seem to be essential in everyday life,” Mostafa says. By reducing the image and concentrating only on the key elements, they are depicted in their essence. Mostafa has twisted the concept of time and space, offering the viewer room for speculation and further imagination.
151
BALLET A day at the
 Lauren Scott joins Clive Booth at the Birmingham Royal Ballet to capture portraits of the Cuban-British director and dancer Carlos Acosta CBE
MASTER B&W
152
© Clive Booth
PHOTOGRAPHY
Clive Booth


Our guest editor needs no introduction. After 20 years as a graphic designer, Clive decided to follow his lifelong ambition of becoming a pro photographer and filmmaker. The British Canon Ambassador is now a leader in shooting atmospheric fashion, beauty and portrait imagery.
@cliveboothphoto www.clivebooth.com
Don Quixote was originally published as a two-part novel in 1605 and 1615, by the Spanish writer Miguel de Cervantes. Titled The Ingenious Gentleman Don Quixote of La Mancha, its themes cover romance, chivalry and adventures aplenty. The vivid story of Don Quixote was then later composed for the opera in 1896, and first performed in Berlin in 1898.
While you might be here for photographic insights, not a history lesson, some context helps to set the scene of this month’s pro shoot – a shoot that features two leading roles.
Digital Photographer has been fortunate enough to receive an invitation from Birmingham Royal Ballet (BRB) to witness our guest editor Clive Booth in action. He has been given a generous two-hour slot with Carlos Acosta CBE, the retired dancer and now director responsible for creating a sparkling new production of Don Quixote for the BRB.
Clive, who already has a strong working relationship with the ballet company from past shoots, will be photographing Acosta as never seen before. He’ll be applying his distinctive visual style of soft-focus and soulful poses, and doing so with a whole load of professional Canon kit (Clive is an active member of the Ambassador Programme).
I’ve interviewed Clive before (see issue 239), so I knew his love of Canon kit and a tendency for perfectionism, but what I didn’t know was the visual outcome he had in mind this time. Clive, who is a true professional in more than just name, knows that preparation is key for a successful outcome. He always puts together a mood board of ideas and does plenty of research on his subject or, when appropriate, a client brief, to ensure the best possible result.
Whatever you’re shooting and however prolific your job is, going in with an idea is always better than winging it. True to form, Clive has already created a Pinterest board of inspiration and sent it to me a week ahead of the shoot –a great way to clarify his thinking and to get feedback on ideas beforehand. In doing so, he was also able to request certain props from staff members at BRB to be made available for use on the day. Following two years of England being in and out of lockdowns (Clive himself was self-isolating just days before our shooting date), this is his first major job ‘post-Covid’. “I’m always scared of failure and I get so nervous before a big shoot like this one,” he says. “But that fear ensures I plan properly, that I know how to handle the lighting, the kit, that I arrive early enough to set everything up and test it...”
153 DRAMATIC PORTRAITS
Canon eye tracking technology
Clive activated the eye detection autofocus function on his camera for precise portraits


Many pro mirrorless cameras now feature eye tracking or eye detection but, arguably, Canon has led the way here. Clive enabled the Eye-detection option from the shooting menu of the Canon EOS R5 and set the subject to People. This allowed him to leave the camera to do the heavy lifting, while he could spend more time interacting with his subject.
Calling on its AI-based ability to track and detect the eyes of subjects, on this shoot, the AF worked even when Carlos’s features were partially obscured by his hands or when only one eye was visible. This allowed Clive to keep up a relationship with his sitter and avoid spending too much time checking that his images were sharp enough.
When I get to BRB HQ on the morning of the shoot, there’s a cool but clear January mood hanging over the city of Birmingham. As expected, Clive is completely set up already, helped by his assistant for the day Mark Spencer (www. mark-spencer.com, Instagram @spencercollection), who is a fantastic photographer in his own right and a good friend.

A dance rehearsal studio has been turned into a blackout space for Clive to use, and on entering I hear some laid-back retro vibes playing out. It makes sense; music has a wonderful ability to evoke emotions and the right playlist can help clients and subjects to relax, as well as set the tone and put a nervous photographer at ease.
Greeting Clive at his large Eizo monitor, which is set up on a tabletop ready to review images later, I ask him about the plan for the morning. “This monitor has already been calibrated with the lighting set as it’s going to be,” he explains, looking back through his Pinterest mood board on-screen to keep it fresh in his mind.
“We’ve got two locations today. We’re starting in a studio upstairs with fantastic floor-to-
ceiling windows and mirrors. I’ve already shot in there before, so a recce wasn’t needed. Then, we’ll be back down here and I’ll be using continuous LED lighting for some more dramatic closeups.” This will ensure a range of compositions, and also allow Clive to try some low-key shots.
When Carlos arrives shortly after, we exchange greetings and Clive explains again where and what we’ll be shooting, and how the morning will pan out. Whether you’re well-acquainted or working together for the first time, letting your subject know what to expect is good practice, as it can make them feel more comfortable. We only have a limited amount of time with Carlos, so this approach ensures that everyone is on the same page with timings.
As promised, the shoot starts upstairs in an expansive and airy studio with plenty of window light. I notice Clive warming up, asking Carlos to make himself seated, he starts with the Canon 85mm lens and fires off a few frames from a distance, quickly checking his settings and results as he goes. He works quickly and is adept at reading the room – both in terms of the light and his subject’s responses to being photographed.
MASTER B&W PHOTOGRAPHY 154
According to Canon, when the EOS R5’s People detection setting is enabled “people can be tracked even if they are wearing a mask, helmet or sunglasses”


f/2.8 1/50 sec ISO 200 f/2.8 1/125 sec ISO 200 f/1.2 1/1000 sec ISO 100 WINDOW LIGHT x3 © Clive Booth 155 DRAMATIC PORTRAITS

WINDOW LIGHTING © Clive Booth f/1.2 1/250 sec ISO 200 156 MASTER B&W PHOTOGRAPHY
After an hour or so, which rushes by at an alarming pace, we take a quick break and move back to the blackout studio and an LED continuous lighting setup. “The continuous light allows me to experiment and deliver a wide edit in a short time,” says Clive. One light is positioned over Carlos’s head and another is set to a 45-degree angle.
“The hanging light is a 1x1 bi-colour LED with light ball attachment, while the main light is a 2x1 bi-colour LED with a softbox and grid. The colour temperature of the lighting is 3500K, so it’s a warmer and more comfortable environment in which to work. The camera’s white balance is set to Auto, as I’m going from two different locations and colour temperatures.”
We’re joined by BRB’s principal dancer Tyrone Singleton, whom Clive met at The Photography Show in 2017 when Tyrone had


Clive’s considerations when shooting this scene
DRAMATIC PORTRAITS
attended one of his talks on the Canon Live stage. Tyrone is an accomplished photographer himself and is helpful to have on set for guidance and feedback.
“We’ve collaborated on several ambitious projects now, and I know I can call on the expertise of Tyrone to tell me what to look for – whether Carlos’s hands and poses are accurate, that sort of thing,” Clive says.

A world-class dancer should be a dynamic subject when it comes to posing, and while Carlos certainly needs no aid to go from looking elegant or dramatic in a second, Clive still uses some regular prompts to guide him and offer reassurance.
In the early part of his photo career, Clive worked alongside fashion master Nick Knight. “He rarely gave advice, but I was told early on, ‘Clive, don’t get bogged down in the technical. Think about the performance. Always think about the performance.” “
1
Positioning Clive set up a chair in the studio, the ideal prop for getting varied poses from Carlos. Positioning his subject near the large window ensured that the light would be even and flattering.
2 Eye autofocus Canon’s eye-detection locks onto the target, even through Carlos’s fingers. “With the new cameras, it’s almost doing it all for you. I lose the technical and focus on the visual,” says Clive.


3 Aperture priority Using a semiautomatic mode left the camera to decide on some of the settings. Clive still remained in control of the aperture, which was set wide in keeping with his style.
4 Add fill light With the window light being directional from one side, Clive wanted fill light from a silver reflector to illuminate the other side of Carlos’s face in shadow. Assistant Mark was on hand to help.
5 Different focal lenses Clients often require a range of framing options. By swapping between a 24-70mm, 50mm and 85mm lens, Clive captured intimate closeups, as well as environmental portraits.
6 Diverse poses It can pay to encourage your sitter to think of emotions or characters. Clive guided Carlos into some poses with demonstrations, taking a series of shots with his jacket and watch removed.
157
Hands in the air Clive explores different angles and poses, calling on Carlos’s elegant lines and theatricality as a professional dancer
“That’s great,” he says to Carlos, motioning for his hands to stay in front of his face. “Amazing, love it. Hold that.” These small but positive affirmations keep up the energy and pace in the room, softening the atmosphere. “I don’t always show subjects my images straight out of the camera, but here it feels right. Carlos is a natural, understandably, and I wanted to show him the magic.”
Clive, by his own admission, doesn’t get bogged down with settings, and yet he regularly mentions Canon’s Eyedetection.
Clive’s photography kit essentials

“If I had to shoot with just one prime lens, it would be this one,” says Clive. The wide maximum aperture suited the
Carlos aware of the frame size so that he knows where to place hands, and avoids having them cut off awkwardly. “I don’t crop my images heavily, if at all,” adds Clive, who uses the viewfinder to compose every shot. “I’m only taking my eye off the viewfinder when I want to look over the camera and give direction.”
CLIVE’S CANON KIT
See more of Clive’s BRB portfolio and discover how he uses Canon cameras: www.canon.co.uk/pro/ ambassadors/clivebooth/
“With the new cameras, it’s almost doing it all for you,” he says. Tyrone asks what distinguishes a pro from anyone with a camera? “Anyone can buy this equipment, but the difference is 40 years of working in a visual industry. It’s my eye, a passion for light, for the subject and, here, a passion for performance,” he says.
The performance is between Clive and Carlos, but composition is only obvious to the one taking photos. That’s why Clive makes
When every angle and height has seemingly been captured from Carlos’s seated position, Clive has time for one more idea. He unfurls a white paper backdrop, and ups the power on the light above Carlos to make it the key light. With Carlos now standing looking directly into the camera, it’s the most powerful shot yet, with no background elements to distract the viewer from his eyes.
What feels like mere moments after the shoot officially ends, Clive starts to review the transferred images on his prograde Eizo ColorEdge CG318-4K monitor. In terms of workflow, he’s loaded all the R5 RAW files directly onto his MacBook

BLOB? CHECK OUT TOMMY’S KIT
WWW.AMAZON.CO.UK/SHOP/ TOMMYREYNOLDS
I was told early on, ‘Clive, don’t get bogged down in the technical. Always think about the performance’.
AT
2 Canon EOS R6 Clive also uses an R6 with a 20MP sensor. At a first glance, the design is similar to that of the R5 – minus a top-plate settings display – but is made from a lighter polycarbonate.
5 Canon RF 24-70mm F2.8L IS USM lens
With 5-stops of image stabilisation and a fast aperture, this flexible telephoto is ideal for speedy recomposition of the frame.
8 MacBook Pro M1 16inch Clive is enjoying the speed and performance of his new MacBook (pictured right) for processing in Lightroom.
1 Canon EOS R5 Clive’s two mirrorless R5 bodies each had a different lens attached to enable quick switching. The 45MP sensor offers him enough resolution for print and demanding clients.
3 Canon RF 85mm F1.2L USM DS lens CIive attributes building his career with the EF 85mm f/1.2L II USM lens. “The RF version takes the brilliant focal length to new levels with increased speed and sharpness,” he says.
6 Canon RF 50mm F1.2L USM lens
low-light studio.
4 SanDisk CFexpress 128GB card Clive’s cameras have SD card slots, but he favours a large capacity high-speed CFexpress card.
6 3 5 1 7 4
1 8 MASTER B&W PHOTOGRAPHY 158
7 Eizo ColorEdge CG3184K monitor Clive’s Eizo monitor (pictured right) is easily calibrated. “It is getting quite old now, but it’s still extremely good,” he says. If he were to replace it, he would choose to get a CG319X.
STUDIO LIGHTING SETUP
Working in the dark
Creative and technical considerations when shooting in a blackout


White balance Clive had set the white balance of his continuous lighting at a slightly warm temperature, at 3500K.
Ambient lighting With the blackout blinds drawn in the studio, there was little to no ambient lighting that needed to be considered in the environment.
Offer direction Talk to your subjects. Have a conversation, engage with them – whoever they are, it can help to draw out emotion.
Continuous lighting Clive prefers to use continuous light sources over flash, so he can instantly see what he’s getting. It’s generally more pleasant for the sitter to be under for longer periods, too. On this shoot, he used two LED lights from Fomex.
Tripod Shooting at such wide apertures and with higher ISOs, Clive doesn’t want to feel hampered by a fixed tripod. Shooting handheld means he can constantly move around Carlos to try out as many dynamic angles and frames as possible.
© Mark Spencer
DRAMATIC PORTRAITS 159


x4 © Clive Booth MASTER B&W PHOTOGRAPHY 160
Pro M1 Max 16” SSD, and then into Lightroom Classic. “My black and white conversion is straightforward, using a standard profile, although there are so many great profiles to choose from. Then, I’ll increase contrast, sharpening, sometimes use dodge and burn, the vignette tool and maybe a little shadow recovery.” Clive does as much in-camera as possible but, here, he asked his retoucher to do some additional work removing a plug point in Photoshop. “I also transfer the files to Lightroom so they can be on the cloud and easily accessible on all devices.”
Clive’s previous career as a graphic designer has given him a wealth of knowledge about printing and file types, which can
be vital as a pro photographer.

“The final files are exported from LRC as 16-bit TIFs full-res, which means I can make fine-art archival prints to just about any size,” he says.
Processing images is one thing, but having the skill to narrow down hundreds of shots into a cohesive selection takes skill (turn to p66 for a feature on editing).
As I leave, Clive is engrossed in capturing a Don Quixote rehearsal, but I have no doubt that his final selection will be cohesive, if not completely mesmerising.
The Birmingham Royal Ballet production of Don Quixote is in UK theatres until 19 March 2022. For details and tickets visit: www.brb.org.uk/whats-on/ event/don-quixote-2022
Editing the images
Clive imported over 1,700 images before editing them down to a portfolio of 17 final portraits

With the size of modern memory cards and the speed of continuous shooting modes, it’s all too easy to capture hundreds of images just from one shoot. Clive transferred all 1,700 images from his CFexpress cards onto the laptop’s hard drive, before importing them into Lightroom. “I’m oldfashioned in the sense that I still like to put it into folders,” he says. “And I’m using Lightroom Classic, not Lightroom.” Classic is the desktop-based program, while Lightroom (or what used to be Lightroom CC) is the integrated cloudbased version. Once imported, Clive could quickly discount images – those out of focus, or where the pose wasn’t quite right – before moving on to the full edit of 17 shots.

My black and white conversion is straightforward, using a standard profile in Lightroom Classic. Though there are many great profiles to choose from
161 DRAMATIC PORTRAITS
© Mark Spencer
Alistair Campbell
As the technique editor for our sister magazine Digital Camera, Alistair writes about a huge range of photographic topics on a daily basis, however, candid street photography is one of his personal passions.


Having previously worked as a freelance photographer, his knowledge of using locations to their full potential has armed him with the practical skills to find subject matter in the most unlikely of scenarios.
To see more of his work, including his fashion portraiture, find him on Instagram.
@alistaircampbellphoto
MASTER B&W PHOTOGRAPHY 162
STREET WISE
Peter Fenech explores historical Bath with Alistair Campbell to discover the essentials of street photography
Street photography has a unique historical association within the art world. Some of the most well-respected names in the medium created their legacies by capturing people and places on the street, documenting a snapshot of the decades in which they worked. Names such as Henri CartierBresson, Vivian Maier, Elliot Erwitt and Helen Levitt are synonymous with 20th Century street photography and the unique style of capturing the world they pioneered.
While certain concepts that these artists generated have endured, none more so than CartierBresson’s ‘decisive moment’, many photographers working today can have difficulty interpreting their ideas in a modern context. Digital photography has revolutionised the way photographers view and capture the world around them, meaning we must use historical inspiration with care if we are to get the most from our time and modern equipment.
I’m keen to explore the genre of street photography through the eyes of a contemporary artist. As such, I am in the picturesque city of Bath Spa, in Somerset to meet Alistair Campbell for a photowalk. Armed with his Fujifilm cameras, an X-T2 and an X-100V compact, we set off in search of engaging subject matter.
I ask Alistair what he looks for in a subject and the elements he aims
to find first when hunting for the perfect street composition.
“I look for people first and then the background,” he says. “Of course, you can’t always find the perfect background but, sometimes, I’ll set up and wait for a good subject to walk into the scene. If you focus on people it doesn’t really matter where you shoot in terms of location.”
I notice Alistair has both cameras out of his bag at the same time, which might seem counterintuitive for a genre that’s all about maintaining discretion. He explains that he has adapted his camera bag to allow easy access to both bodies on demand while remaining as inconspicuous as possible. This raises a common question about street photography – how to shoot confidently without creating conflict with the subject. This is an area where those new to the genre of street photography might feel uncomfortable at first.
“To avoid unwanted attention, I’ll just keep on shooting after I’ve taken a picture of somebody,” Alistair says.
“If I were to stop and check the back of the camera straight away, the subject would know I was focused on them. Whereas, if I look interested in the background and act casual, they won’t assume I was shooting them. People know what you’re doing but, most of the time, they don’t seem to care. It depends where you are.”

163
© Alistair Campbell
Be ready for action
Overcome typical street photography challenges
One of the biggest hurdles in street shooting is the speed with which picture opportunities come and go. Alistair believes digital technology has eased the process but that being prepared is still an essential skill to master. “Digital photography has made the practice easier, but being in the right place at the right time can be tricky. If you’re just walking around, you end up missing things. I suggest finding a spot, setting up and waiting for things to happen. It’s a bit like fishing – you can have the location and the bait but nothing happens and that’s okay. It’s about creating a little control in an otherwise uncontrollable setting,” he says.
We move through the crowded High Street and exit onto the quieter York Street, under its iconic archway – built in 1889 by Charles Davis to carry water to the famous Spa. Alistair spots a shaft of sunlight on a wall that is creating an ideal background and suggests we wait for someone to walk onto our al fresco stage.
It doesn’t take long for passers-by to appear, but Alistair waits for someone to enter the natural spotlight before taking his shot. He tells me he tends to favour harsher, dramatic lighting. “A lot of my work is quite dark. I used to shoot a lot of portraits in flat light, but now I often shoot in a harsher light, which means I just expose for the highlights to underexpose the overall frame. This gives a darker look.”
The advantage of studying graphic properties is that it is not always necessary to capture a literal representation of a subject. “In this type of scene, I don’t always worry about perfect exposure control. If the highlights are a bit bright or the shadows a little darker than usual, it’s okay as long as the subject is clear,” Alistair says, proving that
it’s always important to decide on your creative priorities before heading out on a shoot.
I ask him about the technical side of shooting incognito. How does Alistair focus his subjects on the go?
“Often I’ll just focus on the background and depth of field will be enough to get most everything sharp. If you’re shooting at f/1.4, that might not work, but at f/5.6 or f/8 it’ll usually be fine,” he explains.


“Alternatively, you can focus at the estimated distance from the camera your subject will be walking, pre-focus on that spot and wait. It depends on the focal length in use too.”
With wider lenses, the depth of field is naturally deeper, meaning small focus shifts are not as noticeable as when shooting at higher magnifications and wider aperture settings.
Speaking of focal lengths, as we move on further around Bath’s quaint streets and narrow alleyways, I quiz Alistair on his preferred choice of lenses for this style of street photography. What are his favourites and why does he choose each type?

MASTER B&W PHOTOGRAPHY 164
Alistair uses two cameras, each with a prime lens mounted, to allow quick recomposing. A single camera with a zoom lens would offer the same flexibility, reducing missed shots.


x4 © Alistair Campbell 165 STREET WISE
Alistair’s essential photo gear
1 Fujifilm X-T2 Featuring a 24MP APS-C format sensor, this Fujifilm is a favourite amongst street photographers and all those capturing candid images.
Alistair is able to use the camera discreetly, while the physical exposure dials, common to the Fujifilm design philosophy, allow rapid access to settings on-the-go
On our shoot, Alistair had his most used settings assigned to the function buttons to further streamline his shooting workflow.
2 Fujifilm XF 56mm f/1.2
R WR With its ultra-fast aperture, this optic offers a great balance of light gathering and portability. It provides the equivalent Full Frame focal length of 84mm, for subtle compression.
3 Fujifilm X-100V
While compact cameras have seen a decline in recent years, this model retains its position as a street photography master, thanks to the APS-C-sized sensor.
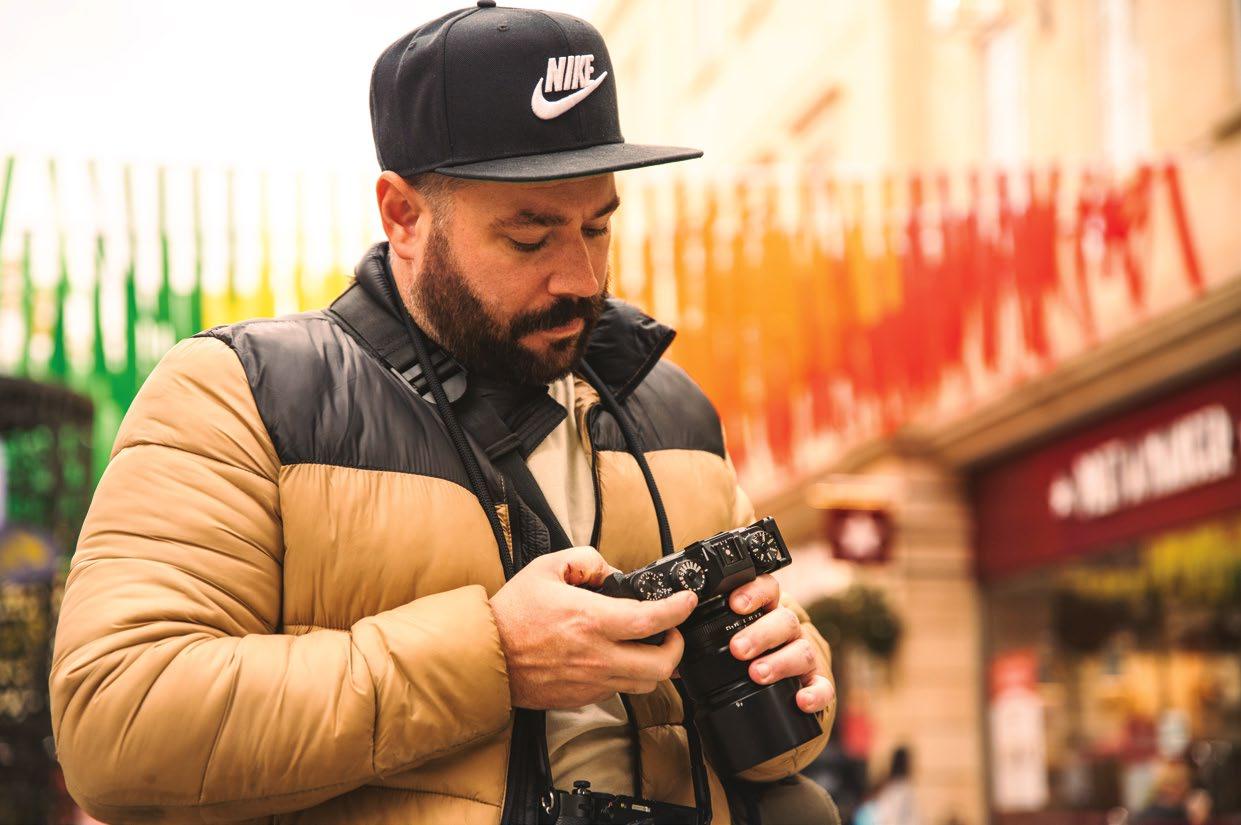
The camera provides a retro handling experience, similar to that of many cameras used by street photographers of decades past, but it also offers modern features, such as film simulation and an internal ND filter.

4 Assorted Fujinon lenses
Alistair has used multiple optics before, but now works mainly with prime lenses. He prefers standard focal lengths up to 50mm, which he takes into account with his X-Series lens choices, allowing for the 1.5x magnification of his X-T2. Not pictured
“When I started out, I was using a 16-55mm zoom lens, which was fine for most things. It wasn’t the sharpest lens, but it was versatile. I started using primes but I don’t like carrying lots of kit, so I’ve worked through several different focal lengths.
Ideally, I prefer a 50mm. When I had my first camera, all I had was a 50mm and I got really good at using that. But then I moved to an 85mm and used that for a while. Basically, when I get tired of one perspective I switch to the other – I try not to overcomplicate things. If I have an 85mm on my camera, I’ll get the most out of what I can achieve with that lens. I tend to prefer longer lens shots but I like to show variety. The experience of using a 35mm is different from a 50mm or 85mm.”
Ultra-fast prime lenses are another element that has become synonymous with street photography, but Alistair recommends they are used with caution. While maximum aperture may have been essential when paired with an ISO 100 film or an early DSLR, which was noise-limited, today f/stops wider than f/1.8 can be overkill.
“Because the low f/number is a main selling point, with fast primes, it’s tempting to shoot wide open all the time, but often this can be too shallow or far too bright,” he says, as he adjusts the exposure for the highly reflective limestone used
heavily throughout Bath’s period architecture. Keeping the ISO at 400 allows us to stop down, increasing focus depth and allowing us to get the highest possible quality from our chosen lens. Even stopping down by 2EV can vastly improve detail resolution across the frame, while making from-the-hip shooting more practical.
We traverse the expansive shadow cast by Bath Abbey and head back into the shopping areas, in search of different characters. We stop to capture a street performer juggling flaming torches, who strikes a pose for the camera – another reason to remain inconspicuous when looking for candid shots.
In an attempt to capture a unique perspective, Alistair lowers the camera height and employs the built-in ND filter in his X-100V to lengthen the exposure time. This blurs passing shoppers and creates some contrast of tone. It makes full use of modern camera features to provide a contemporary feel to his street photography.
I ask him how the creative approach to modern street photography differs from that of other genres.
“The first thing I shot was fashion. I often shot on the street as I had limited kit and space. That was about finding textures and patterns for backgrounds, which is the same as street photography,” he says.
3 2 1 4
BLOB?
CHECK OUT TOMMY’S KIT AT WWW.AMAZON.CO.UK/SHOP/ TOMMYREYNOLDS
MASTER B&W PHOTOGRAPHY 166
“Commercial street photography is about balancing spontaneity with publishing requirements”
Top tips for street shooting


Prevent exposure changes When shooting quickly or with your eye away from the camera, lock exposure to prevent unpredictable shifts between frames as you recompose.
Pick a spot Increase your chances of combining an engaging subject with a great background by selecting a good location and waiting for an effective scene to materialise.
Colour or monochrome Colour can sometimes detract from the main details you want the viewer to focus on, making black-and-white conversion an effective creative choice.
Shoot past the moment Keep shooting for several frames after the ‘perfect’ composition to increase the choice of images and also make yourself less conspicuous to your subject.
19 STREET WISE
© Alistair Campbell
Change your angle
Make the location part of the narrative of your shots by changing perspective. Shooting down low or up high can offer greater intrigue in everyday scenes
“The only real difference is that, with street photography, I don’t care too much about absolute technical perfection – if something blows out or is underexposed, you make it work for the scene. With fashion, you have to capture certain detail in the clothes or model,” he adds.

“Making street photography work commercially is more challenging. For example, if I was shooting for a magazine, I’d be balancing spontaneity with the publishing requirements. If I knew what it was for, let’s say it’s a landscape format shot going across two pages, I’d wait until the subject was on a third. That would keep them out of the gutter [the middle line where pages are bound] and ensure a decent amount of interest on the other side of the spread.”
As we turn onto Dorchester Street, I ask Alistair how street photography differs from travel shooting – two genres often mistakenly confused.
“They are similar but in travel, it’s more about showing where you’ve been and what was there. With street photography, it’s about showing a specific narrative. Somebody is reading a paper, walking a dog or feeding some birds. What are they doing? Where are they going? It has a different purpose.”

Before we part ways, Alistair offers some advice on developing a mindset for street photography. “If you have good contrast, nice light and an interesting subject that you want to know more about, you’ll find something. It doesn’t pay to overthink things. Just be out enjoying the process.”
Shoot dramatic street scenes
1
Set f/stop Although shooting at maximum aperture will enable you to reduce depth-of-field for dramatic effect, it is often better to stop down slightly to maintain easier control over sharpness when shooting from the hip.
Select ISO Set the sensitivity to between 400 and 500. Although ISO100 will give the best absolute quality in most cases, these low sensitivities can become problematic when light levels fall. Mid settings allow the greatest flexibility.
2
3Test focal length Shooting with the lens you have on the camera can open up creative possibilities, however, it is worth changing to a different focal length occasionally, to ensure you are covering every possible available perspective.


168
MASTER B&W PHOTOGRAPHY
© Alistair Campbell
4 Apply camera styles If shooting JPEG files, these will be applied to the final image, but even when shooting RAW, in-camera image styles offer a detailed preview of the final image. These can be selected later in proprietary RAW software.


5Set AF mode Choose the single-point AF mode as this offers precise control over where the camera is focusing. It is particularly useful when shooting from the hip, as you know exactly where in the frame the priority will be.
6 Check histogram While minor clipping is often acceptable in small areas of the frame, always check the histogram to gauge if there are any problem zones, extending far beyond the dynamic range. Use exposure compensation accordingly.

169 STREET WISE
CONTEMPORARY COWBOYS
Anouk
Krantz has
For many people, the stereotypical image of a cowboy is of a man in denim and leather, riding a horse and duelling with pistols. These misconceptions have been around ever since the first Western movies appeared on our screens and have been reinforced by Hollywood films, books and comics. Whether they were ever true or not, for the modern-day cowboy community, it is a warped view of their reality.

Perhaps the real surprise is that cowboys still exist in the 21st century. Indeed, in many parts of the US, cowboy culture is very much alive, with states such as Texas, Colorado and Montana still having active communities of cowboys helping to run ranches.
In her photographic career, Anouk Masson Krantz has documented the USA’s modernday Wild West. The French-born photographer has always had an affection for horses and, after moving to New York City, she worked at a lifestyle magazine at Cartier’s Headquarters. There, one of her earliest projects, ‘Wild Horses of Cumberland’, took her from the fast-paced city life of New York to the remote community of Cumberland Island in Georgia, populated mainly by wild horses. Her first art book resulted from that project and was followed by two bestsellers focusing on ranching communities. Her latest book, Ranchland: Wagonhound, follows the lives of modern cowboys on a working ranch in Wyoming.
All images ©Anouk Masson Krantz
Words by: Kim Bunermann
Pictured The Storm
“In Ranchland:Wagonhound, Anouk’s images tell the story of the rancher and his stewardship of a historic ranch”
Masson
spent over a decade exploring the USA’s Wild West and its cowboy culture. In her three books, she shares their stories, values and way of life with the world
170 MASTER B&W PHOTOGRAPHY
Anouk Masson Krantz

Anouk Masson Krantz has become known for her work in documenting the present-day cowboy culture in the USA. Born and raised in France with a Dutch mother, she moved to New York and later studied at the International Center of Photography. Her work earned accolades from the International Photography Awards and the International Monochrome Awards. Anouk has released three bestselling books and launched her latest publication, Ranchland: Wagonhound, in November 2022. To see more of Anouk’s work: www.anoukkrantz.com @anoukmassonkrantz

171
So Anouk, tell us what fascinates you so much about the life of a cowboy...
It is inspiring to feel the strength that comes from this culture, especially its independence, values and work ethic. Not to mention the landscapes, which are incredible.
What is so special about this project?
It is all about these people, their animals, the land and the hard work that goes into building their community. When you are there, you can smell and breathe it. You understand why these people have done this for 150 years and still not quit – and it is not about the money. They are in their beautiful land and as long as they can eat every day and just be within those landscapes, they’re happy – probably a lot more so than most people in the city.
How do they keep their traditions alive?
The oldest family that I came across are in the ninth generation of cowboys – can you believe that? Their kids went to school and college but all came back. They just love being one big family working together. One prejudice about cowboys is that they are uneducated and that’s just not true. A lot of them go and get masters degrees in business ranching as you need this kind of knowledge and qualifications to run a ranch today.
How did you gain the trust of such a close-knit community?
I am French and certainly an outsider, so the first introductions with many of the ranchers were not easy. How would you feel if a stranger asked to capture your life, your home and your family? Their thoughts of ‘what will she do with the work’ and ‘could it possibly reflect upon us negatively’ were understandable. My intention was to spend time with them, listen to their stories and photograph them in the most realistic way possible. No staging, no costumes, just an authentic slice of their daily lives.

How do you manage to capture these moments with such a closeup view?
I don’t want to be breathing down anyone’s neck, you have to give people respect. It’s such a privilege for me to even be there with them. I always try to remove myself from the action so they may not even notice me.
Right, above The Release
Anouk uses a Fuji GFX 100 and a 45mm lens to capture daily life at Wagonhound ranch
Right Mountain Range
Anouk braved the elements and subzero temperatures during winter in Wyoming
Opposite, above Breather II
Anouk’s use of black and white photography allows the integral components of the photo to shine

Opposite, below War Bonnet Camp
Anouk worked with negative space, as seen in this photograph of teepees and horses
172 MASTER B&W PHOTOGRAPHY


173 CONTEMPORARY COWBOYS
What is in your kitbag?
Believe it or not, my new book was pretty much shot entirely with one body and lens. I use the Fuji GFX 100 and a 45mm lens, which is incredibly sharp, and those two pieces of equipment are all I need. I’m very simple –I’m often riding, climbing and exploring, so I don’t want to drag a suitcase full of stuff around with me. The biggest reward has been that, by sticking to that, I’ve not missed out on anything by not having more equipment with me. The landscapes and my subjects, including the cowboys, the horses and the cows, are all important. They are all one. Nothing gets blurred out with a telephoto lens. Less is often more!
Would you say that too much gear is limiting the photographic view?
I feel that a lot of photographers think that
Right Legacy II
“Although cowboys may have their differences, the one common thread that ties them together is their values,” says Anouk
they need to have a massive case with all these lenses. Why don’t you just use your feet and eyes to find a good position? It means that I may have to climb a mountain or walk past some snakes, but I still get those amazing landscape shots.
What attracted you to work exclusively in black and white?
I love the simplicity of shooting in monochrome as it’s both clean and timeless. By taking away a lot of the distractions of the colours, the work is more focused and you can create emotions. Since I started to photograph on Cumberland Island, I’ve always shot in black and white. I want to convey what it feels like to be out there doing the work. I believe that I am able to deliver this message more clearly in black and white, but maybe one day, I’ll shoot in colour again.
You have published several bestselling books. What is your recipe for success?
My goal is to convey a message that people will latch on to and feel empowered and uplifted by. We see a lot of negativity and so, as human beings, we need to realise there is still a lot of beauty out there. People want to see an authentic window into the lives of the ranching or rodeo communities in the USA, not the Wild West. Putting these stories and photographs together in an elegant and yet authentic way so they can cross over to the rest of the world isn’t easy. This process took months of brainstorming and working with different layouts and covers. I am fortunate that I know both worlds, so I took a risk with the first book and it worked in a way I never imagined it would. Then came the next one, American Cowboys, and the third, Ranchland Three Western books – all three bestsellers among the greatest masters of photography!

What advice can you give anyone looking to find their own photographic style?
Your camera is a tool to capture moments but it’s not putting different visual aspects
Above The Grip
The attention to detail in Anouk’s images offers a rare insight into the modern cowboy and ranching culture from an outsider’s viewpoint
Right, above Rambo
174 MASTER B&W PHOTOGRAPHY
In this photograph, the lines visually lead to the main characters of the scene, the cowboy and his horse


175 CONTEMPORARY COWBOYS
together. It’s all about you, your way of thinking and your creative eye. Use this uniqueness to create art and not end up being a stock photographer. Not all photographers out there understand that anymore. They think that because they’re taking pictures, they’re fine art photographers, but it doesn’t work like that. It requires commitment, patience, long days and relentless hard work.
You experience two extreme worlds. How is this beneficial to your work?
I used to work for luxury brands in New York and still enjoy being around this world, but can completely extract myself from it too. I enjoy being in cowboy boots and working in tough conditions in the dust, knowing at the end of the day, that what I’ve done is rewarding. When you start living in those two worlds, you understand better how to

connect with people who don’t live that life but still have some affection for that way of living. When I am back in New York and slip into a more comfortable life, I’m looking at it from a bigger angle and reflecting on everything I’ve done. Being in the other extreme helps me figure out what I want to focus on and how to share it with people.
If you had to decide between both, where would you stay for the rest of your life?
That’s a tough one, but I love both. There is something that you find back in the city that you just don’t have out West. I couldn’t do my work without a lot of people who are back in New York, such as my publisher, filmmaker, master printer or friends. If I took all that away, there’s no question that you would find me riding with cowboys. I love the Western way of life and what it represents, their values and the incredible landscapes of the frontier.
176 MASTER B&W PHOTOGRAPHY
“When you’re there, you understand why these people have done this for 150 years. They are in their beautiful land and, as long as they eat every day, they’re happy. Probably more so than people in the city”
Opposite,
left Winter Storm
The Wyoming landscape shrouded in snow during the winter almost becomes a white canvas, over which the animals make their path

Above
Wagonhound Traffic
Measuring some 300,000 acres in area, Wagonhound is one of the largest working ranches in the United States today

Left Western Sunrise
With this perspective, Anouk sets the scene for the cowboys and celebrates the panoramic views of Wyoming’s vast landscape

177 CONTEMPORARY COWBOYS
monochrome? 5 FINAL TIPS
Thinking in
1 Shoot in mono Try shooting in-camera black and white images to think of every frame in monochrome, rather than as candidates for later conversion. Shoot in JPEG format to apply B&W picture presets.
2 Change aspect
Consider altering the native aspect ratio of your images in-camera. A 5:4 ratio or 1:1 square more closely resembles classic film and is conducive to minimalist or unconventional framing.
3 Coloured monochrome While black and white is a clear definition, ‘monochrome’ is open to interpretation. Technically images dominated by single colours are monochromatic, so try blending coloured midtones with pure shadows and highlights.
4 Black and white cameras If you’re dedicated to black and white landscapes, consider getting your camera converted to infrared or even buy a mono-only camera such as the Leica M Monochrom for maximum detail capture.
5 Focus on light Black and white is photography at its most basic. Create simplified landscapes by looking for abstract detail emphasised by strong lighting. Use shadows to push depth and form rather than colour.

Five final tips to master black and white ©Gettyimages 178

9000
BLACK & WHITE PHOTOGRAPHY


GEAR ADVICE
The best cameras, lenses and accessories for black and white

CAMERA TECHNIQUES
All the practical advice and menu settings you need for shooting

EDITING TRICKS
Steps for processing your images to make them truly compelling

PROJECT IDEAS
Creative tutorials to help you practise and apply your new photography skills
INSPIRING STORIES
Interviews and insights from professional photographers


Photographic examples from every genre that inspire and explain

STUNNING IMAGES MASTER
ESSENTIAL TIPS FOR IMPROVING YOUR MONOCHROME PHOTOGRAPHY
