to CROCHET
Cute Amigurumi Creatures from Myth and Legend

INCLUDES DETAILED DIAGRAMS FOR EVERY BEAST!

Megan Kreiner

INCLUDES DETAILED DIAGRAMS FOR EVERY BEAST!
An imprint of SOHO Publishing LLC
19 West 21st St, Suite 601 New York, NY 10010
www.sixthandspringbooks.com
Editor
JACOB SEIFERT
Creative Director
IRENE LEDWITH
Designer
DANITA ALBERT
Pattern Editors
AIMÉE HANSEN URSULA REIKES
Photography JACK DEUTSCH

Publisher CAROLINE KILMER
President ART JOINNIDES
Chairman
JAY STEIN
Copyright © 2023 Megan Kreiner
All rights reserved. No part of this publication may be reproduced or used in any form or by any means—graphic, electronic, or mechanical, including photocopying, recording, or information storage-and-retrieval systems—without written permission of the publisher.
The written instructions, photographs, designs, projects, and patterns are intended for the personal, noncommercial use of the retail purchaser and are under federal copyright laws; they are not to be reproduced in any form for commercial use. Permission is granted to photocopy patterns for the personal use of the retail purchaser.
Items made from patterns in this book are for personal use only and are not intended for resale.
WARNING: Small items attached to crocheted items could present a choking hazard. Take care to attach them securely. Supervise child at all times.
Illustrations by Megan Kreiner courtesy of Cedar Lane Press: pages 12–18, 20
Library of Congress Cataloging-in-Publication Data
Names: Kreiner, Megan, 1981- author.
Title: Baby beasts to crochet: cute amigrumi creatures from myth & legend / Megan Kreiner.
Description: First edition. | New York, New York : Sixth&Spring Books, [2023] | Includes index.
Identifiers: LCCN 2023010887 | ISBN 9781970048131 (paperback)
Subjects: LCSH: Amigurumi--Patterns. | Soft toy making-Patterns. | Crocheting--Patterns. | Monsters in art.
Classification: LCC TT829 .K735 2023 | DDC 745.592/4-dc23/eng/20230308
LC record available at https://lccn.loc.gov/2023010887
Manufactured in China
 Megan Kreiner

When I was 10, I had a book of Greek mythology that I reread and flipped through so much that the spine gave out. For as much as the stories themselves drew me in, it was the wondrous illustrated beasts that lived between the pages that really captured my imagination. This fascination with tales of mythical and magical places and the creatures that lived there was deepened by the animated films I grew up watching, where epic narratives and fantastical visuals were woven together by movie magic.
Those same stories and characters led me to a career as an animator, where I get to bring those worlds to life for audiences every day, making animated characters as appealing, imaginative, and engaging as possible. That work is the inspiration for the crochet toy patterns I love to create.
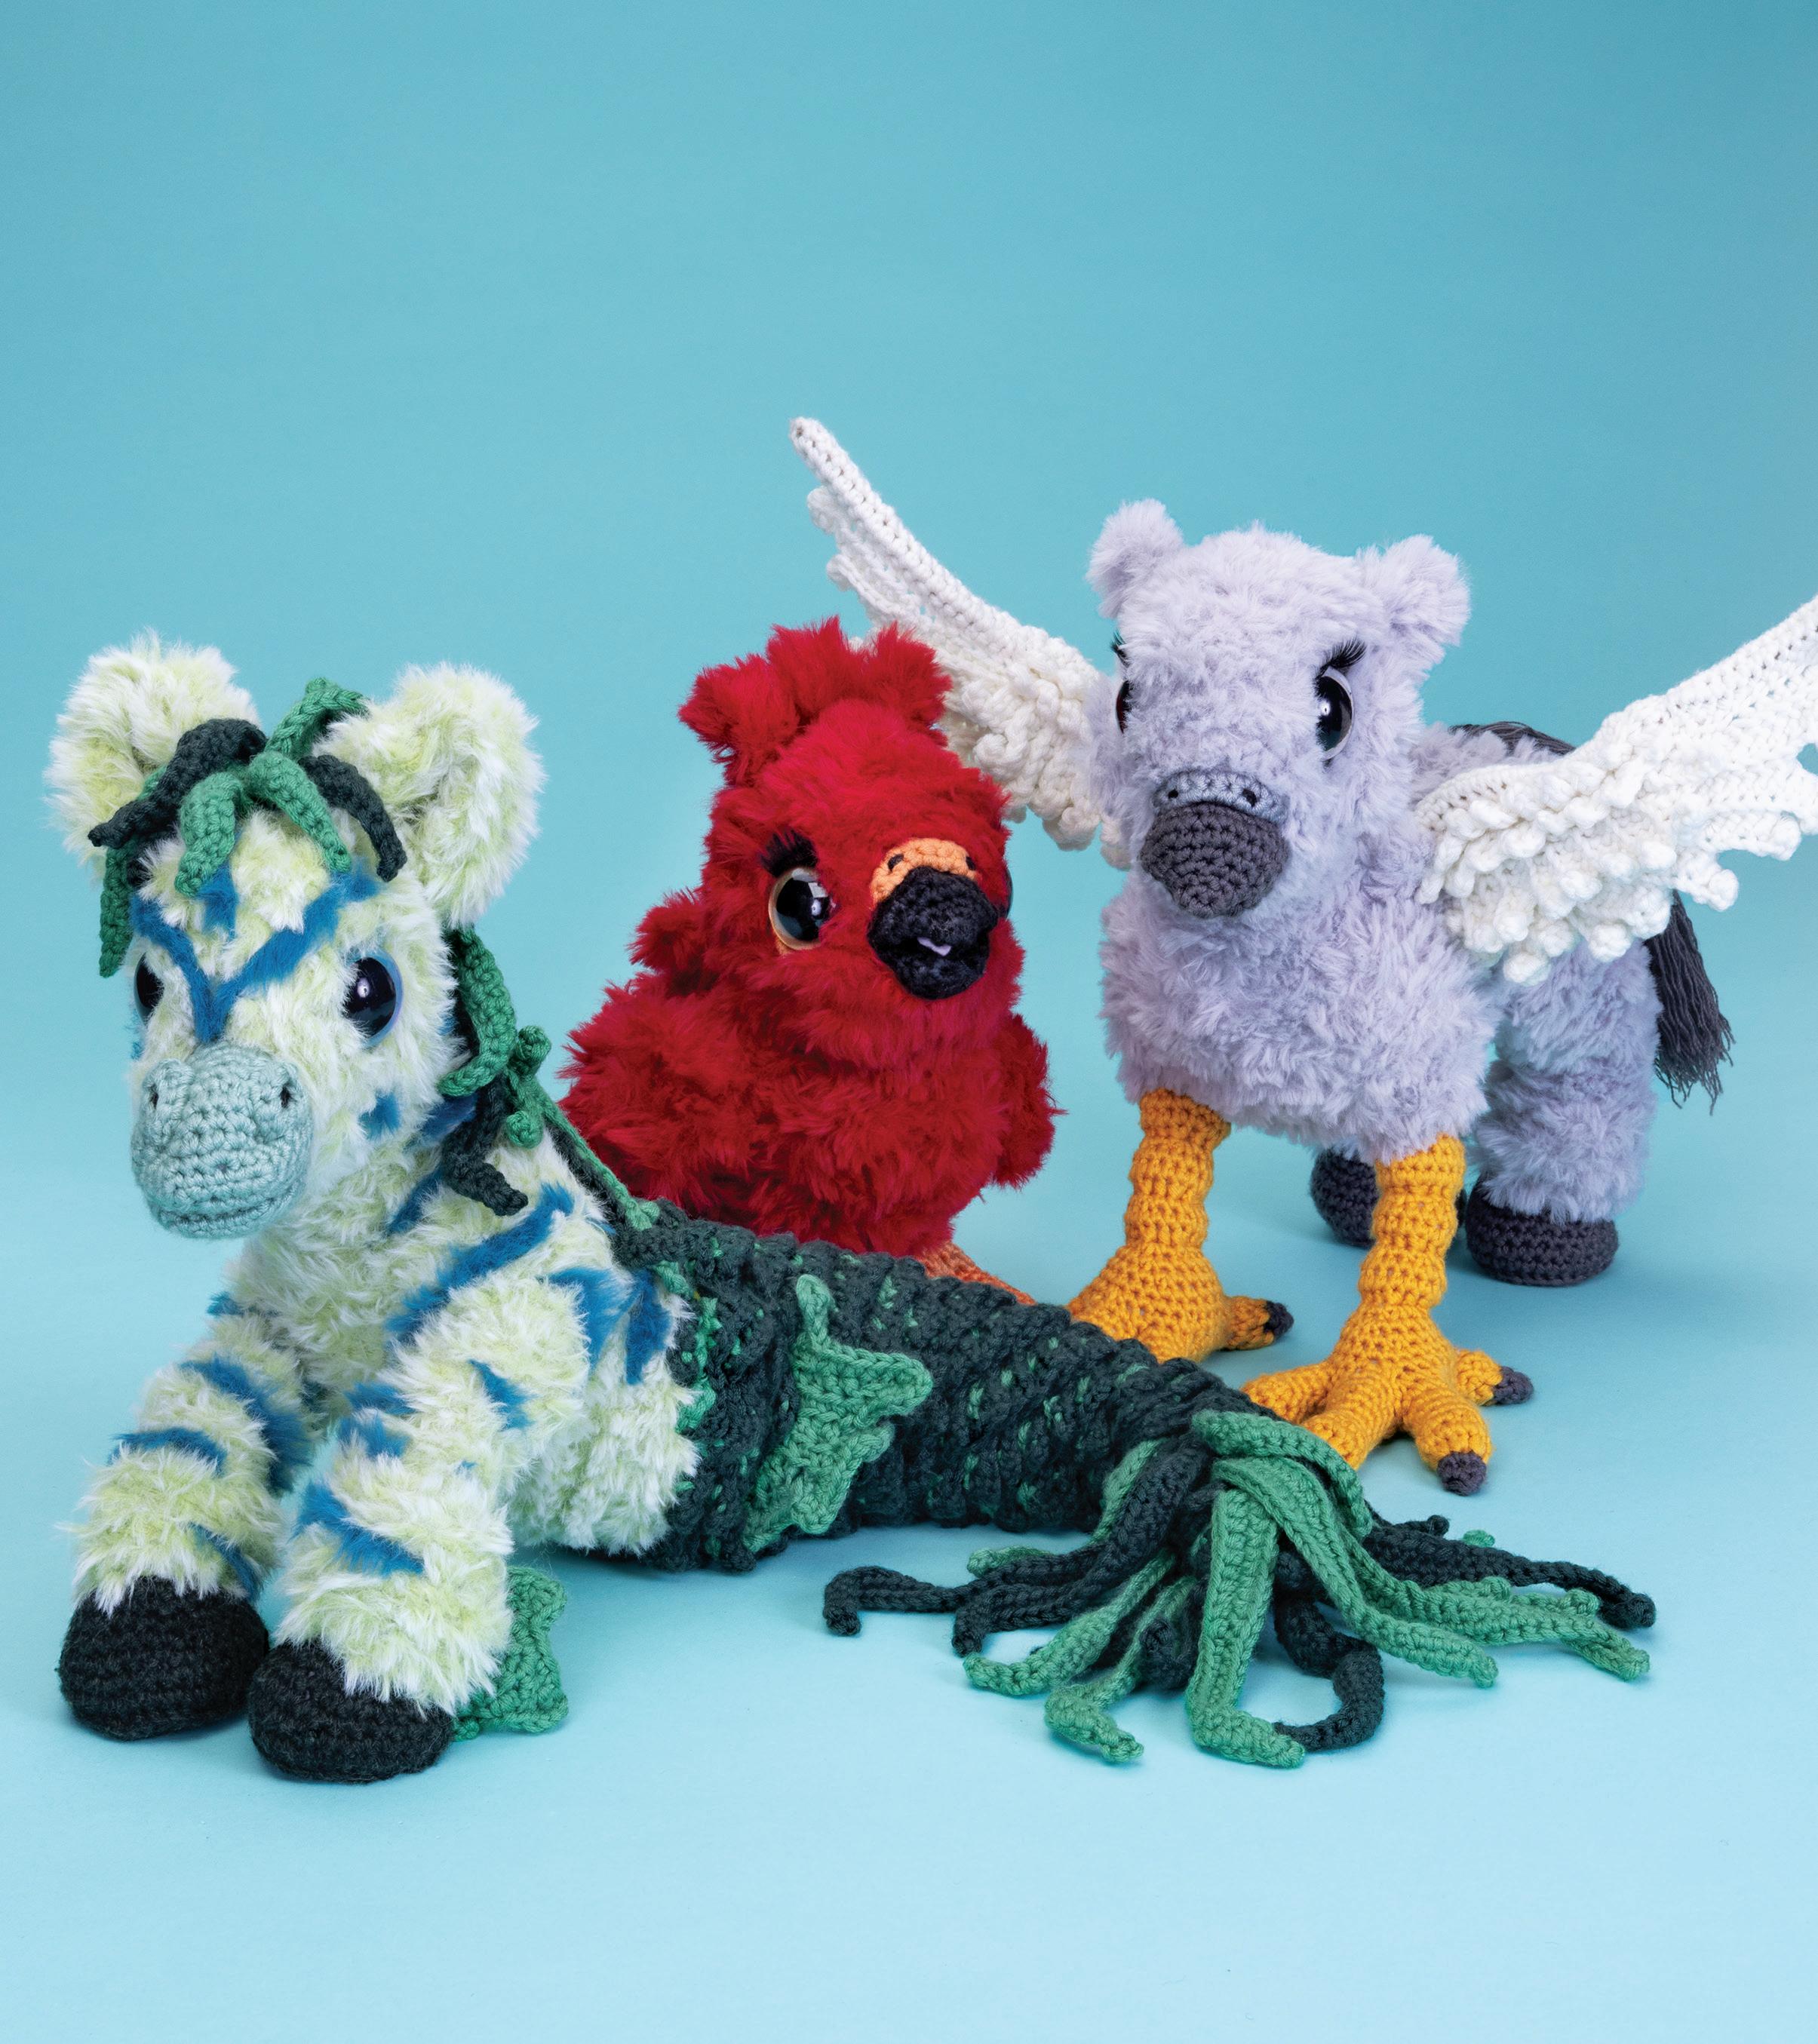
The mythical and magical beasts in this book are designed to delight, inspire, and entertain. While the full-grown versions of these beasts can be huge and downright terrifying, these baby versions are crafted for maximum cuteness with their large eyes, oversized paws, fluffy fur, and feather details. Even the baby basilisk is super huggable, scales and all!
I am excited for you to create some fantastically adorable creatures to join you on your next epic adventure!

The projects in this book are worked using a size F (3.75mm) hook with the worsted-weight yarn and a size H (5mm) hook with the chunky-weight and faux-fur yarns. With toy making, it’s ideal to keep your stitches tight enough so the stuffing does not show through. Because most of the chunky yarn will be covered with faux-fur yarn, less-than-perfect stitches will be mostly hidden.
Large steel tapestry or doll needles with relatively pointy tips will hold up best when assembling, shaping,
and embellishing your toys. Be sure the needle eye is large enough to accommodate your yarns!
Depending on your preference, you can attach felt details using a sewing needle and thread, or craft glue. If you choose craft glue, select a glue that is very thick so it doesn’t soak into the fibers of your yarn and dry before it has a chance to set.

Invest in a small, sharp pair of scissors that you will use exclusively for crochet projects.
They can easily navigate the surface of your work to trim leftover yarn tails and threads or to cut clean shapes out of felt.
Sharp, straight pins with large, easy-to-see heads will make assembly quicker and easier before sewing your baby beast together.
Markers come in a variety of styles (like split rings or clip/locking style), although a piece of scrap yarn will do in a pinch. For projects where the surface will be manipulated quite a bit, locking markers may be preferable over an open-ring
style. Stitch markers are also useful for marking the start of a round, which can be tricky to track since rounds are worked in a spiral with no chains to mark the end or beginning of the next round. They are also sometimes left in place to mark specific points of a pattern that will be referenced later during project assembly.
After applying the faux-fur yarn to the surface, you’ll want to loosen the long fibers that become twisted in the slip stitches. Vigorously drawing a metal tooth comb or a pet slicker brush across the surface of faux-fur will help to

fluff up your creature’s coat. Just take care not to catch the surface of any exposed worsted-weight stitches as combs and brushes can snag and pull on them.
To keep the various supplies for your project together while working on a babybeast-to-be, consider using a sturdy, reusable tote along with a small, zippered case for storing hooks and smaller tools.

A small device that keeps track of how many rounds or rows you have worked.
If you plan to use paperwrapped floral wire in your projects, purchase a small set of wire cutters (located online or in the jewelry-making section of your local craft store). Do not use your scissors to cut wire as that will quickly dull and chip the blades.
When you are ready to complete your baby beast, assemble and shape the surface of your work with a handful of basic assembly and sculpting stitches before adding the faux-fur.
Before you begin assembly, use straight pins to test and prepare the placement of all pieces before sewing them together as follows:
1 Pin limbs to body to ensure everything is even and balanced.
2 Use yarn tails to apply a stitch at each pin to tack the limbs in place.
3 Remove the pins and finish sewing the seams using whip stitch or mattress stitch.
Leave long yarn tails when fastening off on the last rounds of your arm and leg pieces. They come in handy during assembly.
This is a good stitch for closing flattened openings and sewing straight seams.
Pin or hold the edges of the work together and draw the yarn through the matched-up edges in a spiral-like motion, working along the edges until the seam is closed or the piece is attached.
on the first surface. Return to the first surface and insert the needle directly next to (or above if you’re working vertically) exit point B. Continue to work back and forth in this manner until the seam is closed, pulling firmly after every few stitches to ensure a clean, closed seam.
The mattress stitch provides a tight, flat seam when sewing crochet surfaces together, like a head to the open edges of a neck or limbs to the sides of a body.
To close the hole after completing the last round of your work, thread the remaining yarn tail onto a tapestry needle and, following along the edge of the opening, insert the needle through just the front loops (unless otherwise indicated) of each stitch, effectively winding the yarn tail around the stitches. Once you’ve worked all the way around the opening, pull the tail firmly to close the hole (just like you were cinching a drawstring bag closed).
pull to close hole A B
Choose a point on the surface or edge of the first piece and insert the needle from A to B under a single stitch and pull the yarn through. Cross over to the opposite surface and draw the needle under a single stitch from C to D, with the entry point at C lining up between points A and B
Once your pattern pieces are assembled, use these sculpting stitches to add additional shaping and dimension to your creature.
This stitch is good for defining the toes on a paw, creating lip clefts, and additional shaping to hooves.
This stitch is good for sinking eyes into the head, shaping the bridge of a nose, and creating a rounder cheek under an eye.
body and catch the inside surface of the opposite leg, pulling gently to draw legs together. Repeat once or twice more. Secure the yarn, and weave in ends.
This stitch can be used to create eyebrow ridges, shape lips, and sharp the edges of beaks.
Working between two points along the surface of the work, secure your yarn to point A, then draw yarn over to point B, allowing yarn to rest along the surface of the work (like an embroidered long stitch). Insert the needle into point B and draw it out at point A. Pull firmly to tighten and cinch the surface of the work with the yarn. Repeat two or three times to secure cinch before fastening off.
The sink stitch can be worked between two specific points or between two defined areas (like around the edges of two eyes). Insert needle into point A and draw it out at point B. Catch the surface of the work at point B, reinsert needle into point B, and draw it out at point A. Pull as firmly as needed to achieve the desired effect before fastening off or applying additional sink stitches.
The following variation of the sink stitch adds stability to the front and/or back legs of your baby beast.
Pinch the surface of the work between your fingers to create a ridge of material. When you’re happy with the shape and size of the ridge, secure the yarn to the surface of the work and apply a running stitch through the top and bottom layers of the ridge (as close to the base of the ridge shape as possible). The ridge stitch will hold the shaping in place.
To sharpen up the edge of a beak, apply the running stitch through the interior/exterior of the beak surface, slightly below the folded edge.
Attach the yarn along the upper inside surface of a leg. Draw the yarn through the lower half of the

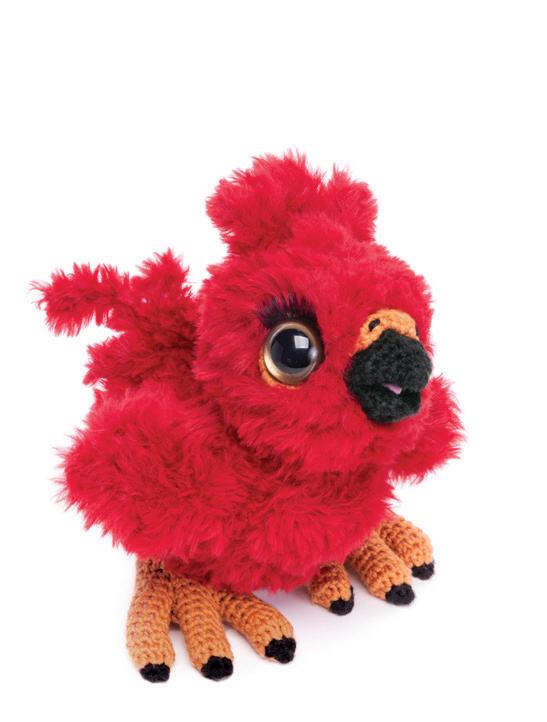
If you’re looking for a feisty yet loyal companion that can keep your family company for generations, then look no further than the immortal phoenix. This fluffy firebird brings a whole new meaning to HOTH (hot off the hook)! With its adorable feathery details, stubby little wings, and ability to withstand searing temperatures when regenerating, baby phoenix is always ready for fun well into the next millennium.
Finished Measurements
Height 9 ½ in/25cm
Width 6in/16cm
Length 8in/21cm
Materials
• Berroco Comfort Chunky
A 1 skein in 5750 Primary Red
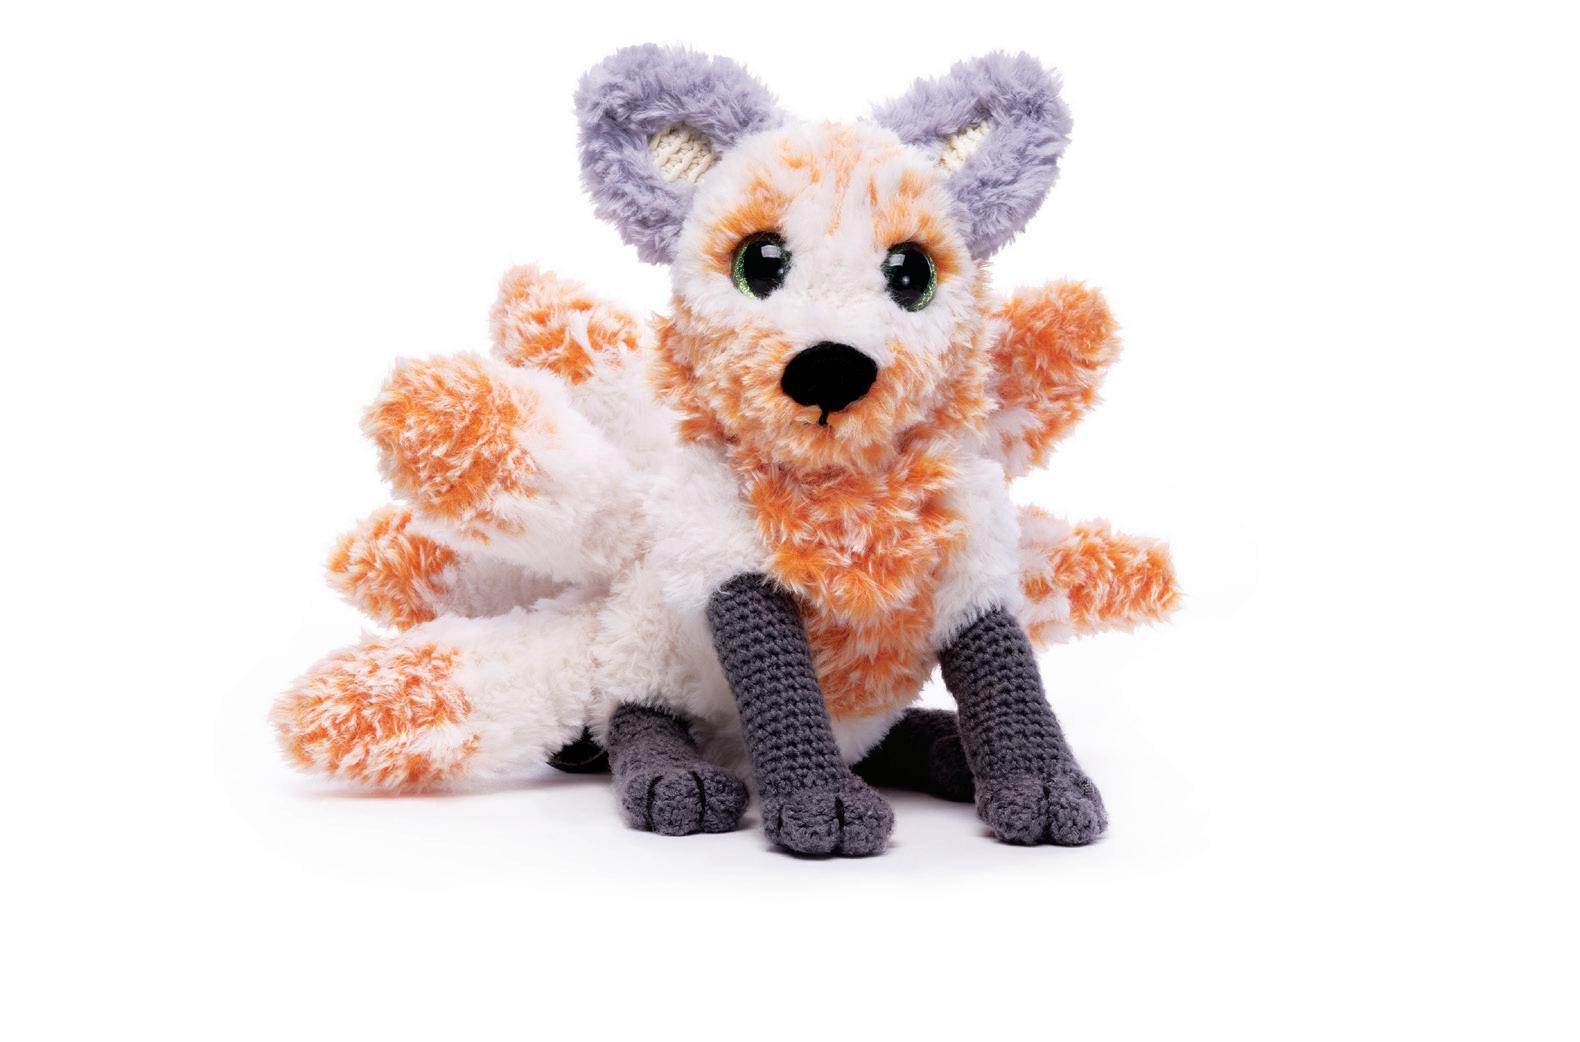
• Berroco Comfort
B 1 skein in 9724 Pumpkin
C 1 skein in 9734 Liquorice
• NICEEC Fur Yarn
D 2 skeins in Red
• Size H (5mm) crochet hook
• Size F (3.75mm) crochet hook
• Stitch markers in 3 colors
• 1 pair of 30mm round-pupil
safety eyes
• 2in/5cm square of pink felt
• Tapestry needle
• Round-headed pins
• Stuffing
• Optional: 5 lengths of paperwrapped floral wire, each
18in/46cm long, if wiring beast
• Optional: Fake eyelashes (Ardell
Professional 3D Faux Mink)
With A and size H (5mm) hook, make a 6-st AR. Note: Work in BLO to end.
Rnd 1: Sc 2 in each st around. (12)
Rnd 2: (Sc 1, sc 3 in next st, sc 1)
4 times. (20)
Rnd 3: (Sc 2, sc 3 in next st, sc 2)
4 times. (28)
Rnd 4: (Sc 6, sc 2 in next st) 4 times. (32)
Rnd 5: Sc 32.
Rnd 6: (Sc 7, sc 2 in next st) 4 times. (36)
Rnd 7: Sc 36.
Rnd 8: (Sc 8, sc 2 in next st) 4 times. (40)
Rnds 9–11: Sc 40.
Rnd 12: Sc 16, sc2tog 10 times, sc 4. (30)
Rnd 13: Sc 30.
Rnd 14: Sc2tog 2 times, sc 10, sc2tog 8 times. (20)
Rnd 15: Sc2tog 2 times, sc 6, sc2tog 5 times. (13)
Rnd 16: Sc 13.
Fasten off, leaving a long tail.
Stuff and rotate head so decs on Rnds 14 and 15 face down and Rnd 1 faces you. Orient the square shaping at front of head to be plumb and level. Place eyes 4–5 rnds from front of head with 10–12 sts bet top edges of eyes. If helpful, temporarily remove stuffing while installing.
Flatten seam horizontally at back of head and sew shut. Apply sink st bet edges of top halves of eyes to sink eyes into head.
With B and size H (5mm) hook, ch 15 and sl st in ch 1 to form a loop. Working in ch-15 sp, sc 20 (enclosing edge of loop). Fasten off, leaving a long tail.
Pin eye ring around eye with FSlps of ring against sides of head. Pinch upper back corner of ring tog to create a small, folded bump along
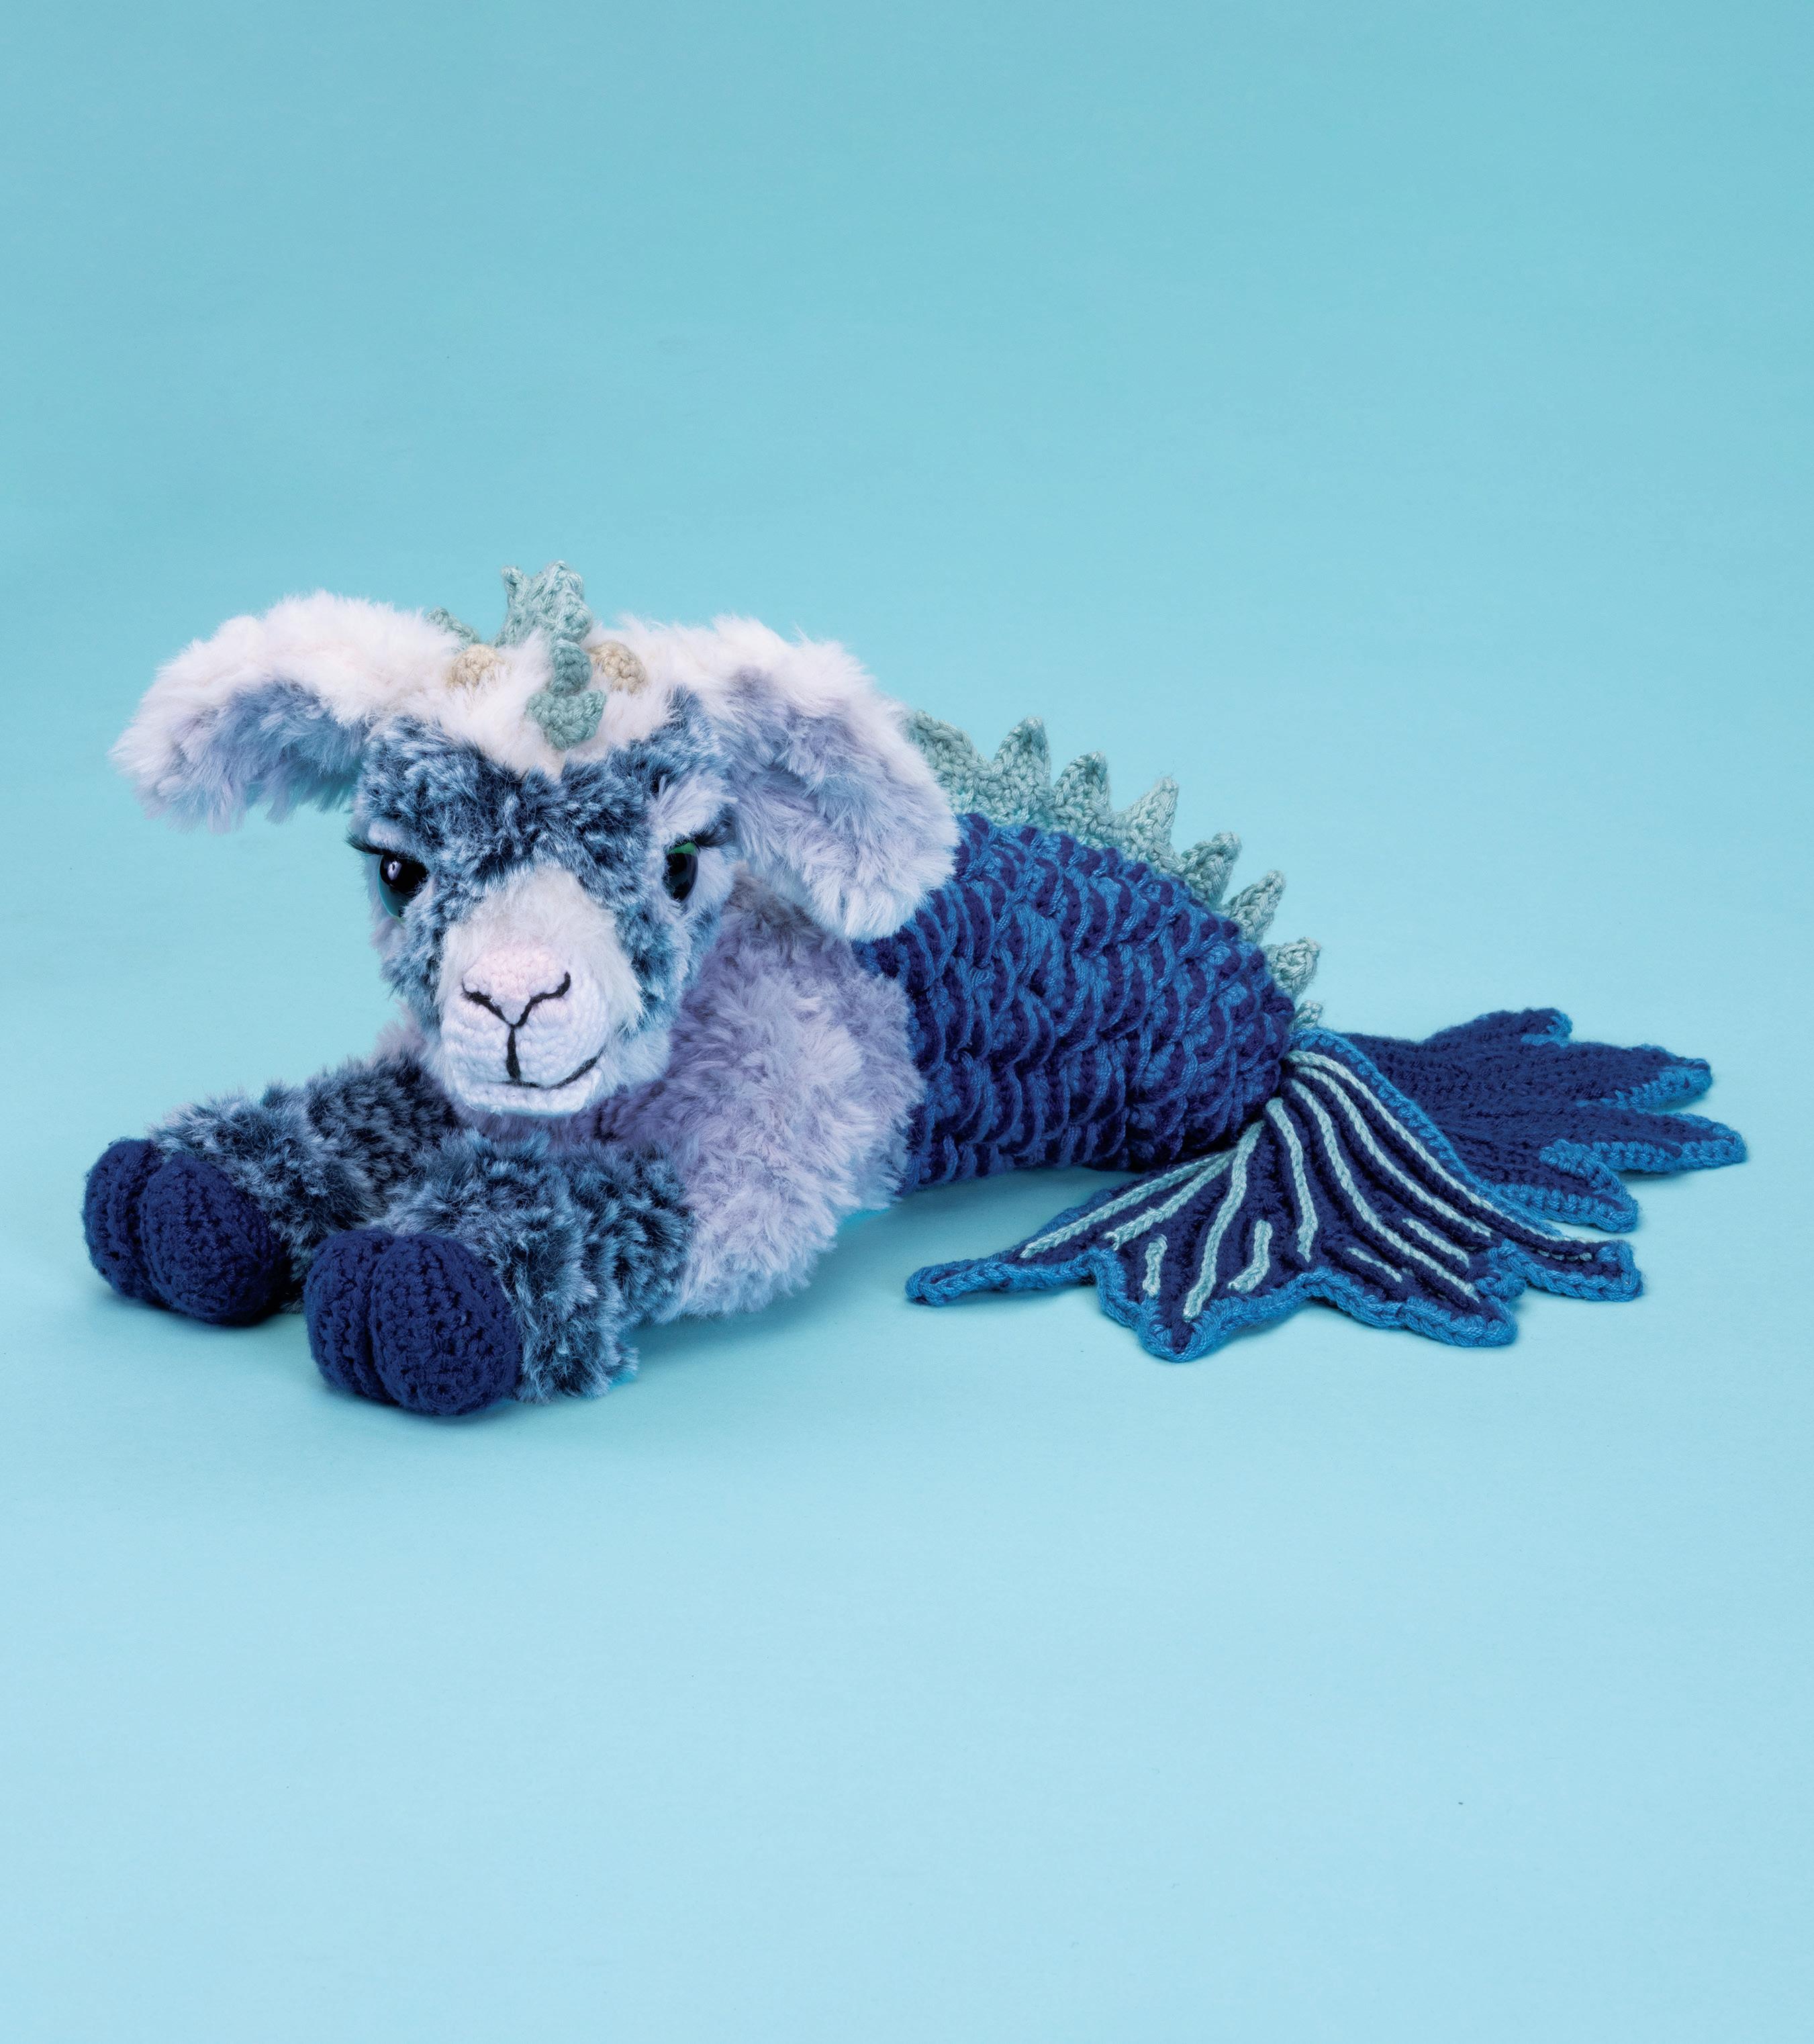
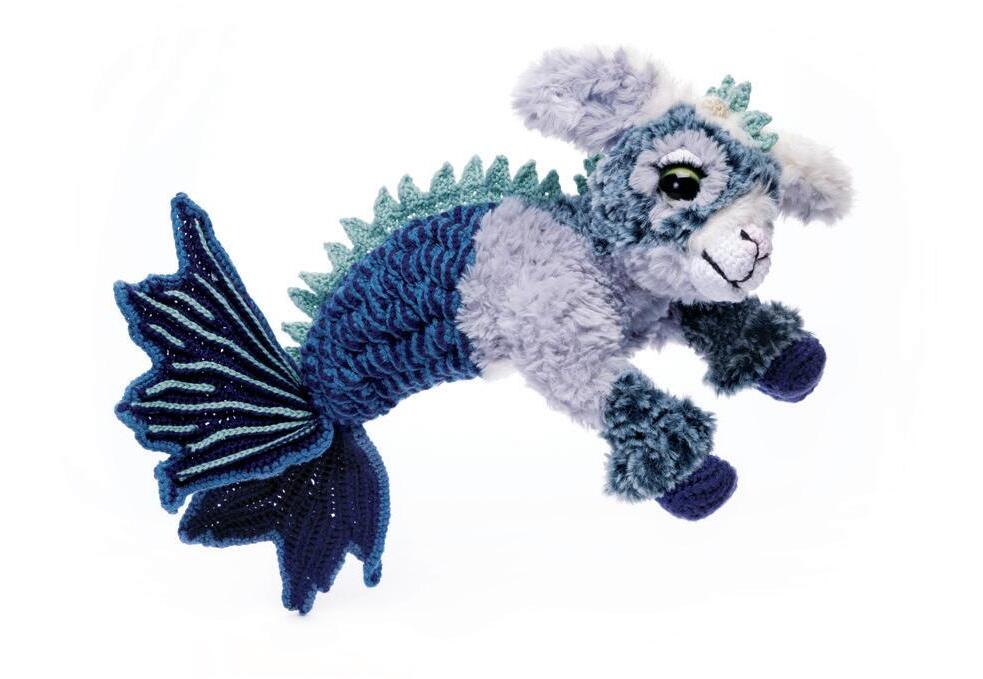
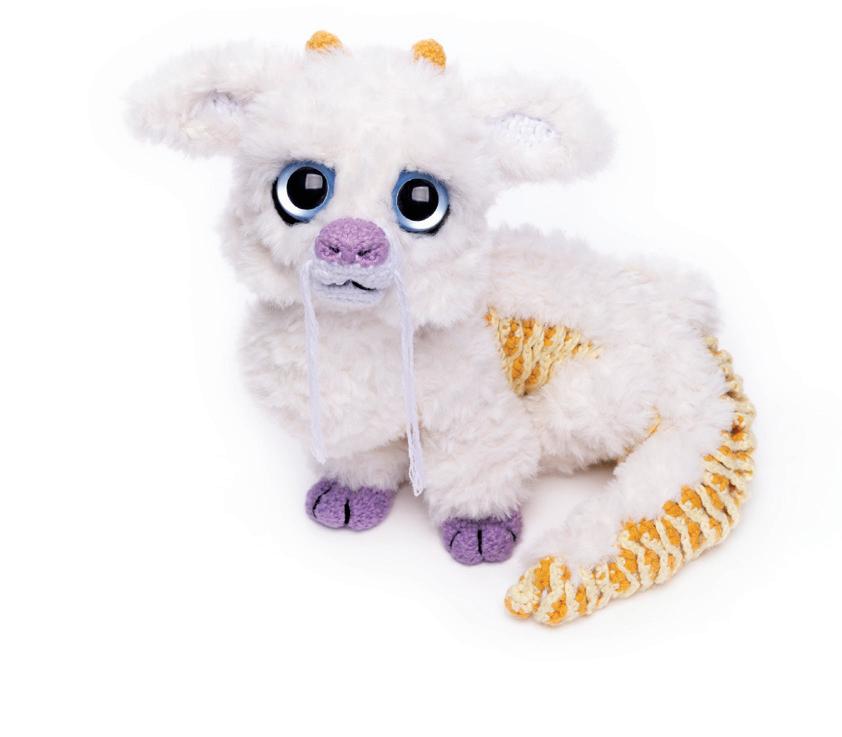
The 10th astrological sign in the zodiac, capricorns are said to be hardworking, goal-minded individuals who like to set lofty challenges for themselves. That go-getter kind of attitude will come in handy when working through the tail scales on this adorable little sea goat!
Finished Measurements
Height 7in/18cm
Width 8in/21cm
Length 8in/21cm
Materials
• Berroco Comfort Chunky
A 1 skein in 5700 Chalk
B 1 skein in 5726 Cornflower
C 3 yds in 5734 Liquorice
• Berroco Comfort
D 1 skein in 9700 Chalk
E 1 skein in 9705 Pretty Pink
F 1 skein in 9703 Barley
G 1 skein in 9763 Navy Blue
H 1 skein in 9709 Jadeite
I 1 skein in 9753 Agean Sea
J 1 skein in 9747 Cadet
• Knit Picks Fable Fur
K 1 skein in 28717 Eisbar
L 1 skein in 28725 Hibou
M 1 skein in 29440 Andesite
• Size H (5mm) crochet hook
• Size F (3.75mm) crochet hook
• Stitch markers
• 1 pair 30mm slit-pupil safety eyes
• Tapestry needle
• Round-headed pins
• Stuffing
• Optional: 5 lengths of paperwrapped floral wire, each
18in/46cm long, if wiring beast
• Optional: Fake eyelashes (Ardell Professional 3D Faux Mink)
With A and size H (5mm) hook, ch 5. Rnd 1: Starting in 2nd ch from hook and working in BRlps, sc 3, sc 3 in next ch; rotate ch; starting in FSlps of next ch, sc 2, sc 2 in next ch. (10)
Note: Work in BLO to end unless otherwise indicated.
Rnd 2: Sc 3 in next st, sc 2, sc 3 in next st, sc 1, sc 3 in next st, sc 2, sc 3 in next st, sc 1. (18)
Rnd 3: Sc 1, BPsc 8, sc 1, sc 3 in next st, loosely sl st 6, sc 3 in next st. (22)
Rnd 4: Sc2tog, sc 5, sc2tog, sc 4, sc2tog 2 times, sc 5. (18)
Rnd 5: Sc 2 in next 8 sts, sc 10. (26)
Rnd 6: Sc 1, (sc 1, sc 2 in next st, sc 1) 6 times, sc 1, (sc 1, sc 2 in next st, sc 1) 2 times. (34)
Rnd 7: Sc 34.
Rnd 8: Sc 3, sc 2 in next st, (sc 3, sc 2 in next st, sc 2) 5 times. (40)
Rnds 9–12: Sc 40.
Rnd 13: (Sc2tog, sc 2) 10 times. (30)
Rnd 14: Sc 30.
Rnd 15: (Sc 1, sc2tog) 10 times. (20)
Rnd 16: Sc2tog 10 times. (10)
Fasten off, leaving a long tail. Stuff head 50% full.
Install Safety Eyes
Count from BPsc of Rnd 3 to help locate Rnds 8 and 9 and insert eye posts bet Rnds 8 and 9 with 13 sts of sp bet the top edges of eyes.
Stuff head firmly, close hole, and weave in end.
Shape Nose Bridge (fig q )
With A, apply a sink st bet inner corners of eyes, pulling gently to sink eyes into head and define nose bridge.
With D and size F (3.75mm) hook, loosely ch 6.
Rnd 1: Starting in 2nd ch from hook and working in BRlps, sc 4, sc 3 in next ch; rotate ch; starting in next ch and working in FSlps, sc 3, sc 2 in next ch. (12)
Rnd 2: (Sc 2, sc 2 in next st) 4 times. (16)
Rnd 3: (Sc 1, sc 2 in next st, sc 2) 4 times. (20)
Rnd 4: Sc 2, ch 6, sk ch-6, sk 6 sts, sc 12.
Attach Remainder of Back Frill Attach rest of back frill to back of tail section.
Note: Work in BRlps of chs. Right fin is worked as written. For left fin, switch all BLO/ BPsc/BPhdc to FLO/FPsc/ FPhdc. Except for ch-1, count and use chs as sts. With G and size H (5mm) hook, ch 33, turn.
Row 1: Starting in BRlp of 2nd ch from hook, sc 3, hdc 18, sc 11, ch 1, turn. (32)
Row 2: Sc 1, BPsc 12, BPhdc 18, sc 1, ch 3, turn. (35)
Row 3: Starting in BRlp of 2nd ch from hook, sl st 1, sc 1; in BLO, sc 3, hdc 18, sc 11, ch 1, turn. (34)
Row 4: Sc 1, BPsc 10, BPhdc 16, ch 6, turn (leave rem 7 sts unworked). (33)
Row 5: Starting in BRlp of 2nd ch from hook, sl st 1, sc 4; in BLO, sc 3, hdc 6, ch 1, turn (leave rem 18 sts unworked). (14)
Row 6: Sc 1, BPhdc 9, BPsc 3, sc 1, ch 5, turn. (19)
Row 7: Starting in BRlp of 2nd ch from hook, sl st 1, sc 3; in BLO, sc 4, hdc 9, sc 1, insert hook into side edge of Row 6, YO and pull up a lp, insert hook into BL of next unworked st from Row 5, YO and pull up a lp. YO and pull through 2 lps on hook (counts as 1 sc). In BL of rem sts from Row 5, hdc 7, sc 10, ch 1, turn. (36)
Row 8: Sc 1, BPsc 10, BPhdc 16, BPsc 8, sc 1, ch 1, turn. (36)
Row 9: In BLO, sl st 2, sc 4, hdc 9, ch 1, turn (leave rem 21 sts
unworked). (15)
Row 10: Sc 1, BPhdc 6, BPsc 4, ch 1, turn (leave rem 4 sts unworked). (11)
Row 11: In BLO, sl st 3, sc 4, hdc 3, sc 1, insert hook into side edge of Row 10, YO and pull up a lp, insert hook into BL of next unworked st from Row 9, YO and pull up a lp, YO and pull hook through rem lps on hook (counts as 1 sc); in BL of rem sts from Row 9, hdc 8, sc 12, ch 1, turn. (32)
Row 12: Sc 1, BPsc 10, BPhdc 14, ch 6, turn (leave rem 7 sts unworked). (31)
Row 13: Starting in BRlp of 2nd ch from hook, sl st 1, sc 4; in BLO, sc 3, hdc 6, ch 1, turn (leave rem 16 sts unworked). (14)
Row 14: Sc 1, BPhdc 8, BPsc 4, sc 1, ch 5, turn. (19)
Row 15: Starting in BRlp of 2nd ch from hook, sl st 1, sc 3; in BLO, sc 4, hdc 9, sc 1, insert hook into side edge of Row 14, YO and pull up a lp, insert hook into BL of next unworked st from Row 13, YO and pull up a lp, YO and pull hook through rem lps on hook (counts as 1 sc). In BL of rem sts from Row 13, hdc 7, sc 8, ch 1, turn. (34)
Row 16: Sc 1, BPsc 10, BPhdc 15, BPsc 7, sc 1, ch 1, turn.
Row 17: In BLO, sl st 2, sc 4, hdc 9, ch 1, turn (leave rem 19 sts unworked). (15)
Row 18: Sc 1, BPhdc 6, BPsc 4, ch 1, turn (leave rem 4 sts unworked). (11)
Row 19: In BLO, sl st 3, sc 4, hdc 3, sc 1, insert hook into side edge of Row 18, YO and pull up a lp, insert hook into BL of next
unworked st from Row 17, YO and pull up a lp, YO and pull hook through rem lps on hook (counts as 1 sc). In BL of rem sts from Row 17, work hdc 8, sc 10, ch 1, turn. (30)
Row 20: Sc 1, BPsc 10, BPhdc 10, BPsc 3, ch 6, turn (leave rem 6 sts unworked). (30)
Row 21: Starting in BRlp of 2nd ch from hook, sl st 2, sc 3; in BLO, sc 4, hdc 10, sc 10, ch 1, turn. (29)
Row 22: Sc 1, BPsc 10, BPhdc 10, BPsc 7, sc 1, ch 3, turn. (32)
Row 23: Starting in BRlp of 2nd ch from hook, sl st 1, sc 1; in BLO, sc 7, hdc 11, sc 11. (31)
Cut G, change to J.
With lps from right fin BP or left fin FP sts facing up, sc around outside edge of tail fin and fasten off.
Orient fins so surface lps from right fin BP or left fin FP sts face up and frilled edges point to left. With H, sl st yarn into line of surface lps of BP/FP sts on each fin, working from right to left. Fasten off after completing each line and weave in ends.
With fin line detailing facing up, attach side edges of fins to back of tail, working fins in bet scales.
Optional: Add Eyelashes
Stick adhesive band of fake lashes to back edge of eyes. ■
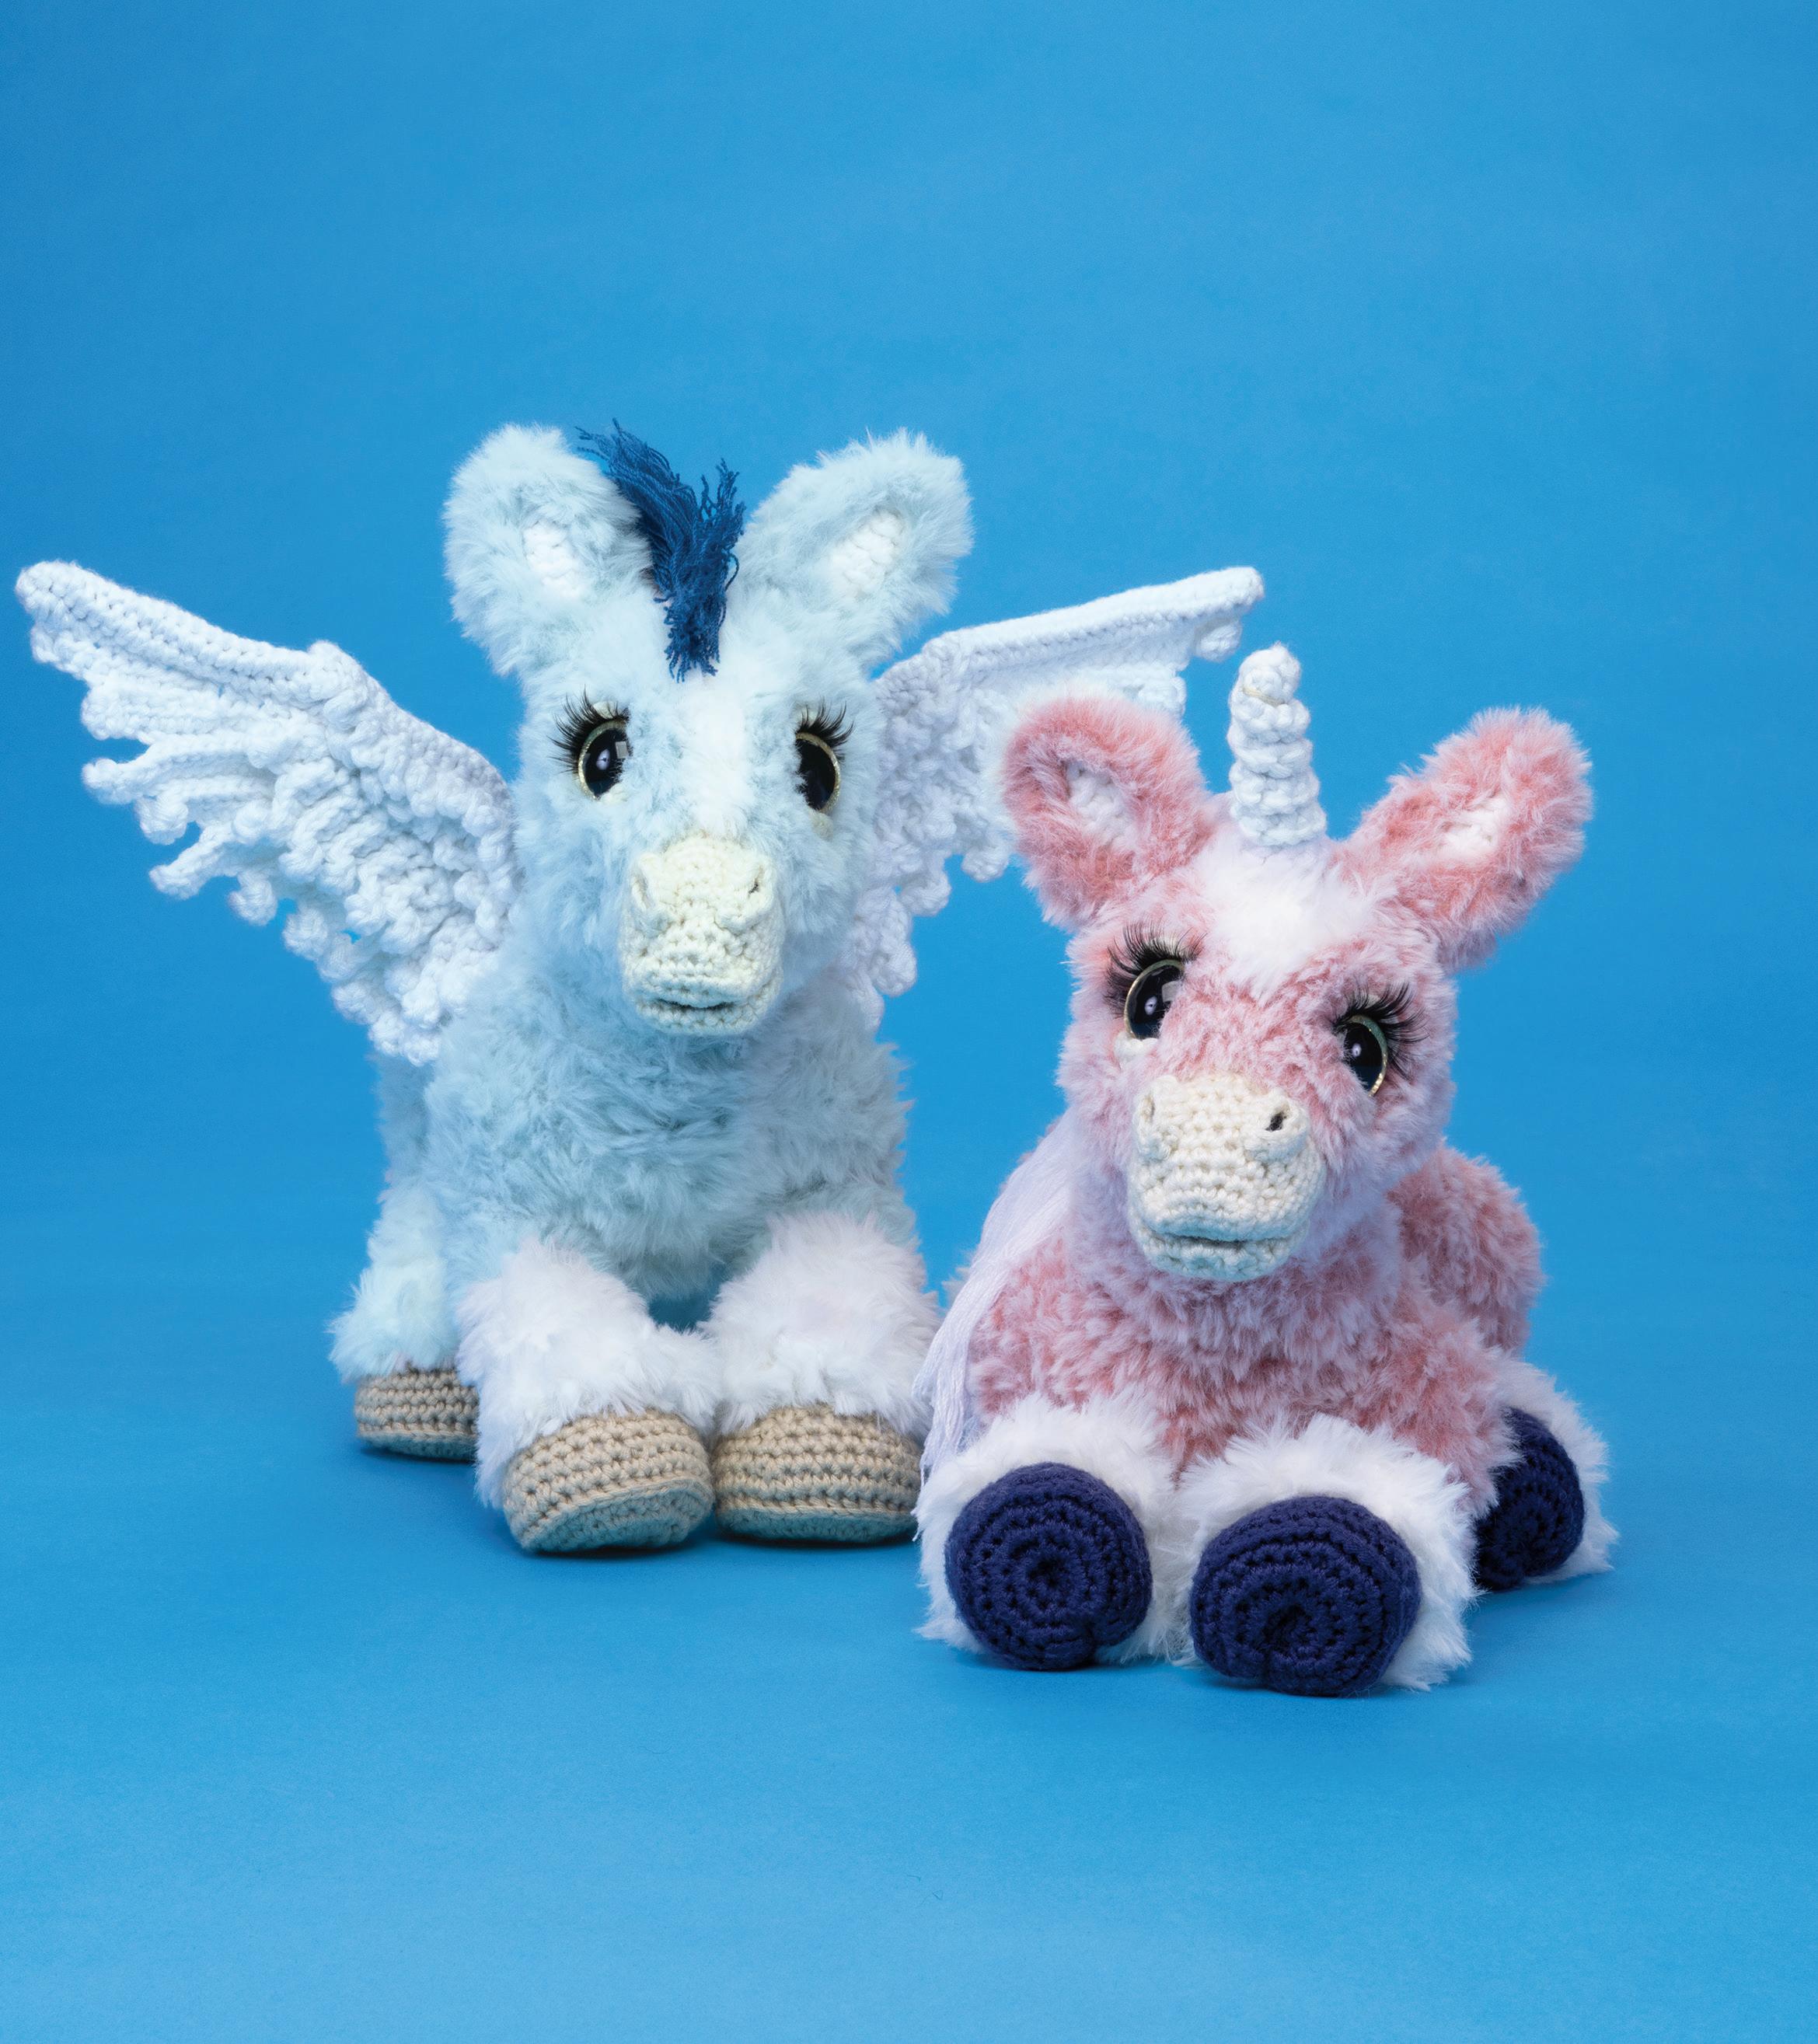
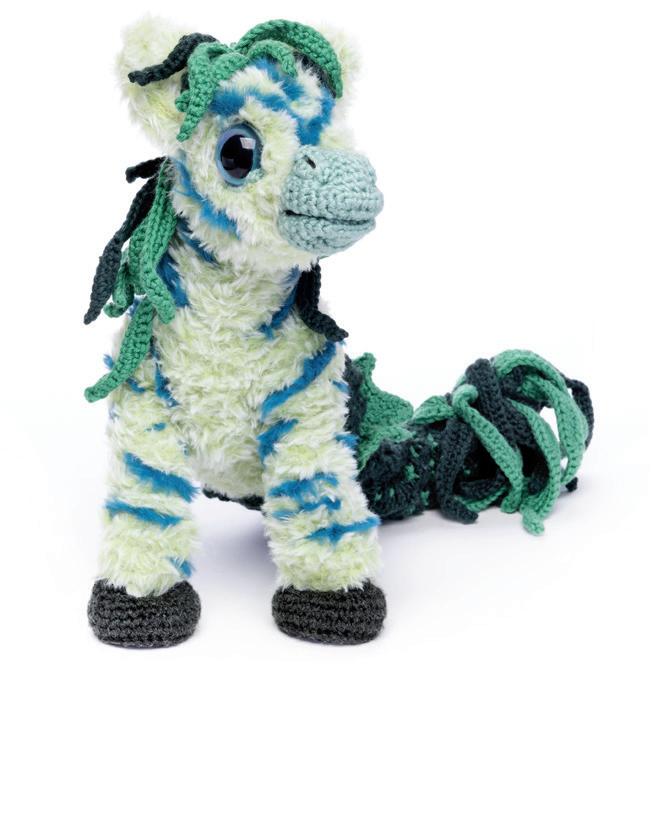
You’ll have your hands full corralling these two spunky darlings. Unicorn and pegasus foals are majestic, magical, and most of all, mischievous, so don’t be surprised when you find the upper branches of your apple trees suspiciously empty of fruit or mysterious holes poked into your sacks of sugar cubes. These two have no idea what you’re talking about.
Finished Measurements
Height 14in/36cm
Width 6in/15cm
Length 9in/23cm
Materials
Note: Yarn amounts listed will cover both foals.
• Berroco Comfort Chunky
A 4 skeins in 5700 Chalk (both)
• Berroco Comfort
B 1 skein in 9701 Ivory (both)
C 1 skein in 9703 Barley (pegasus)
D 1 skein in 9763 Navy Blue (unicorn)
E 1 skein in 9734 Liquorice (both)
F 1 skein in 9700 Chalk (both)
G 1 skein in 9753 Agean Sea (pegasus)
• Knit Picks Fable Fur
H 1 skein in 28723 Topo (pegasus)
I 1 skein in 28726 Volpe (unicorn)
• NICEEC Fur Yarn
J 1 skein in Cream White (both)
• Size H (5mm) crochet hook
• Size F (3.75mm) crochet hook
• Stitch markers
• 2 pairs of 27mm round-pupil safety eyes (both)
• Tapestry needle
• Round-headed pins
• Stuffing
• Optional: 12 lengths of paperwrapped floral wire, each 18in/46cm long, if wiring beast
• Optional: Foam stabilizer, if not wiring wings
• Optional: Fake Eyelashes (Ardell Professional 3D Faux Mink)
Pegasus or Unicorn HEAD
With A and size H (5mm) hook, make an 8-st AR. Note: Work in BLO to end.
Rnd 1: Sc 2 in each st around. (16)
Rnds 2 and 3: Sc 16.
Rnd 4: (Sc 3, sc 2 in next st) 4 times. (20)
Rnd 5: (Sc 2, sc 3 in next st, sc 2) 4 times. (28)
Rnd 6: (Sc 3, sc 2 in next st, sc 3) 4 times. (32)
Rnds 7 and 8: Sc 32.
Rnd 9: (Sc 7, sc 2 in next st) 4 times. (36)
Rnds 10–12: Sc 36.
Rnd 13: (Sc 1, sc2tog) 12 times. (24) Stuff head.
Rnd 14: (Sc 1, sc2tog) 8 times. (16)
Orient the square shaping at front of head to be plumb and level. Place eyes 6–7 rnds from front of head with 9–10 sts bet top edges of eyes. If helpful, remove stuffing while installing eye backings.
Rnd 15: Sc2tog 8 times. (8) Fasten off, leaving a long tail.
Shape Head (fig q )
If needed, add more stuffing before closing hole at back of head. Apply a sink st back and forth through head bet edges of eyes to sink eyes into head.
With B and size F (3.75mm) hook, ch 6.
Rnd 1: Starting in 2nd ch from hook and working in BRlps, sc 4, sc 3 in next ch; rotate ch; starting in next ch and working in FSlps, sc 3, sc 2 in next ch. (12)
Rnd 2: (Sc 2, sc 2 in next st) 4 times. (16)
Rnd 3: (Sc 1, sc 2 in next st, sc 2) 4 times. (20)

TAIL (MAKE 1 IN G FOR PEGASUS OR 1 IN F FOR UNICORN) (FIG 10 )
Cut 20 pieces of F or G in 12in/ 31cm lengths. Divide yarn into 2 bundles of 10 pieces each. Secure middle of 1 bundle to upper back of body and rem bundle directly above it with fringe knots. Separate yarn strands of tail with tapestry needle, then brush out and trim as desired.
With H, I, or J and size H (5mm) hook, sl st fur yarn onto surface of work and cover crochet surfaces worked in A with sl sts (using exposed surface lps wherever possible). Leave bottom 4 rnds of
legs and the area between the eyes unworked to add blaze, fringe and/ or sock details.
Work following details in J:
• Blaze: Apply a strip from front of mane to top edge of nose bet eyes, if desired. Work stripe wider near mane and narrower bet eyes to make a long diamond-like shape.
• Hoof Fringe: Working into surface FLs of sts directly above hoof, (sl st 1, ch 4, sl st 1) into each surface FL around top edge of hoof to create 10–12 hoof fringes.
• Socks: Once hoof fringe is done, cover bottom 4 rnds of each leg in J.
Optional: Add Eyelashes
Stick adhesive band of fake lashes to back edge of eyes. ■
Brush out fur to loosen fibers.
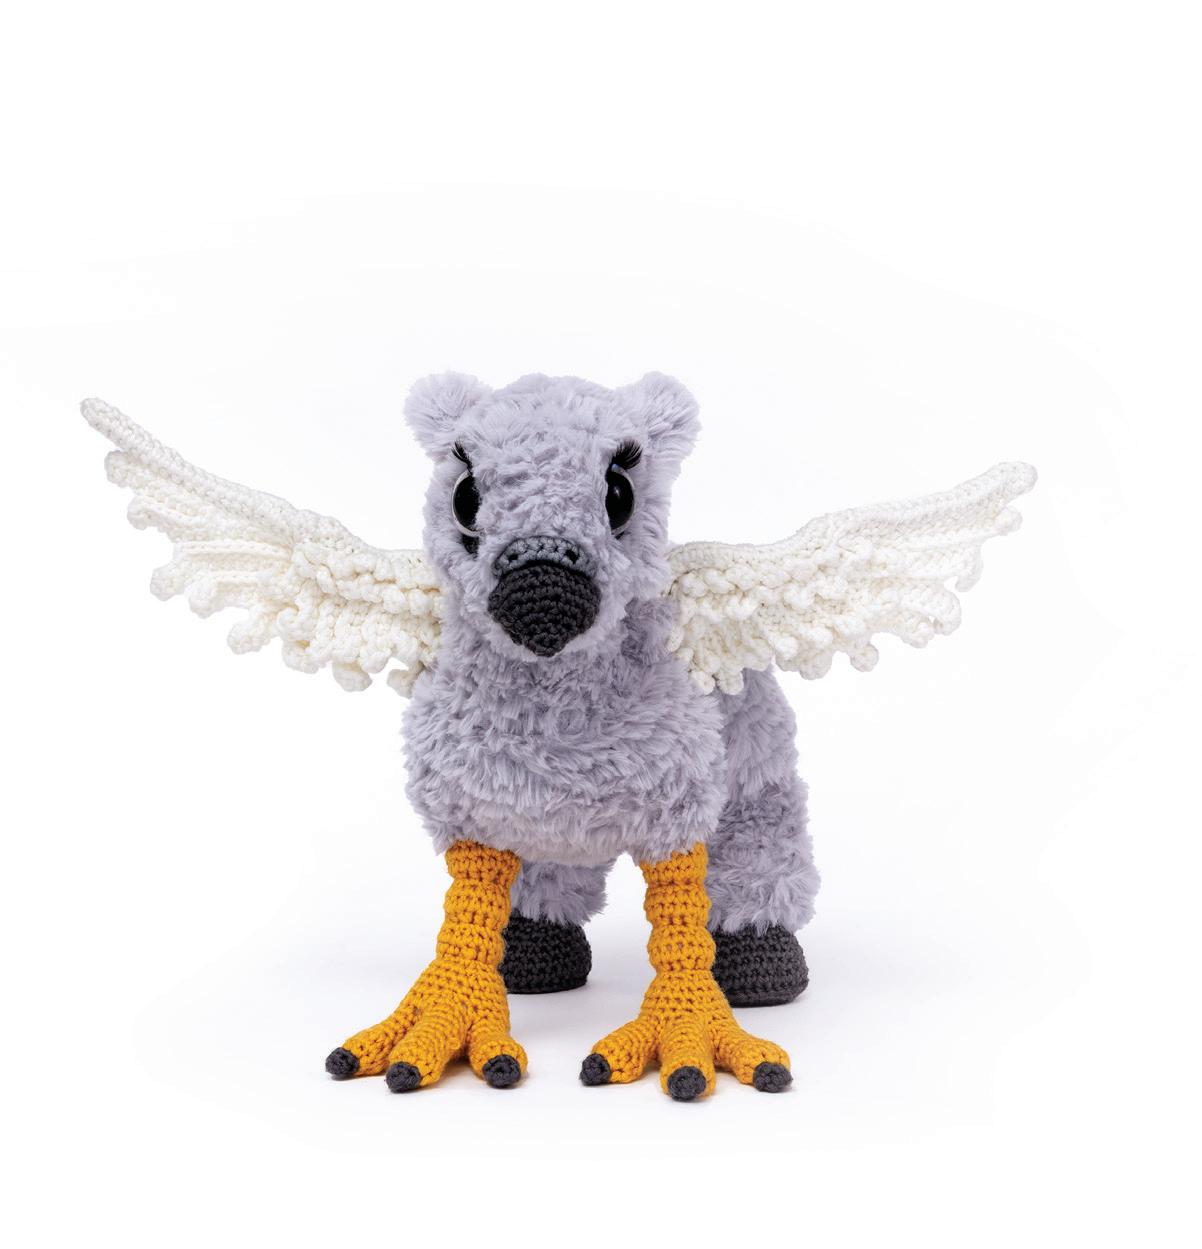
Half eagle and half horse, the hippogriff sprang to existence from a poem written in the 16th century to become the steed of choice for magicians, knights, and wizards. With its sweet disposition, fluffy coat, steely beak, and razor-sharp talons, a baby hippogriff chick is the perfect combination of delightful and deadly! Just watch your fingers when you go in for chin scratches.
Finished Measurements
Height 12in/31cm
Width 11in/28cm
Length 12in/31cm
Materials
• Berroco Comfort Chunky
A 1 skein in 5770 Ash Grey
• Berroco Comfort
B 1 skein in 9713 Dusk
C 1 skein in 9784 Slate
D 1 skein in 9729 Smoke Stack
E 1 skein in 9743 Goldenrod
F 1 skein in 9700 Chalk
G 2 yds in 9734 Liquorice
• Knit Picks Fable Fur
H 1 skein in 29440 Andesite
• Size H (5mm) crochet hook
• Size F (3.75mm) crochet hook
• Stitch markers in 3 colors
• 1 pair of 30mm round-pupil safety eyes
• Tapestry needle
• Round-headed pins
• Stuffing
• 1in/3cm square of pink felt
• Optional: 5 lengths of paperwrapped floral wire, each
18in/46cm long, if wiring beast
• Optional: Foam stabilizer, if not wiring wings
• Optional: Fake Eyelashes (Ardell Professional 3D Faux Mink)
HEAD
With A and size H (5mm) hook, make a 6-st AR. Note: Work in BLO to end.
Rnd 1: Sc 2 in each st around. (12)
Rnd 2: (Sc 1, sc 3 in next st, sc 1) 4 times. (20)
Rnd 3: (Sc 2, sc 3 in next st, sc 2) 4 times. (28)
Rnd 4: (Sc 6, sc 2 in next st) 4 times. (32)
Rnds 5–9: Sc 32.
Rnd 10: (Sc 7, sc 2 in next st) 4 times. (36)
Rnd 11: Sc 36.
Rnd 12: (Sc 1, sc2tog) 12 times. (24)
Rnd 13: (Sc 1, sc2tog) 8 times. (16) Stuff head.
Install Safety Eyes
Orient square shaping at front of head to be plumb and level. Install safety eyes 5–6 rnds from front of
head with 10–12 sts bet top edges of eyes. If helpful, remove stuffing while installing eyes. Finish stuffing head before cont to Rnd 14.
Rnd 14: Sc2tog 8 times. (8) Fasten off, close hole, and weave in end.
Apply a sink st bet edges of eyes to sink eyes into head.
With B and size F (3.75mm) hook, ch 20 and sl st in ch 1 to form a loop. Working in ch-20 sp, sc 25 (enclosing edge of loop). Fasten off, leaving a long tail.
Pin eye rings around eyes with FSlps of ring against sides of head. Pinch upper back corner and lower front corners of ring tog to create 2 small, folded bumps along ring edge. Hold shape in place with a few pins. Sew eye rings and pinched shaping to head.

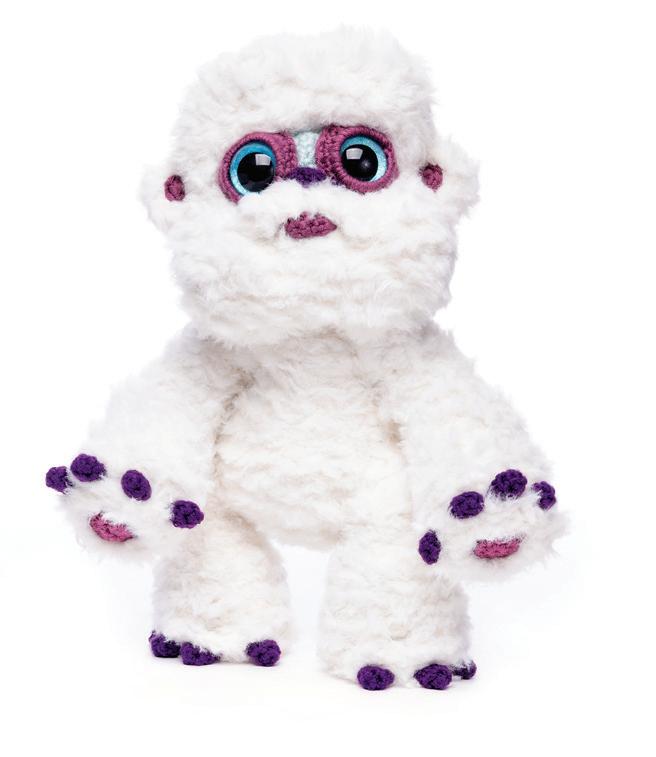
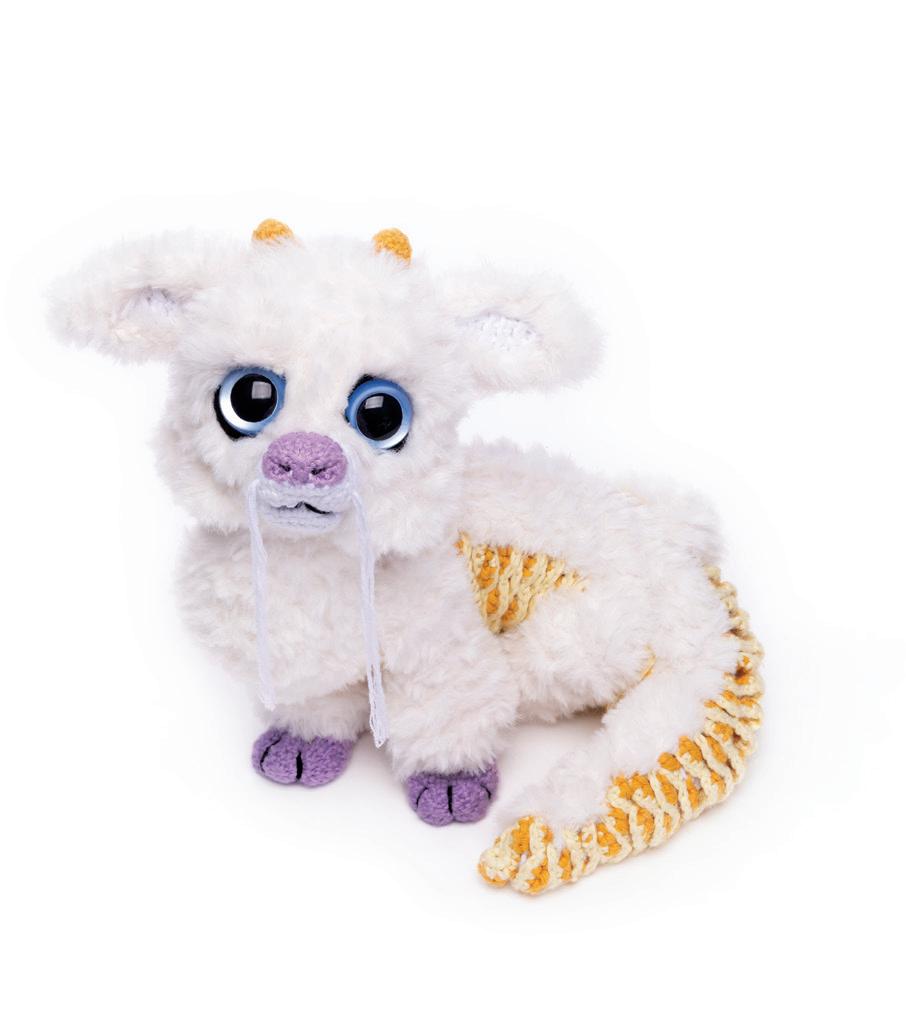
Anything but abominable, adorable baby yetlings can be found among the icy peaks of the Himalayan mountain range in Asia. These cuddly snow-tots are playful, loving, and always in search of fresh powder and warm hugs. Just watch out if one of these little pranksters offers you a “lemon” snow cone.
Finished Measurements
Height 9in/23cm
Width 10in/26cm
Length 8in/21cm
Materials
• Berroco Comfort Chunky
A 2 skeins in 5700 Chalk
• Berroco Comfort
B 1 skein in 9717 Raspberry
Coulis
C 1 skein in 9722 Purple
D 1 skein in 9714 Robin’s Egg
• Lion Brand Go For Faux
Sparkle
E 2 skeins in Star
• Size H (5mm) crochet hook
• Size F (3.75mm) crochet hook
• Stitch markers
• 1 pair of 30mm round-pupil
safety eyes
• Tapestry needle
• Round-headed pins
• Stuffing
• Scrap yarn
• Optional: 5 lengths of paperwrapped floral wire, each 18in/46cm long, if wiring beast
With D and size F (3.75mm) hook, ch 25, turn.
Row 1: Starting in BRlp of 2nd ch from hook, sc 24, ch 1, turn. (24)
Rows 2–8: Sc 24, ch 1, turn.
Row 9: Sc 24. Fasten off, leaving a long tail.
With A and size H (5mm) hook, ch 11, turn.
Rnd 1: Starting in 2nd ch from hook and working in BRlps, sc 9, sc 3 in next ch; rotate ch; starting in next ch and working in FSlps, sc 8, sc 2 in next ch. (22)
Note: Work in BLO to end.
Rnd 2: (Sc 2 in next st, sc 8, sc 2 in next st, dc 1) 2 times. (26)
Rnd 3: (Sc 2 in next st, sc 10, sc 2 in next st, dc 2 in next st) 2 times. (32)
Rnd 4: (Sc 3, sc 2 in next st) 8 times. (40)
Rnd 5: (Sc 2, sc 2 in next st, sc 2) 8 times. (48)
Rnds 6–9: Sc 48.
Rnd 10: (Sc 4, sc2tog) 8 times. (40)
Rnd 11: (Sc 2, sc2tog)10 times. (30)
Rnds 12–14: Sc 30.
Rnd 15: (Sc 3, sc2tog) 6 times. (24)
Rnd 16: Sc2tog 12 times. (12)
Attach Face Patch and Shape Head (fig q )
Stuff head firmly. Position face patch over upper portion of head bet Rnds 11–15. Tack down edges of face patch with whip or running st. With A, apply a sink st bet bottom of head and Rnd 11 below lower edge of face patch, puffing out lower half of head.
Install Safety Eyes
Install eyes onto face patch with 6–7 sts bet them. Cont to Rnd 17.
Rnd 17: Sc2tog 6 times. (6) Fasten off, leaving a long tail. If needed, add more stuffing before closing hole. Weave in end.
With B and size F (3.75mm) hook, ch 15 and sl st in ch 1 to form a lp. Working in ch-15 sp, sc 20 (enclosing edge of loop). Fasten off, leaving a long tail.

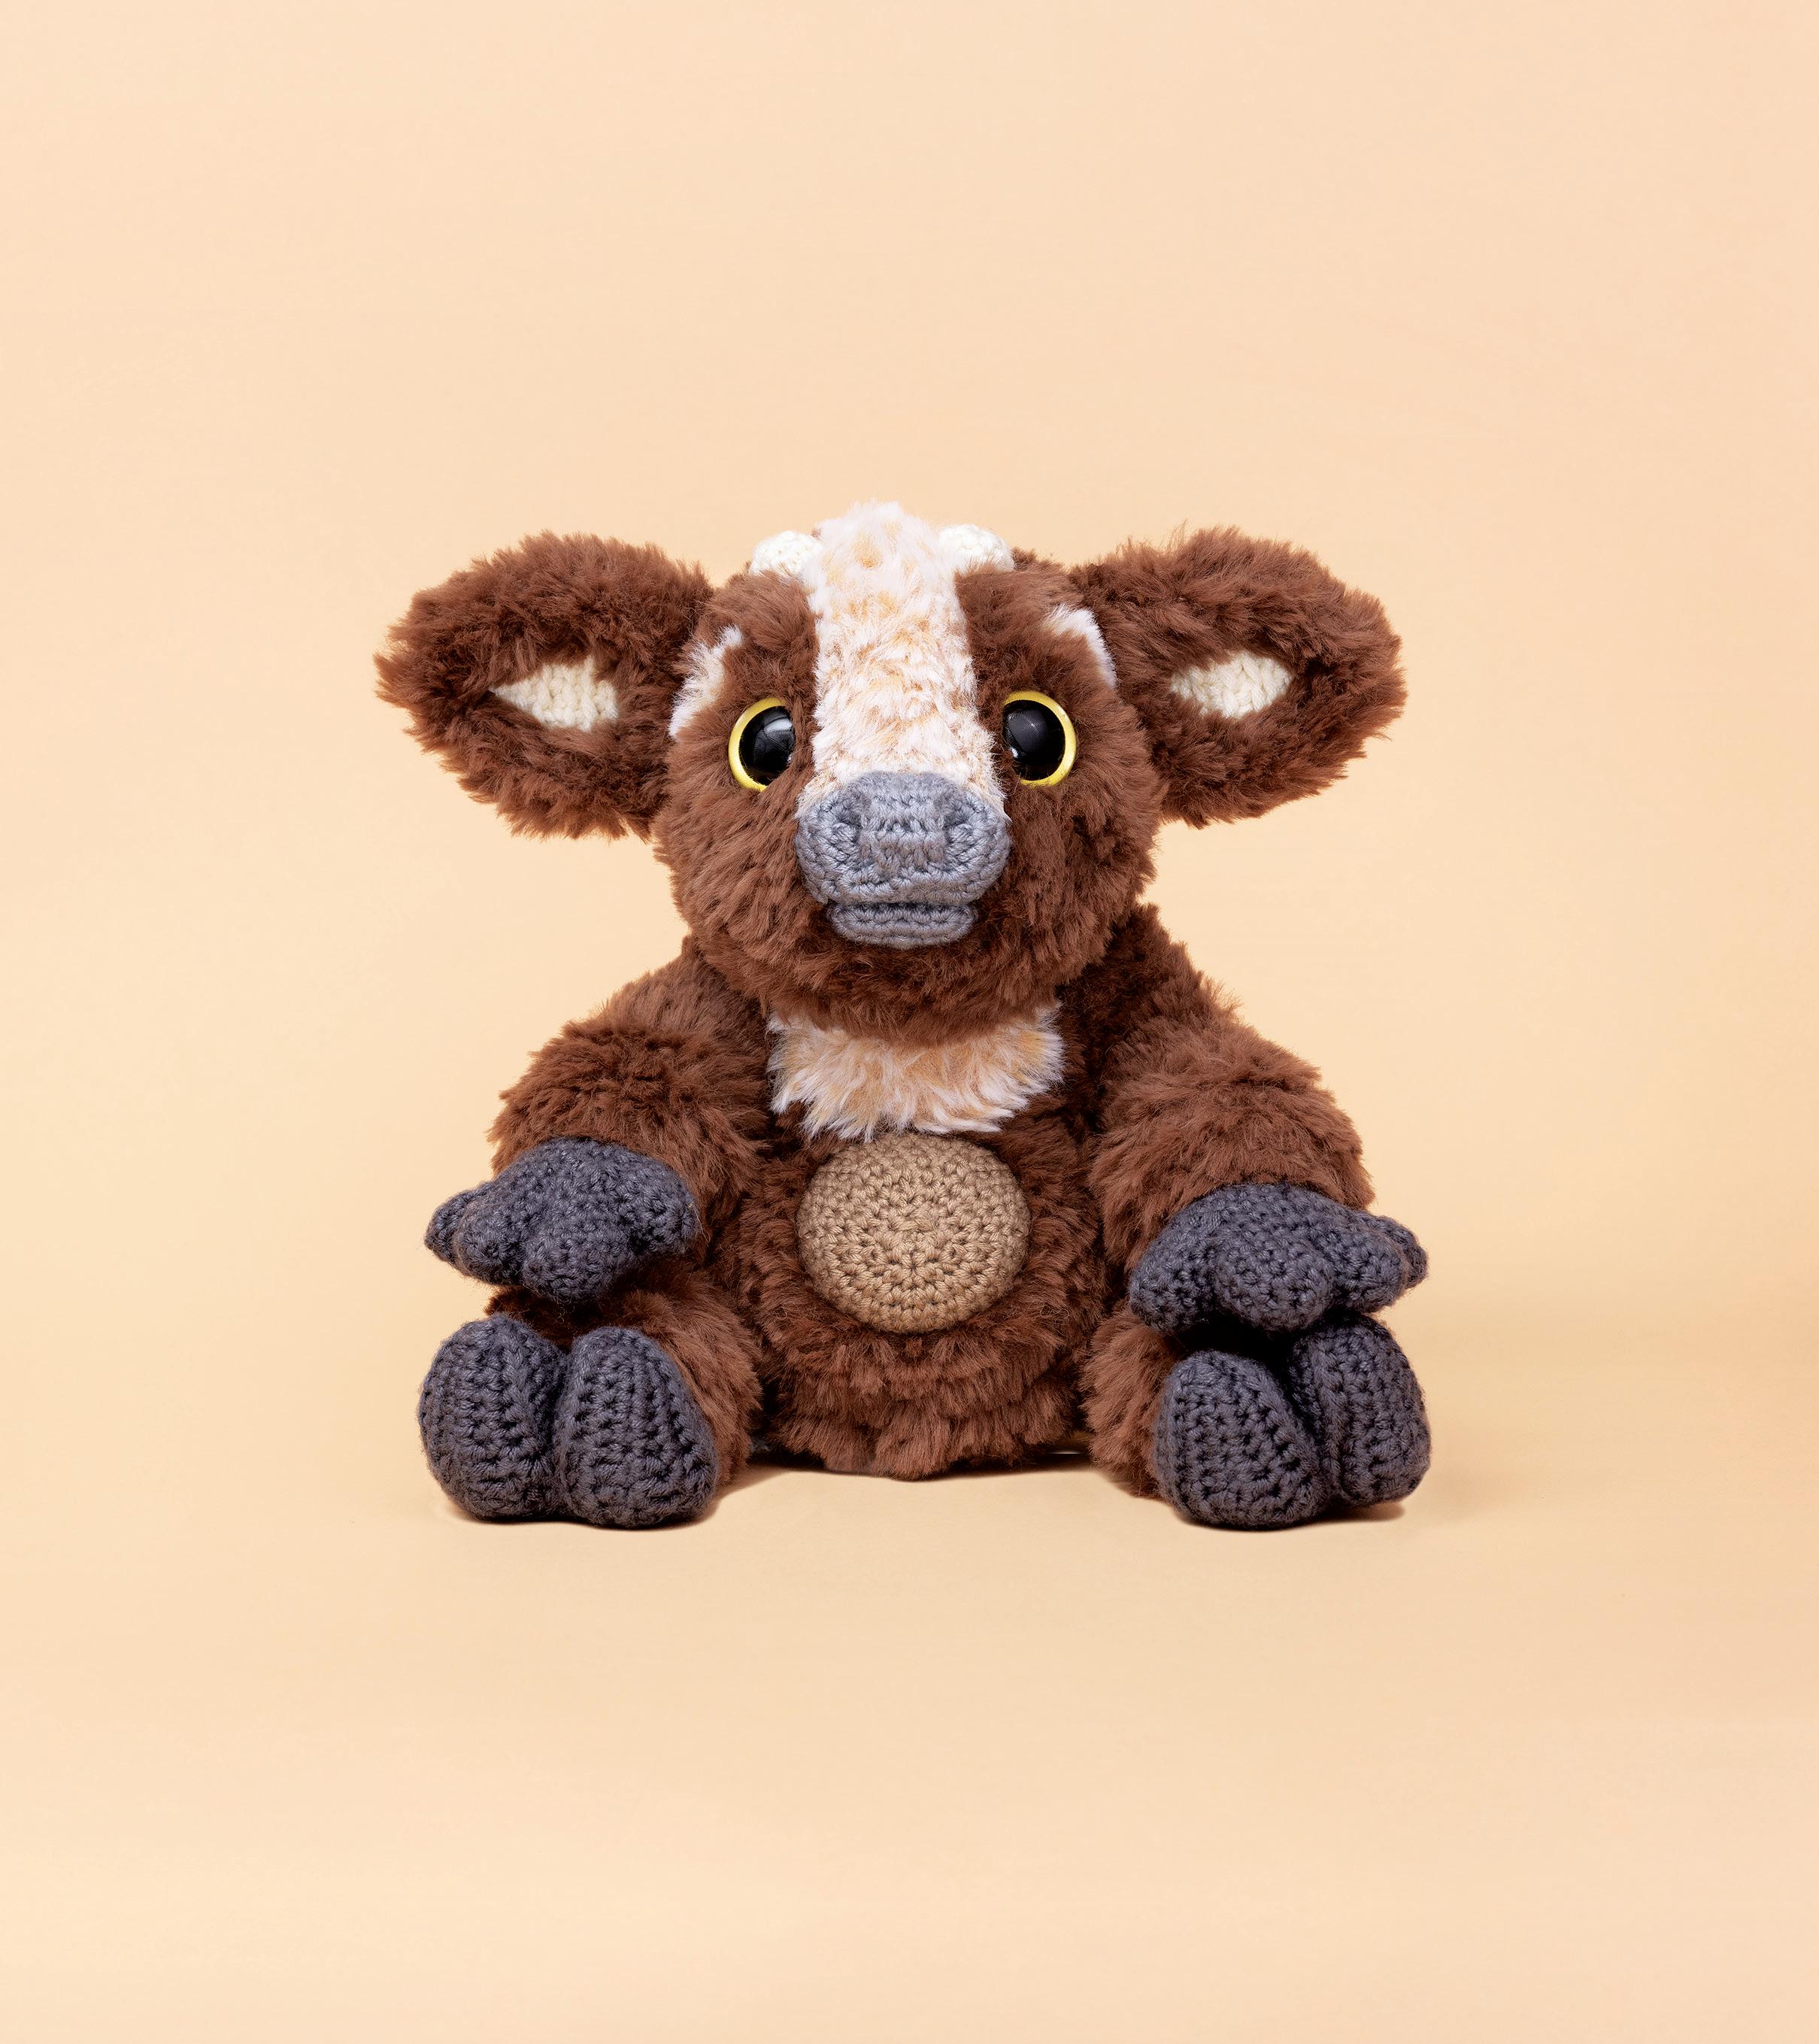
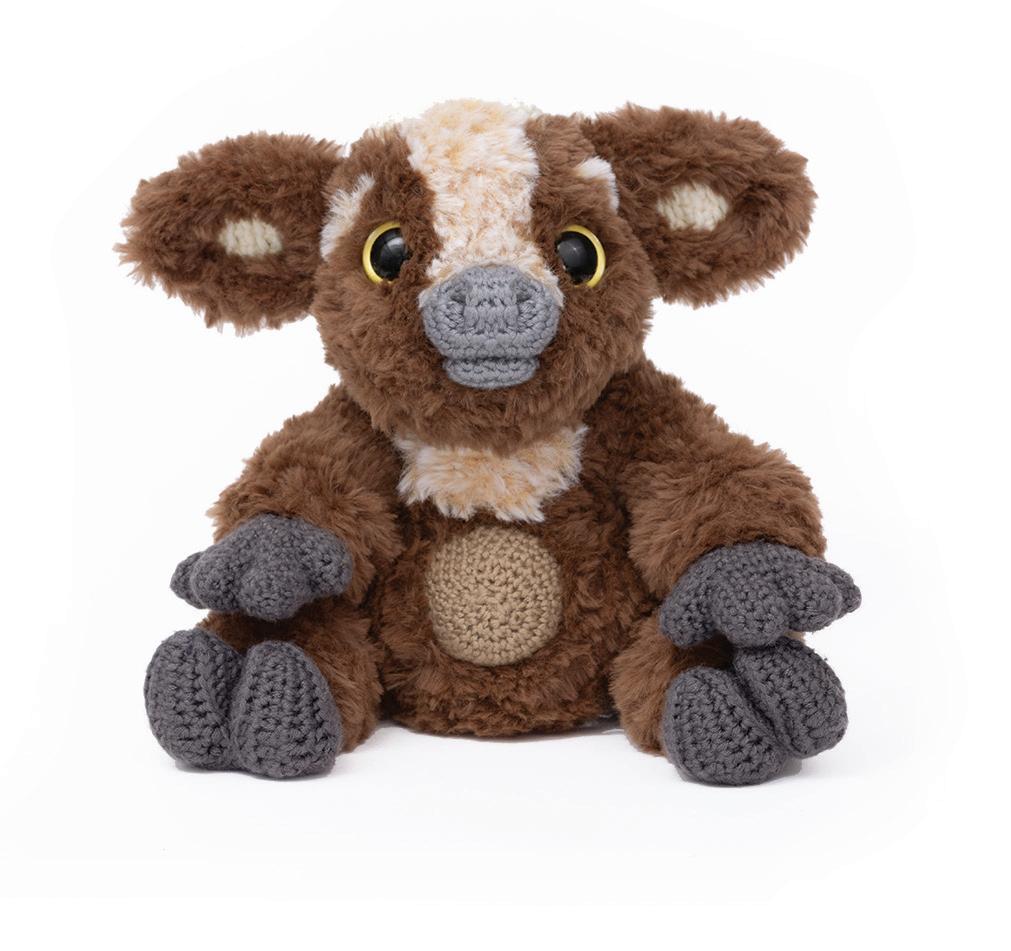
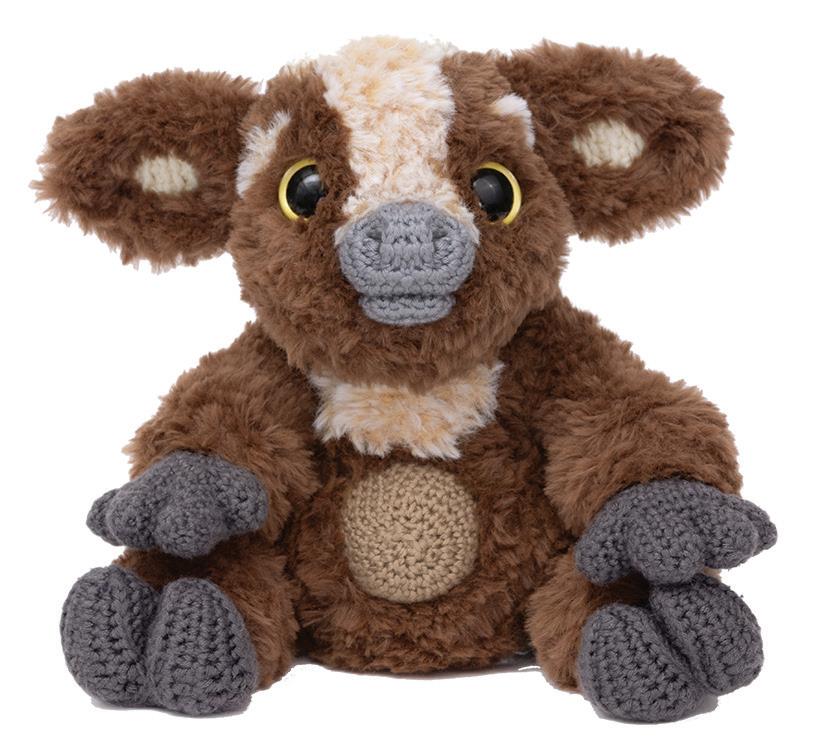
It can be lonely puttering around a massive labyrinth by yourself, so minotaur calves are big fans of inviting friends over for epic games of hide and seek. You can join in as long as you leave your gold sewing thread at the door—no cheating! Feel free to accessorize your cow-headed cutie with a cabone nose ring while assembling their snout or with a blanket for nap time (in any color but red).
Finished Measurements
Height 9in/23cm
Width 9in/23cm
Length 6in/15cm
Materials
• Berroco Comfort Chunky
A 2 skeins in 5727 Spanish Brown
B 1 skein in 5701 Ivory
• Berroco Comfort
C 1 skein in 9729 Smoke Stack
D 1 skein in 9701 Ivory
E 1 skein in 9784 Slate
F 1 skein in 9720 Hummus
• Go Handmade Fur Lux
G 3 skeins 17690 Nougat
• Knit Picks Fable Fur
H 1 skein in 29441 Pumice
• Size H (5mm) crochet hook
• Size F (3.75mm) crochet hook
• Stitch markers
• 1 pair of 27mm round-pupil safety eyes.
• Scrap yarn
• Tapestry needle
• Round-headed pins
• Stuffing
• Optional: 2 lengths of paperwrapped floral wire, each 18in/46cm long, if wiring beast
Note: Count and use chs as sts. With A and size H (5mm) hook, ch 11, turn.
Rnd 1: Starting in 2nd ch from hook and working in BRlps, sc 9, sc 3 in next ch; rotate ch; starting in FSlps of next ch, sc 8, sc 2 in next ch. (22)
Note: Work in BLO to end.
Rnd 2: (Sc 2 in next st, sc 8, sc 2 in next st, dc 1) 2 times. (26)
Rnd 3: (Sc 2 in next st, sc 10, sc 2 in next st, dc 2 in next st) 2 times. (32)
Rnd 4: (Sc 3, sc 2 in next st) 8 times. (40)
Rnd 5: (Sc 2, sc 2 in next st, sc 2) 8 times. (48)
Rnd 6: Sc 48.
Rnd 7: Sc 2, ch 15, sk ch-15, sk 18 sts, (sc 2, sc2tog, sc 2) 4 times, sc 2, sc2tog. (40)
Rnd 8: (Sc 2, sc2tog )10 times. (30)
Rnds 9–13: Sc 30.
Rnd 14: (Sc 3, sc2tog) 6 times. (24)
Rnd 15: Sc2tog 12 times. (12)
Rnd 16: Sc2tog 6 times. (6) Fasten off, leaving a long tail.
With A and size H (5mm) hook, work along edge of ch-15 opening from Rnd 7 of head.
Rnd 1: Starting in lower right corner, (sl st 1, ch 1, sc 1) (counts as 1 sc). Working clockwise, evenly sc 35 around rem edge. (36) Note: Work in BLO to end.
Rnd 2: (Sc 1, sc2tog) 12 times. (24)
Rnd 3: Sc2tog 12 times. (12) Fasten off, leaving a long tail.
Insert safety eyes into Rnd 8 of head with about 7 sts bet them.
With A, use a mattress st to close opening at front of mouth in a horizontal line. Apply a sink st through head bet inner edges of eyes. With A, apply sink st bet Rnd 8 at back of muzzle (just bet eyes) and bottom of head. With A, apply cinch st bet bottom of head and middle of muzzle seam, pulling firmly to form two cheeks.
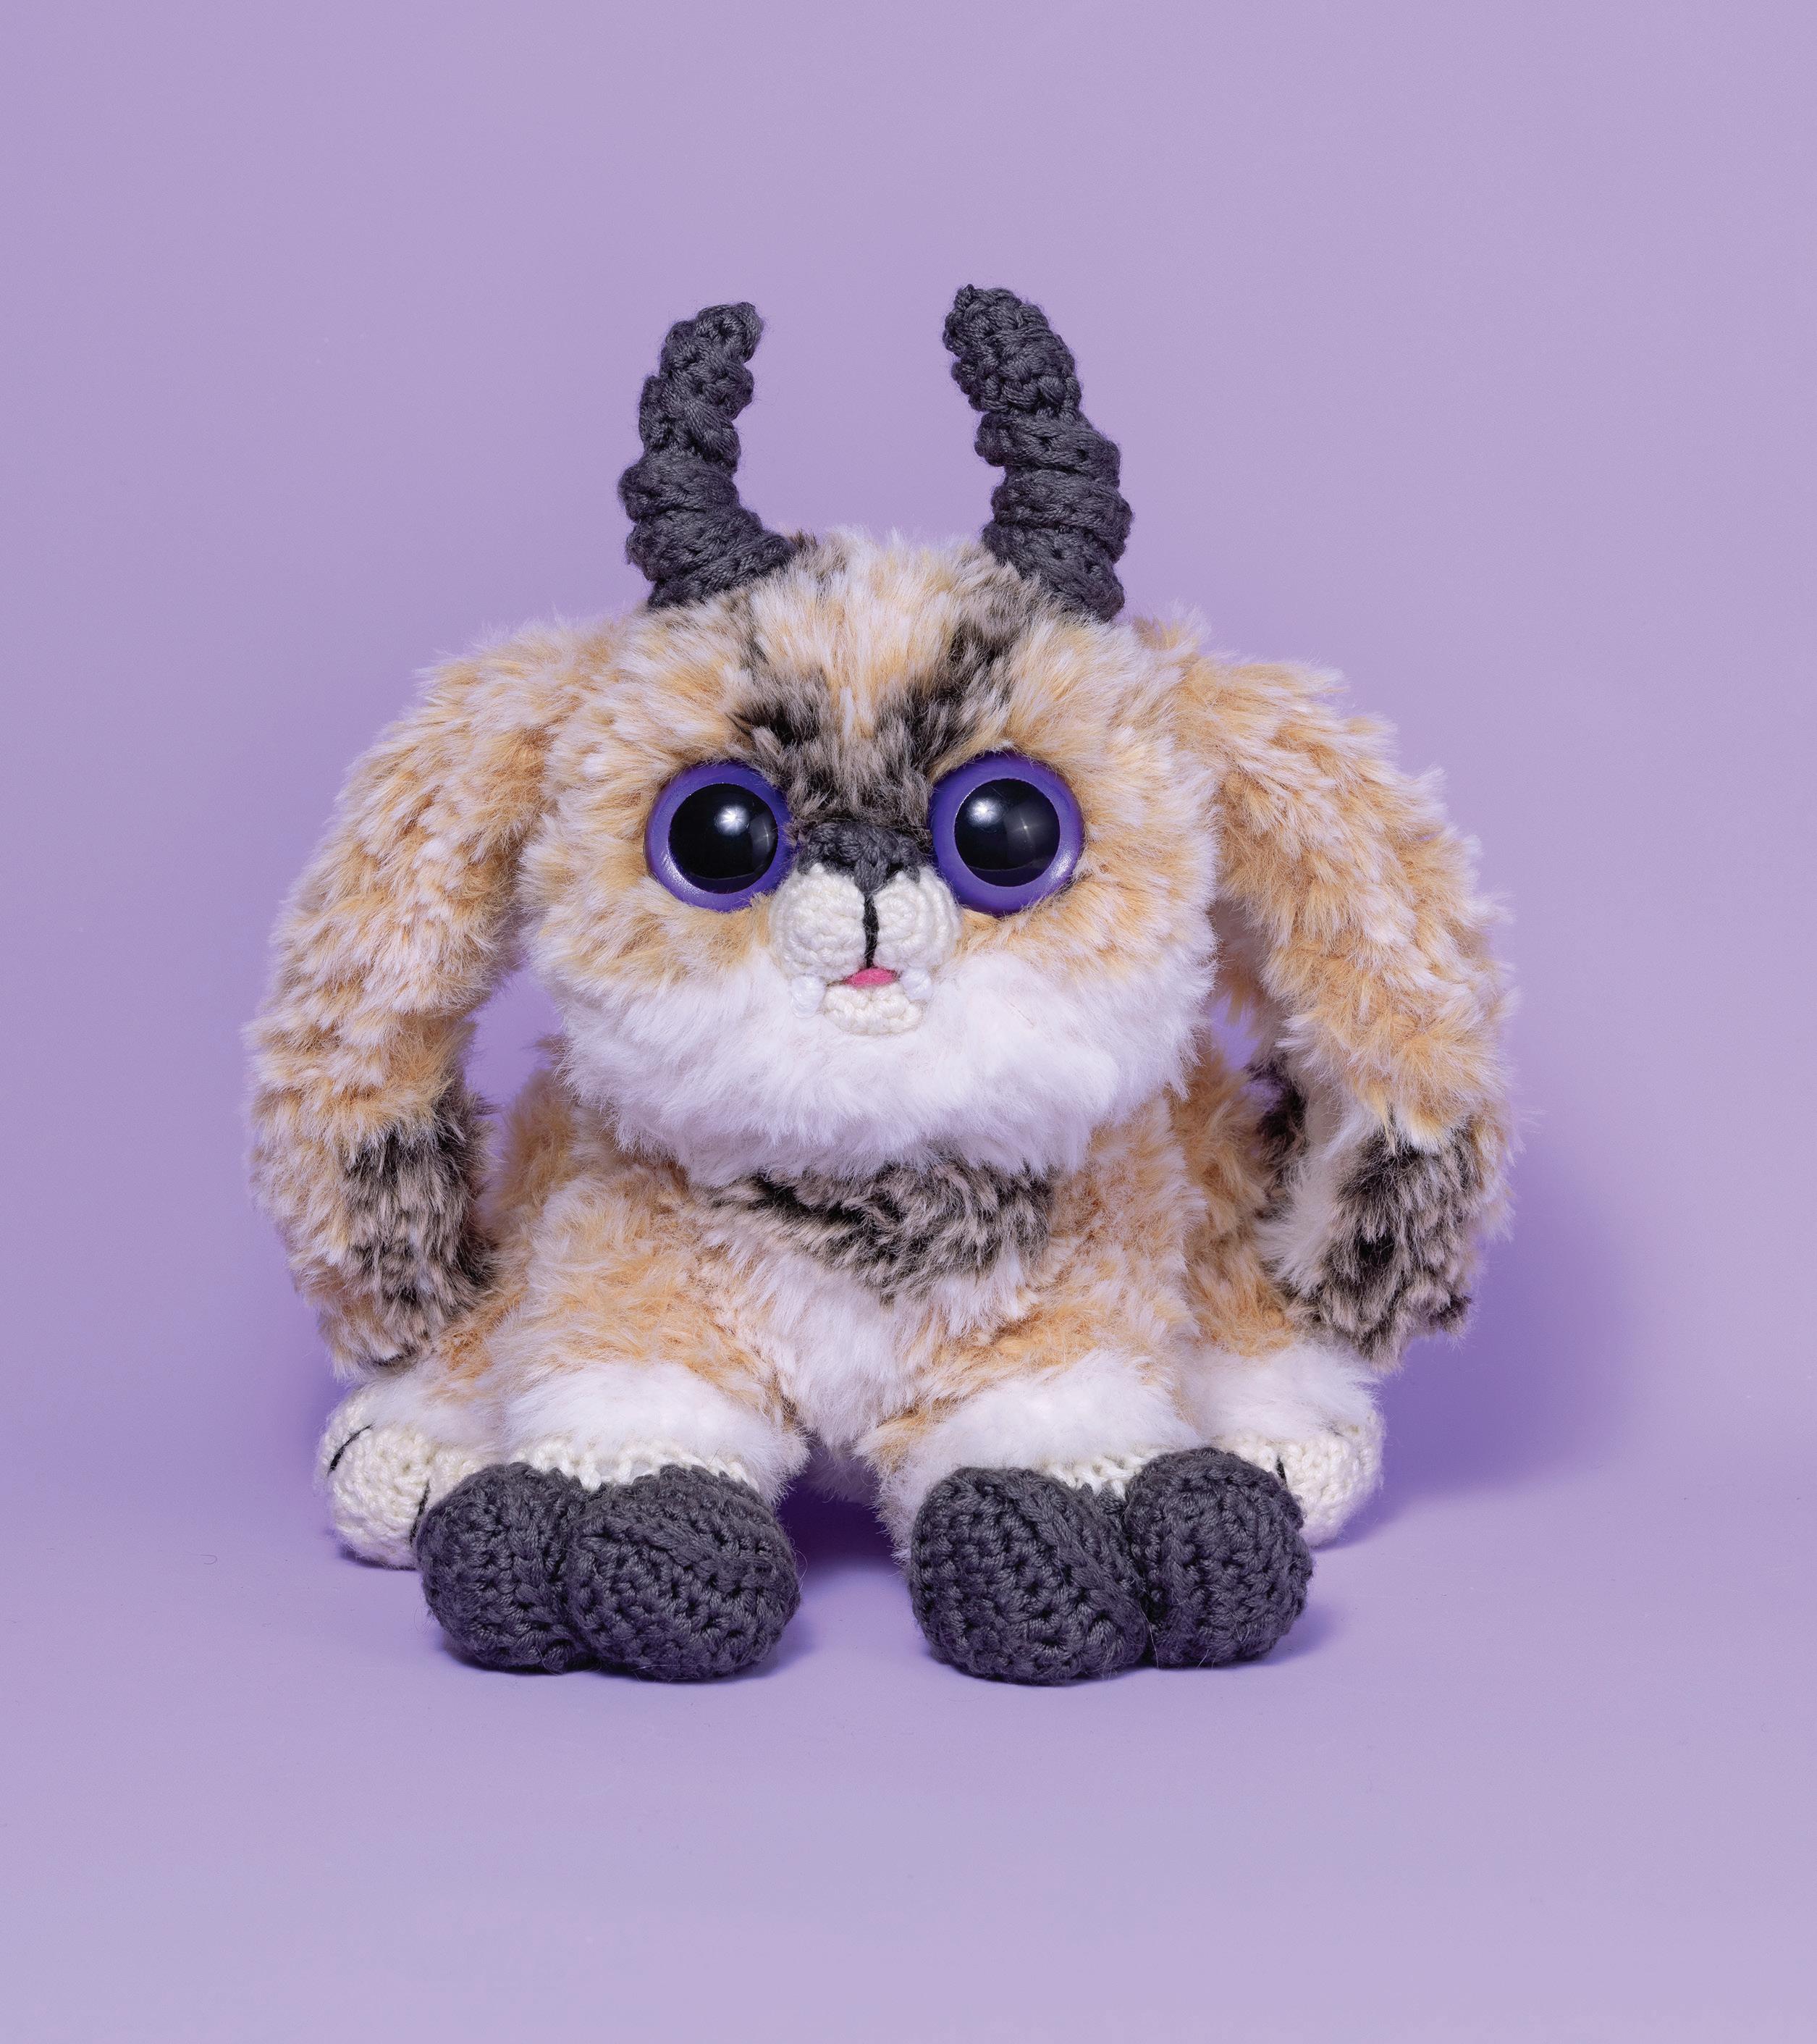
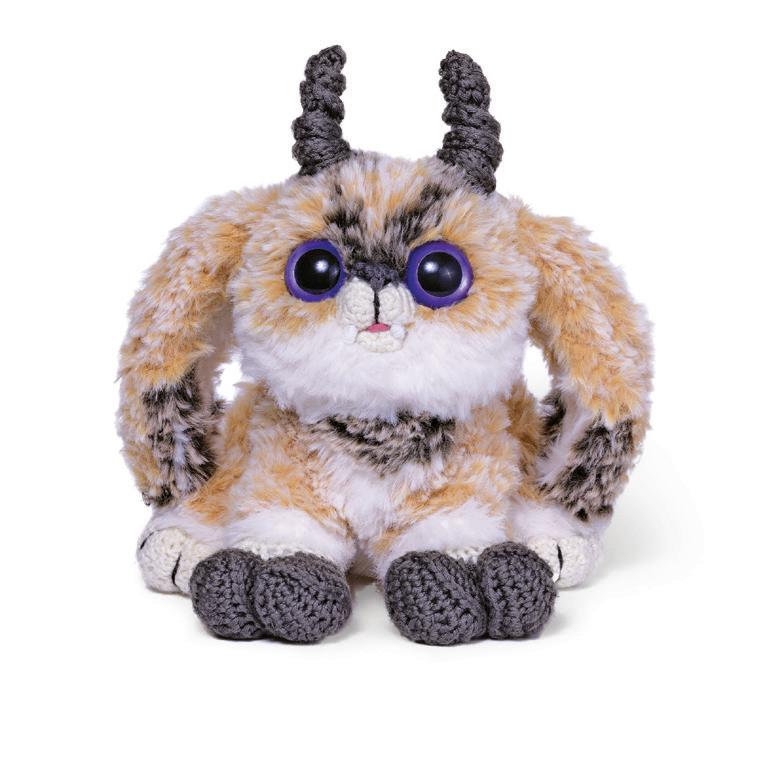
Bouncy balls of fluff, horns, and teeth, baby jackalopes can be found bounding through the tall prairie grasses and wide open plains of North America. Design your jackalope’s pelt after your favorite deer or antelope (I went with Pronghorn for mine!). For some extra character, you can add wire to those long ears for some additional posing possibilities.
Finished Measurements
Height 11in/28cm
Width 9in/23cm
Length 8in/21cm
Materials
• Berroco Comfort Chunky
A 2 skeins in 5703 Barley
B 1 skein in 5701 Ivory
• Berroco Comfort
C 1 skein in 9784 Slate
D 1 skein in 9701 Ivory
E 5 yds in 9734 Liquorice
• KFI Collection Furreal
F 1 skein in #01 Arctic Fox
G 1 skein in #29 Golden Hare
H 1 skein in #04 Canadian Lynx
• Size H (5mm) crochet hook
• Size F (3.75mm) crochet hook
• 1 pair of 30mm round-pupil safety eyes
• Tapestry needle
• Round-headed pins
• Stuffing
• Optional: 3 lengths of paperwrapped floral wire, 18in/46cm long, if wiring beast
• Optional: 1in/3cm square of pink felt, for tongue
• Optional: Sewing needle and thread or fabric glue, for tongue
With A and size H (5mm) hook, ch 11.
Rnd 1: Starting in 2nd ch from hook in BRlps, sc 9, sc 3 in BRlp of next ch; rotate ch; starting in next ch and working in FSlps, sc 8, sc 2 in FSlps of next ch. (22)
Note: Work in BLO to end.
Rnd 2: (Sc 2 in next st, sc 8, sc 2 in next st, dc 1) 2 times. (26)
Rnd 3: (Sc 2 in next st, sc 10, sc 2 in next st, dc 2 in next st) 2 times.
(32)
Rnd 4: (Sc 3, sc 2 in next st) 8 times. (40)
Rnd 5: (Sc 2, sc 2 in next st, sc 2) 8 times. (48)
Rnd 6: Sc 48.
Rnd 7: (Sc 4, sc2tog) 8 times. (40)
Rnd 8: (Sc 2, sc2tog) 10 times. (30)
Rnds 9–13: Sc 30.
Rnd 14: (Sc 3, sc2tog) 6 times. (24)
Rnd 15: Sc2tog 12 times. (12)
Stuff head and install eyes in Rnd 9 of head with 4–5 sts bet them.
Rnd 16: Sc2tog 6 times. (6) Fasten off, leaving long tail. Flatten
and whip st opening at back of head closed.
Shape Cheeks (fig q )
With A, apply a sink st bet lower inner corner of one eye and bottom center of head. Rep on opposite side of head.
With D and size F (3.75mm) hook, loosely ch 4.
Rnd 1: Starting in 2nd ch from hook and working in BRlps, sc 2, sc 3 in next ch; rotate ch; starting in FSlps of next ch, sc 1, sc 2 in next ch. (8)
Rnd 2: (Sc 1, sc 2 in next st) 4 times. (12)
Rnd 3: (Sc 2, sc 2 in next st) 4 times. (16)
Rnd 4: Sc 2, ch 4, sk ch-4, sk 4 sts, sc 10.
Rnd 5: Sc 2; in BRlps of chs, sc 4; sc 10.
Fasten off, leaving a long tail.
With C and size F (3.75mm) hook, work in ch-4 from Rnd 4 of muzzle.
Rnd 1: Starting in lower right
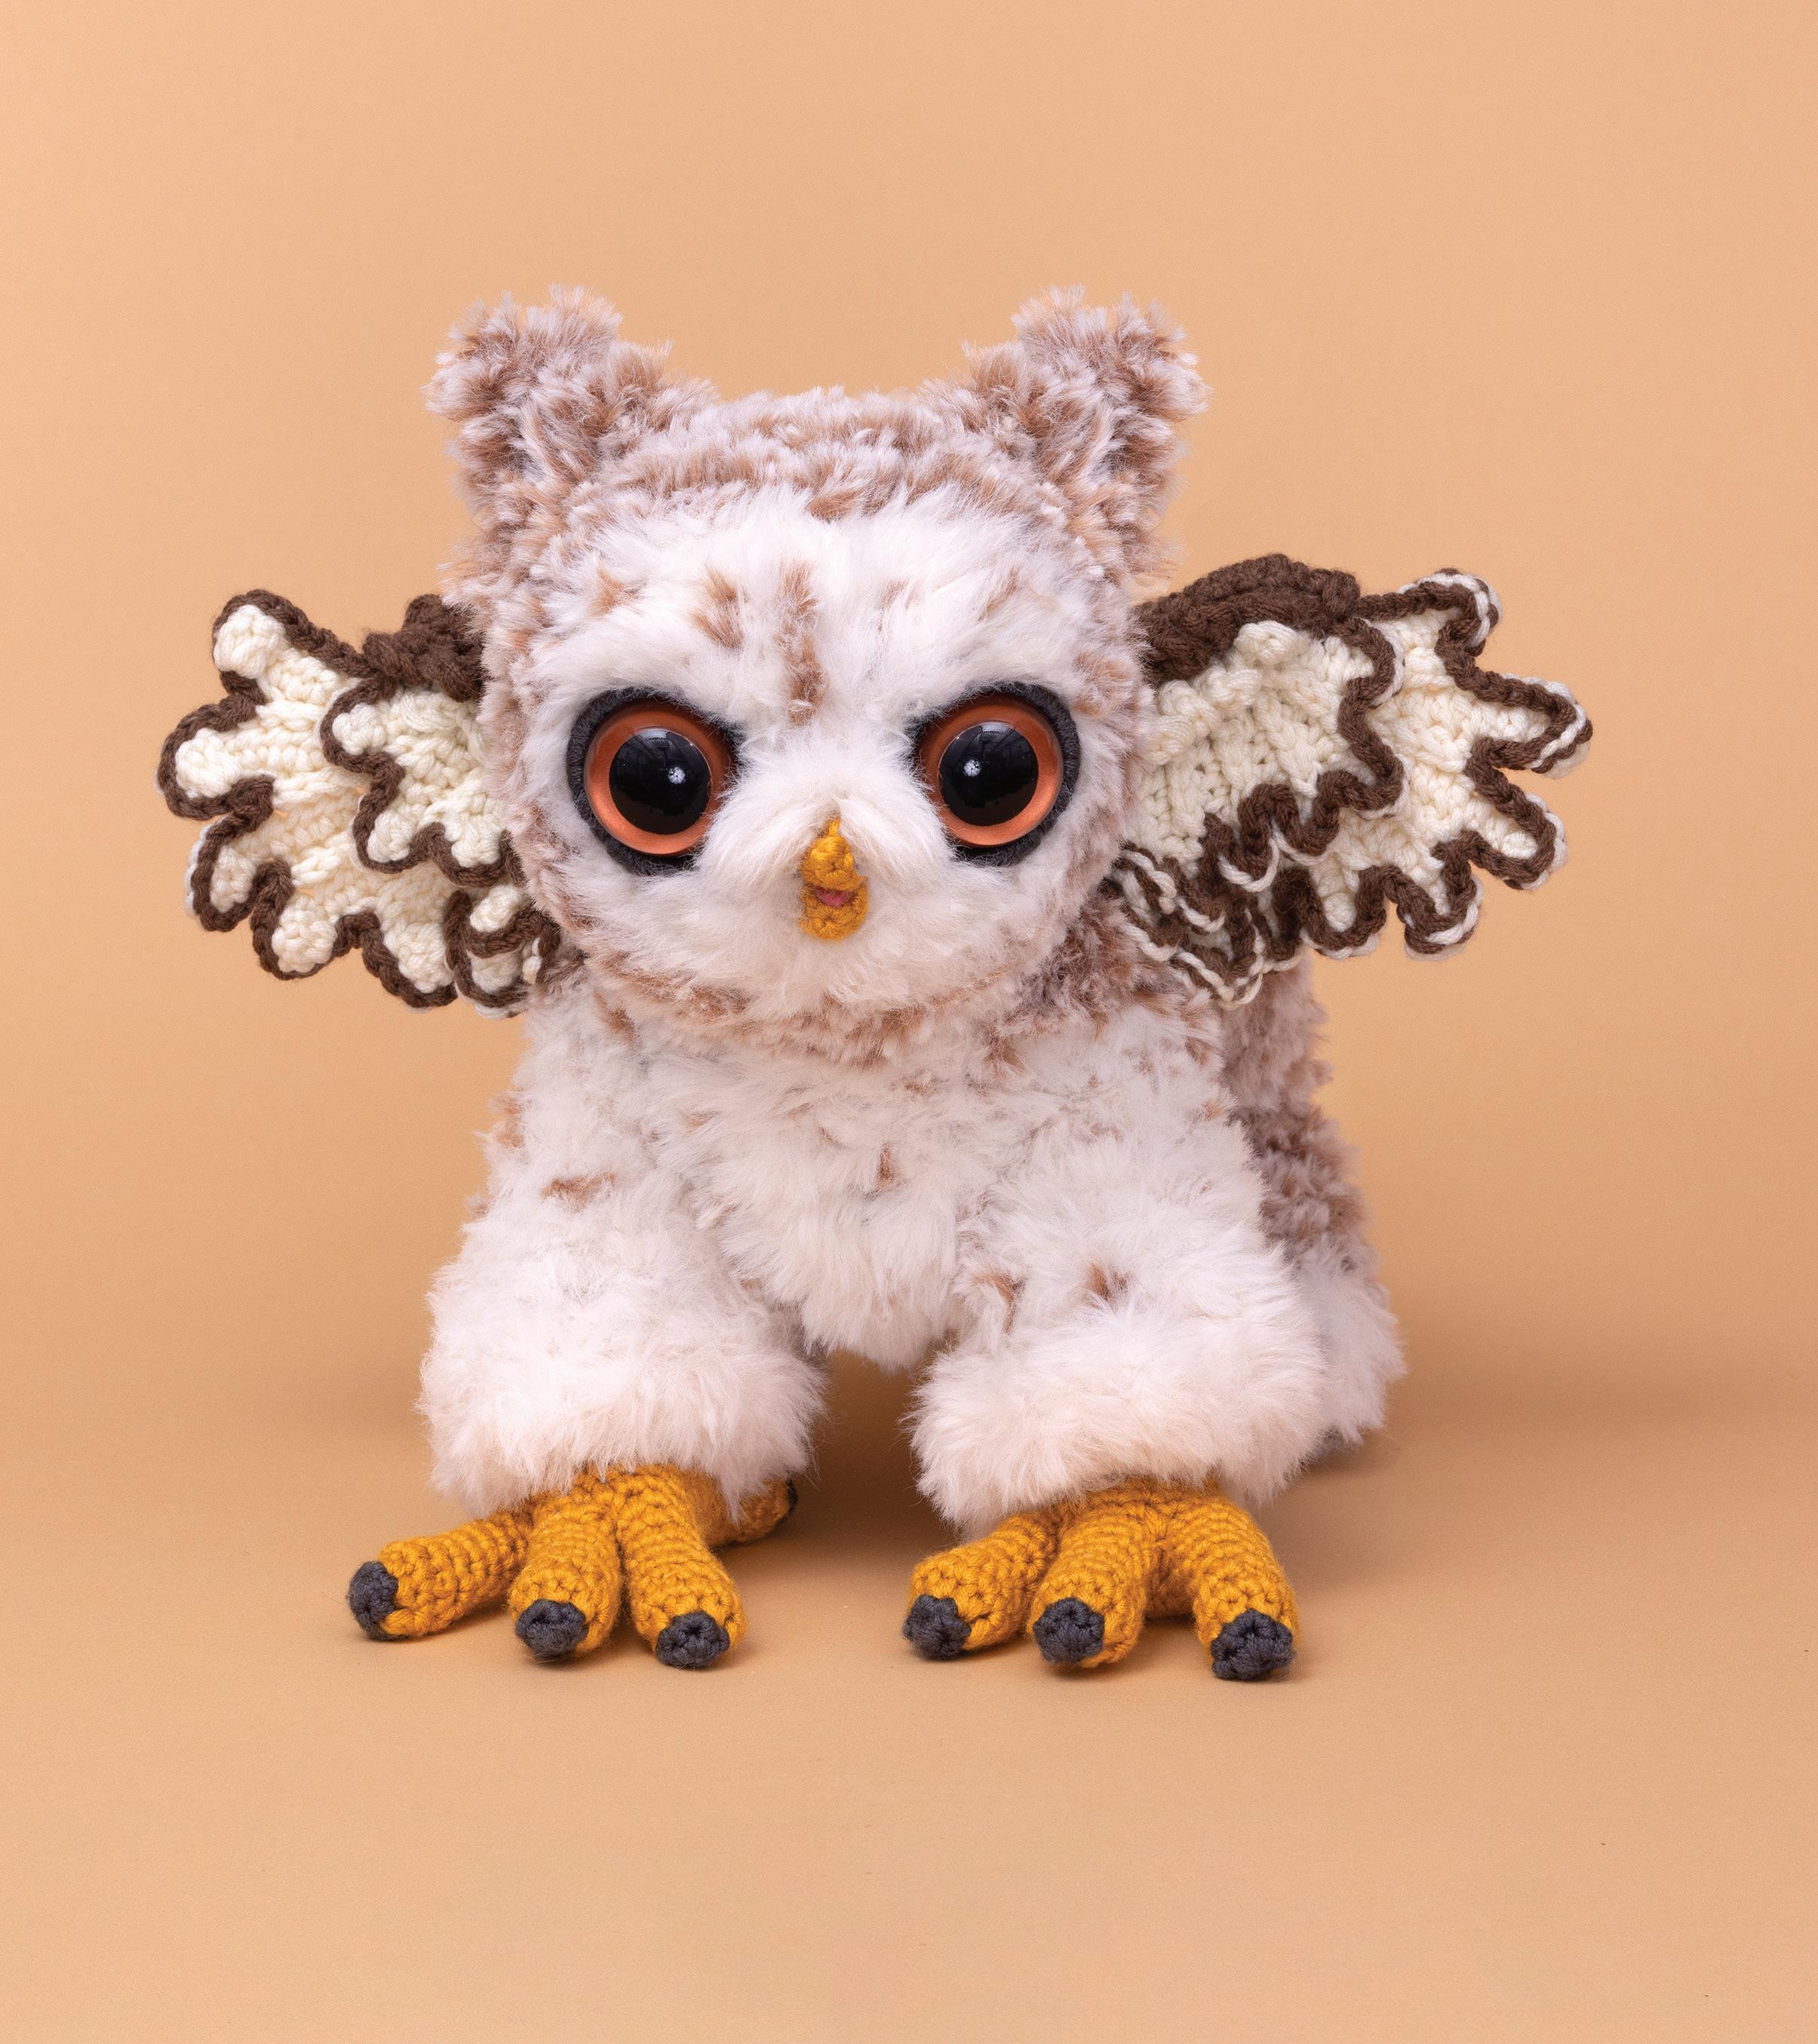
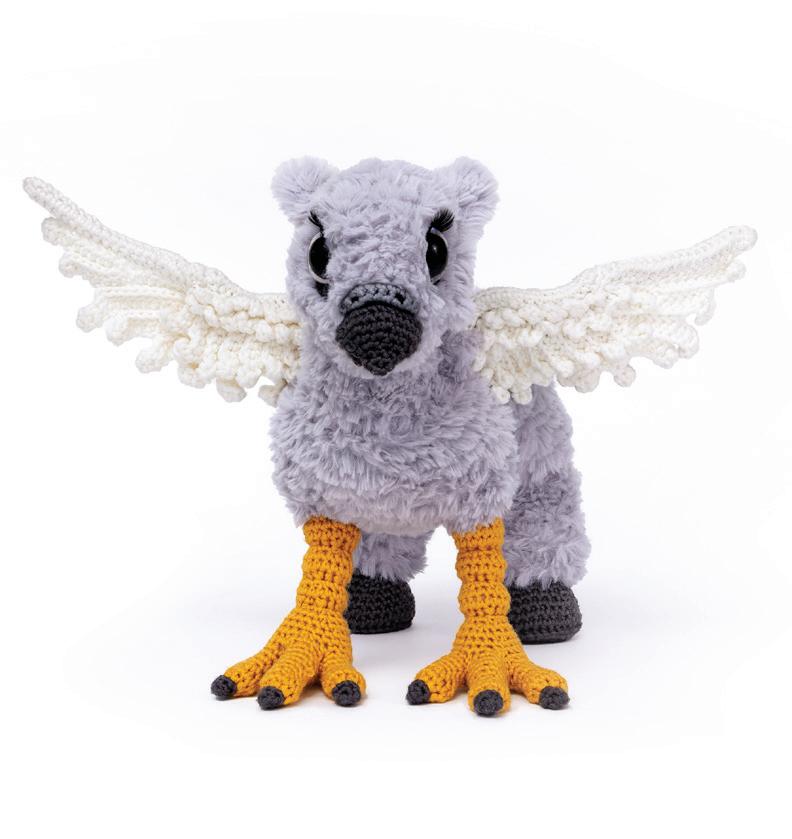
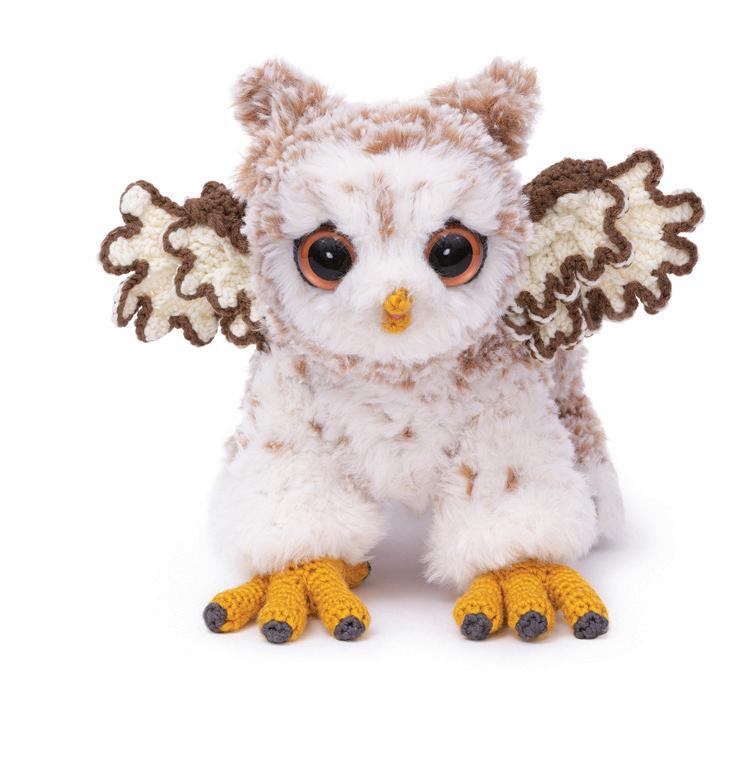
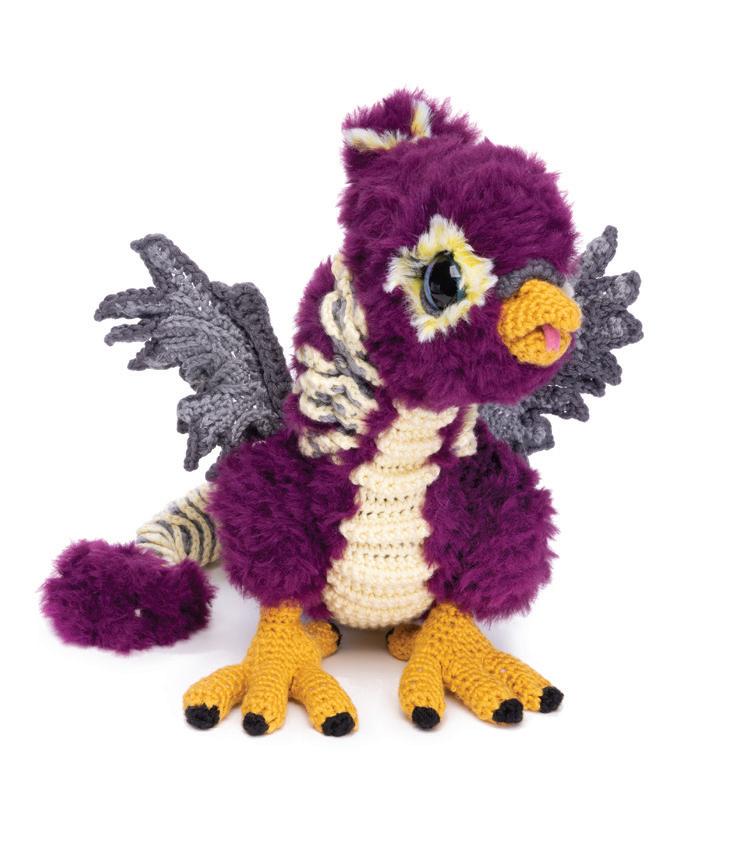
“Whoooo” wouldn’t love having a sweet owl gryphlet to keep an extra-large eye on things? Similar to its hippogriff cousin with wings and a feathery face, this baby boasts a lion’s backend instead of a horse’s. Legend says that griffin nests sometimes contain gold nuggets alongside the eggs, so this little chick will expect some gilded and glittery digs to call home.
Finished Measurements
Height 10in/26cm
Width 7in/18cm
Length 13in/33cm
Materials
• Berroco Comfort Chunky
A 1 skein in 5700 Chalk
B 1 skein in 5703 Barley
C 1 skein in 5734 Liquorice
• Berroco Comfort
D 1 skein in 9784 Slate
E 1 skein in 9743 Goldenrod
F 1 skein in 9785 Falseberry
Heather
G 1 skein in 9701 Ivory
• Knit Picks Fable Fur
I 1 skein in Eisbar
J 1 skein in Maja
• Size H (5mm) crochet hook
• Size F (3.75mm) crochet hook
• Stitch markers, 3 in colors
• 1 pair of 30mm round-pupil
safety eyes
• Tapestry needle
• Round-headed pins
• Stuffing
• Optional : 6 lengths of paperwrapped floral wire, each
18in/46cm long, if wiring beast
• Optional : Foam stabilizer, if not wiring wings
• Optional : 1in/3cm square of pink felt, for tongue
• Optional : Sewing needle and thread or fabric glue, for tongue
With A and size H (5mm) hook, ch 6, turn.
Rnd 1: Starting in 2nd ch from hook and working in BRlps, sc 3 in next ch, sc 3, sc 6 in next ch; rotate ch; starting in FSlps of next ch, sc 3, sc 3 in next ch. (18) Note: Work in BLO to end.
Rnd 2: (Sc 1, sc 2 in next st) 9 times. (27)
Rnd 3: (Sc 2 in next st, sc 2) 9 times. (36)
Rnd 4: (Sc 5, sc 2 in next st) 6 times. (42)
Rnd 5: Sc 1, hdc 1, dc 3, hdc 2, sl st 2, pm, sl st 1, hdc 2, dc 3, hdc 1, sc 26.
Cut A, change to B.
Rnd 6: BPSc 42.
Rnd 7: (Sc 6, sc 2 in next st) 6 times. (48)
Rnd 8: Sc 48.
Rnd 9: (Sc 6, sc2tog) 6 times. (42)
Rnds 10 and 11: Sc 42.
Rnd 12: (Sc 5, sc2tog) 6 times. (36)
Rnd 13: Sc 36.
Rnd 14: (Sc2tog, sc 2) 9 times. (27)
Rnd 15: (Sc 1, sc2tog) 9 times. (18)
Rnd 16: Sc2tog 9 times. (9)
Shape Head and Install Safety Eyes (fig q )
Stuff head. Make a cinch st bet marker on Rnd 6 and middle of face to create eyebrow shaping. Install eyes along middle of face with 5 to 6 sts bet them. Apply a sink st bet inner edges of eyes and pull gently to create a nose bridge. Close hole at back of head.
With D and size F (3.75mm) hook, ch 20 and sl st in ch 1 to form a loop. Working in ch-20 sp, sc 25 (enclosing edge of loop). Fasten off, leaving a long tail.
Attach Eye Rings (fig w )
Pin eye rings around eyes with FSlps of ring against sides of head. Pinch lower front corner of

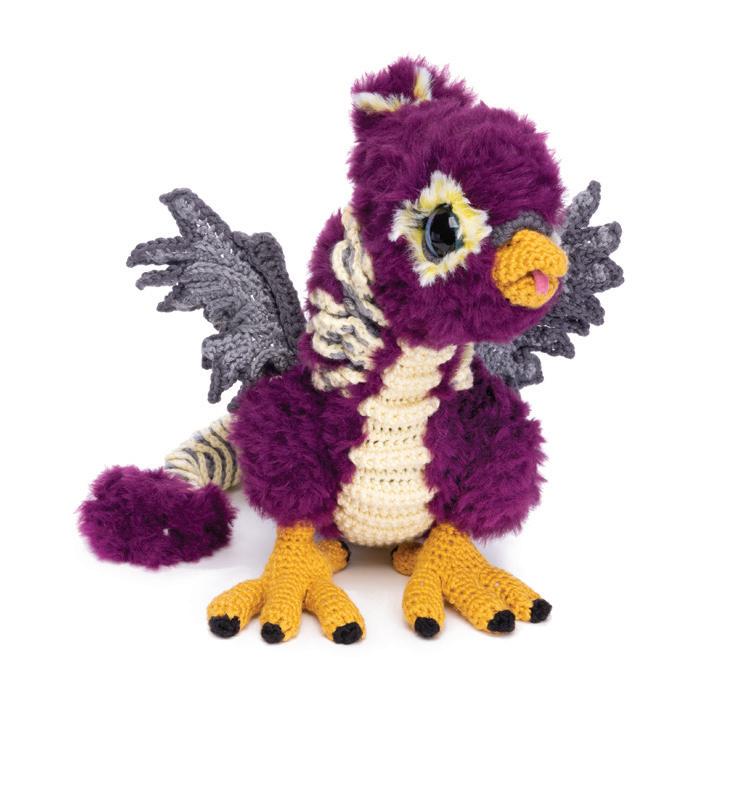
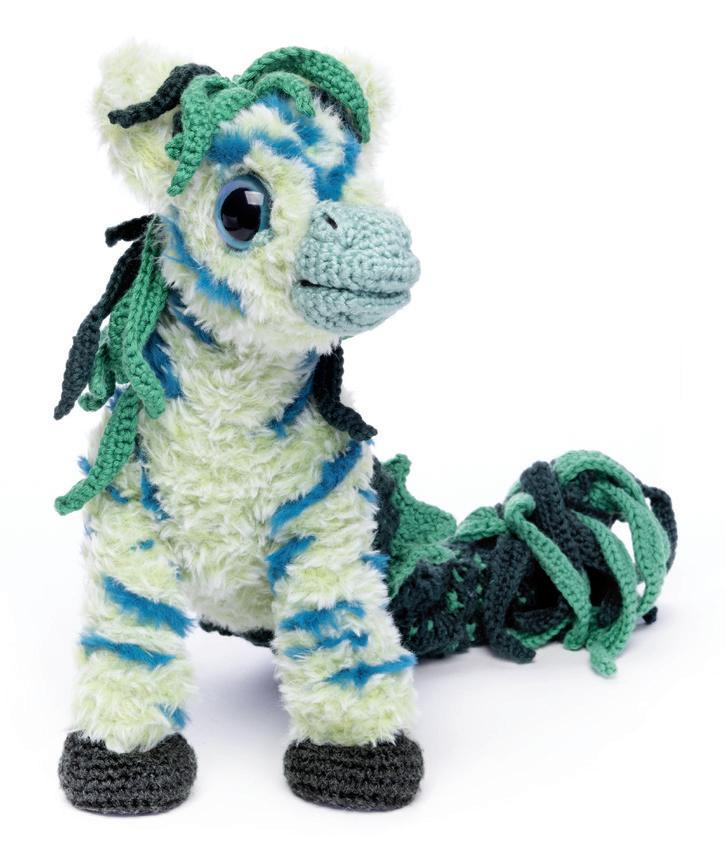
You can consider yourself pretty lucky if you’re fortunate enough to have this floofy cuddly creature as a friend. Inspired by the dragons of Chinese folklore, luck dragons harness the powers of water, strength, and luckiness! Customize your dragon with your lucky colors to ensure the maximum amount of good fortune and adorableness!
Finished Measurements
Height 10in/26cm
Width 7in/18cm
Length 17in/43cm
Materials
• Berroco Comfort Chunky
A 1 skein in 5700 Chalk
B 1 skein in 5734 Liquorice
• Berroco Comfort
C 1 skein in 9701 Ivory
D 1 skein in 9728 Raspberry
Sorbet
E 1 skein in 9734 Liquorice
F 1 skein in 9743 Goldenrod
G 1 skein in 9712 Buttercup
• KFI Collection Furreal
H 2 skeins in #01 Arctic Fox
• Size H (5mm) crochet hook
• Size F (3.75mm) crochet hook
• Stitch markers
• 1 pair of 30mm round-pupil
safety eyes
• Optional: 7 lengths of paperwrapped floral wire, each 18in/46cm long, if wiring beast
• Tapestry needle
• Round-headed pins
• Stuffing
With A and size H (5mm) hook, ch 11, turn.
Rnd 1: Starting in 2nd ch from hook and working in BRlps, sc 9, sc 3 in next ch; rotate ch; starting in FSlps of next ch, sc 8, sc 2 in next ch. (22)
Note: Work in BLO to end.
Rnd 2: (Sc 2 in next st, sc 8, sc 2 in next st, dc 1) 2 times. (26)
Rnd 3: (Sc 2 in next st, sc 10, sc 2 in next st, dc 2 in next st) 2 times. (32)
Rnd 4: (Sc 3, sc 2 in next st) 8 times. (40)
Rnd 5: (Sc 2, sc 2 in next st, sc 2) 8 times. (48)
Rnd 6: Sc 48.
Rnd 7: (Sc 4, sc2tog) 8 times. (40)
Rnd 8: (Sc 2, sc2tog) 10 times. (30)
Rnds 9–13: Sc 30.
Rnd 14: (Sc 3, sc2tog) 6 times. (24)
Rnd 15: Sc2tog 12 times. (12) Fasten off, leaving a long tail.
Stuff head and install safety eyes into Rnd 7 of head with about 5 or 6 sts bet them.
Shape Head (fig q )
With A, apply sink st bet inner edges of eyes (through bridge of nose). Apply another sink st bet Rnd 8 and bottom of head.
EYE RING (MAKE 2)
With E and size F (3.75mm) hook, ch 16 and sl st in ch 1 to form a loop. Working in ch-16 sp, sc 22 (enclosing edge of loop). Fasten off, leaving a long tail.
Attach Eye Rings (fig q )
Pin eye rings around eyes with FSlps of ring against sides of head. Hold in place with a few pins. Sew eye rings to head.
Note: Count and use chs as sts. With C and size F (3.75mm) hook, loosely ch 6.
Rnd 1: Starting in 2nd ch from hook and working in BRlps, sc 4, sc 3 in next ch; rotate ch; starting in FSlps of next ch, sc 3, sc 2 in next ch. (12)
Rnd 2: (Sc 2, sc 2 in next st) 4 times. (16)

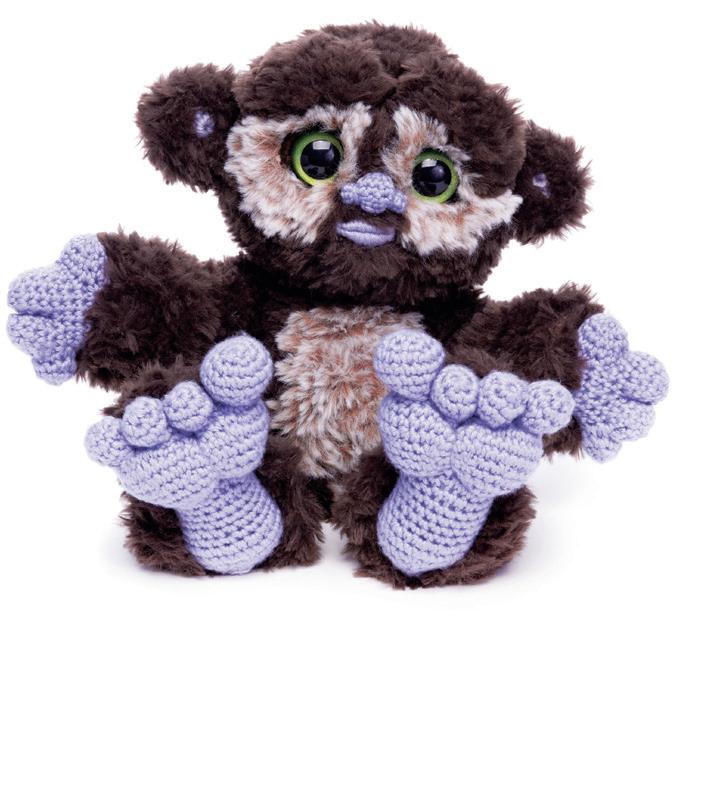
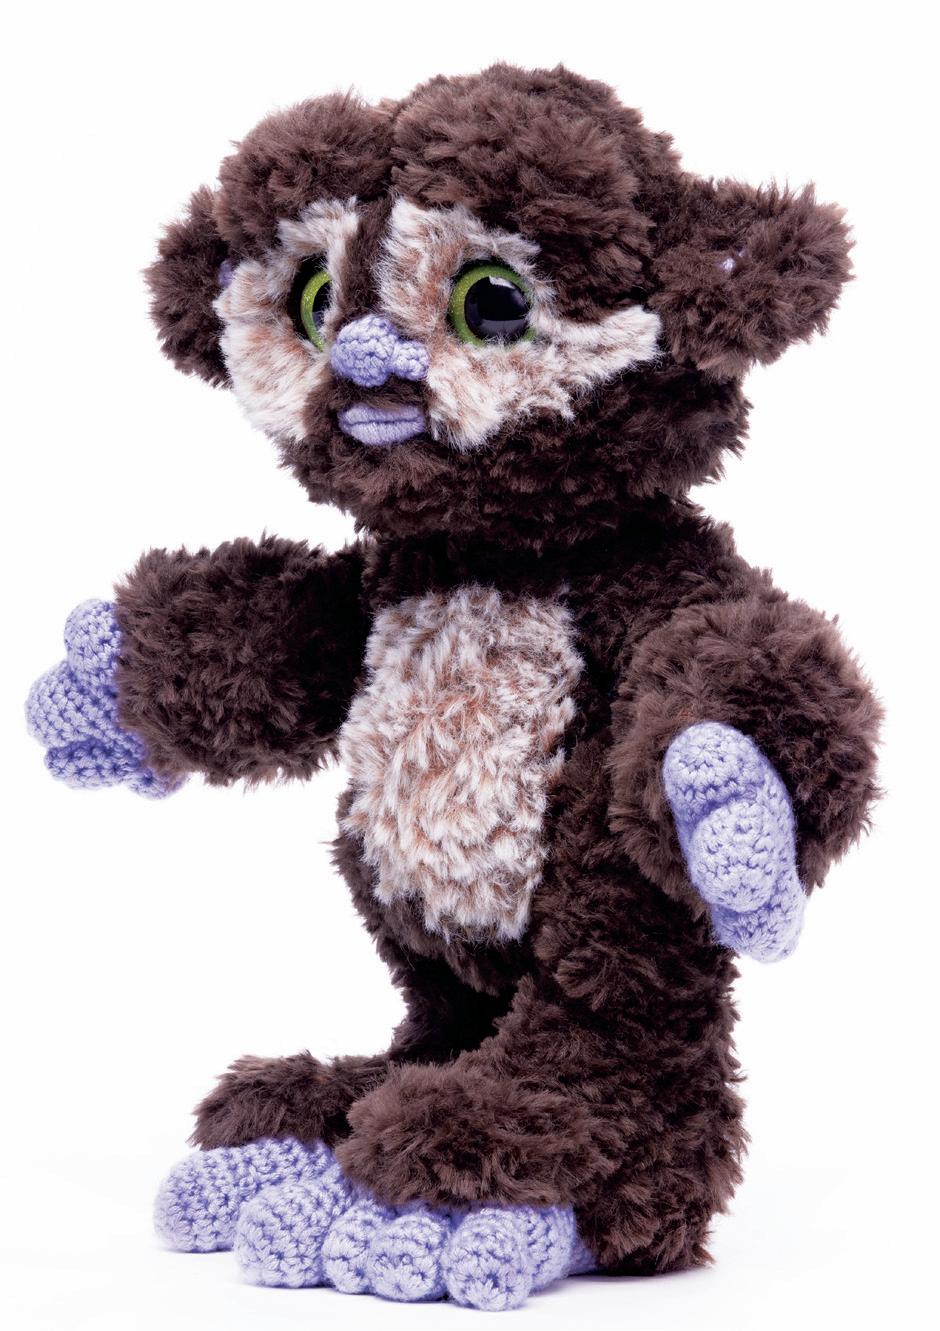
If you frequent the forests of North America, you might catch a glimpse of this woodland ape. Even with it being well-known for its furry frame, strong aroma, and tremendous tootsies, it is surprisingly shy.
Squatchlings love to play among the trees, mud, and moss, and to leave their mark wherever they go—usually in the form of a giant footprint!
Finished Measurements
Height 10in/26cm
Width 9in/23cm
Length 8in/21cm
Materials
• Berroco Comfort Chunky
A 2 skeins in 5727 Spanish
Brown
• Berroco Comfort
B 1 skein in 9786 Coffeeberry
Heather
C 1 skein in 9715 Lavender Frost
• Knit Picks Fable Fur
D 1 skein in 27941 Oso
E 1 skein in 29442 Breccia
• Size H (5mm) crochet hook
• Size F (3.75mm) crochet hook
• Stitch markers
• 1 pair of 30mm round-pupil safety eyes
• Scrap yarn
• Tapestry needle
• Round-headed pins
• Stuffing
• Optional: 3 lengths of paperwrapped floral wire, each
18in/46cm long, if wiring beast
With A and size H (5mm) hook, ch 11.
Rnd 1: Starting in 2nd ch from hook and working in BRlps, sc 9, sc 3 in next ch; rotate ch; starting in FSlps of next ch, sc 8, sc 2 in next ch. (22)
Note: Work in BLO to end.
Rnd 2: (Sc 2 in next st, sc 8, sc 2 in next st, dc 1) 2 times. (26)
Rnd 3: (Sc 2 in next st, sc 10, sc 2 in next st, dc 2 in next st) 2 times. (32)
Rnd 4: (Sc 3, sc 2 in next st) 8 times. (40)
Rnd 5: (Sc 2, sc 2 in next st, sc 2) 8 times. (48)
Rnds 6–12: Sc 48.
Rnd 13: (Sc 4, sc2tog) 8 times. (40)
Rnd 14: (Sc 2, sc2tog) 10 times. (30)
Rnd 15: Sc 30.
Rnd 16: (Sc 3, sc2tog) 6 times. (24)
Rnd 17: (Sc 2, sc2tog) 6 times. (18)
Rnd 18: Sc2tog 9 times. (9) Fasten off, leaving a long tail.
Stuff head firmly.
q )
Install eyes on Rnd 11 of head with 6 or 7 sts bet them. With A, run a sink st bet bottom of head and under bottom edge of eyes only. Apply a sink st bet inner edges of eyes to shape a nose bridge. If needed, add more stuffing, and close hole at top of head.
With B and size F (3.75mm) hook, ch 15 and sl st in ch 1 to form a loop. Working in ch-15 sp, sc 20 (enclosing edge of loop). Fasten off, leaving a long tail.
Attach Eye Rings (fig w )
Pin eye rings around eyes with FSlps of ring against sides of head. Hold in place with a few pins. Sew eye rings to head.
With A and size H (5mm) hook, make a 4-st AR.
Note: Work in BLO to end.
Rnd 1: Sc 2 in each st around. (8) Rnds 2 and 3: Sc 8.
There will be an 18-st opening at top of work. Markers should line up one behind the other. Whip st marked sts tog to create 2 finger sps. You now have 4 spaces to work fingers.
Working along edge of finger sp or pinky sp, (sl st 1, ch 1, sc 1) to rejoin yarn to edge (counts as 1 sc), sc 9 evenly around rem edge. (10)
Rnd 1: Sc 10.
Rnd 2: (Sc 3, sc2tog) 2 times. (8)
Fasten off, leaving a long tail. Weave tail through rem sts, pull to close, and weave in end.
Working along edge of thumb sp (sl st 1, ch 1, sc 1) to rejoin yarn to edge (counts as 1 sc), sc 11 evenly along rem edge. (12)
Rnd 1: Sc 12.
Rnd 2: (Sc 4, sc2tog) 2 times. (10)
Rnd 3: (Sc 3, sc2tog) 2 times. (8)
Fasten off, leaving a long tail. Weave tail through rem sts, pull to close, and weave in end.
Stuff fingers and hand through opening at base. Attach base of hands to Rnd 2 of arm. Slide wire loop into hand base before attaching, if applicable. Thumbs should point in towards body.
With D and size H (5mm) hook, sl st fur yarn onto surface of work and cover crochet surfaces worked in A with sl sts (using
exposed surface lps wherever possible) leaving belly, Rnd 2 of arm, Rnd 3 of legs, and area arond eyes uncovered.
Work following details: • With E, cover belly and area around eyes, leaving a small vertical strip of D bet eyes. Leave inner ears, feet, and hands uncovered. Brush out fur to loosen fibers.
With D and size H (5mm) hook, and working into surface FLs of Rnd 3 of arms and Rnd 2 of legs, (sl st 1, ch 2, sl st 1) in each st to make fringe edging.
With B and size F (3.75mm) hook, ch 7.
Rnd 1: Starting in 2nd ch from hook and working in BRlps, sc 5, sc 3 in next ch; rotate ch; starting in FSlps of next ch, sc 4, sc 2 in next ch. (14)
Rnds 2 and 3: Sc 14. Rnd 4: Sc2tog 7 times. (7) Fasten off, leaving a long tail. Lightly stuff nose and close hole at back of nose.
Shape Nostrils (fig u ) Tie middle of an 18in/46cm piece of B to back of nose where you would like to add nostril shaping (leaving two 9in/23 tails). Wrap tails once around nose until they meet at attachment point, pulling tightly to cinch nostril shaping. Tie tails together and weave in ends. Rep on other side of nose.
Sew nose to center of face, slightly below middle of eyes.
With B and size F (3.75mm) hook, ch 10 and sl st in ch 1 to form a loop. Working in ch-10 sp, sc 15 (enclosing edge of loop). Fasten off, leaving a long tail.
Shape and Attach Mouth (fig u )
Flatten loop to form a top and bottom lip and sew inside edges tog to form mouth. With FSlps of mouth against head, attach lips just below nose leaving a bit of fur showing bet nose and lips. ■
2nd second
3rd third
4th fourth
AR adjustable ring beg begin(ning)
bet between
BL back loop in one stitch
BLO back loop only in more than one stitch
BLs back loops
BPdc back post double crochet
BPhdc back post half double crochet
BPsc back post single crochet
BRlp(s) back ridge loop(s)
ch(s ) chain(s)
ch-sp chain space
cont continue
dc double crochet
dec(s) decrease(s)
fig figure(s)
FL front loop in one stitch
FLO front loop only in more than one stitch
FLs front loops
FPdc front post double crochet
FPhdc front post half double crochet
FPsc front post single crochet
FPslst front post slip stitch
FSlp(s) front side loop(s)
hdc half-double crochet
hdc2tog half-double crochet 2 stitches together
inc(s) increase(e)(ing)(es)
lp(s) loop(s)
M meter(s)
mm millimeter
patt pattern
pm(s) place marker(s)
rem remaining
rep(s) repeat(s)
rnd(s) round(s)
RS right side
sc single crochet
sc2FLtog single crochet 2 front loops together
sc2tog single crochet 2 stitches together
sc3tog single crochet 3 stitches together
sk skip
sl st(s) slip stitch(es)
slst2tog slip stitch 2 stitches together
sp(s) space(s)
st(s) stitch(es)
tog together
WS wrong side
yd(s) yard(s)
YO yarn over ( ) repeat instructions within parenthesis as many times as indicated OR a note [ ] repeat instructions within brackets as many times as indicated
Berroco
Fiskars www.fiskars.com
• Scissors and cutting mats
GlassEyesOnline www.glasseyesonline.com
Hobbii www.Hobbii.com
• Go Handmade Fur Lux Yarn
Hobbs Bonded Fibers www.hobbsbondedfibers.com
• Poly-down fiberfill toy stuffing and black batting
Joann www.joann.com
• “The Bloom Room” stem wire
Knit Picks
www.knitpicks.com
Knitting Fever Inc
www.knittingfever.com
Lion Brand www.lionbrand.com
Sobo Craft Glue www.plaidonline.com
• Glue and Craft supplies
AND ALWAYS CHECK YOUR LOCAL CRAFTING STORES!
A
hooves
M
abbreviations 155
adding faux-fur 21
adding wire 21
assembly stitches 18
B
Basilisk Fledgling 130
beak
Basilisk Fledgling 130
Hippogriff Chick 60
Owl Gryphlet 112
Phoenix Chick 22 C
Capricorn Kid 38
Cerberus Pup 30
crochet stitches 12–15
crochet techniques 15–16
embroidery stitches 20
F
finishing 18–20 H
Hippogriff Chick 60
Capricorn Kid 38
Hippogriff Chick 60
Jackalope Kit 104
Kelpie Fry 80
Minotaur Calf 96
Pegasus & Unicorn Foals 48
horns
Capricorn Kid 38
Jackalope Kit 104
Luck Dragon Hatchling 140
Minotaur Calf 96
Unicorn Foal 48
J Jackalope Kit 104
K
Kelpie Fry 80
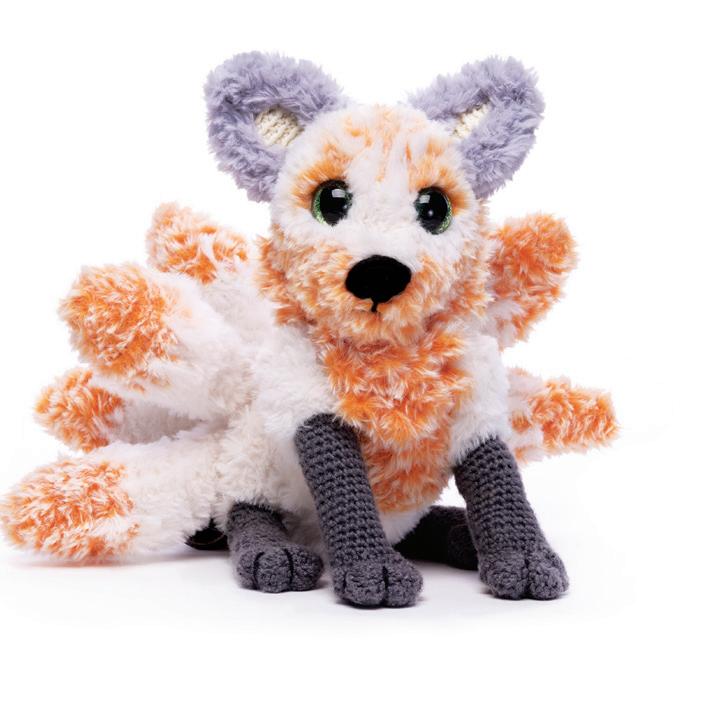
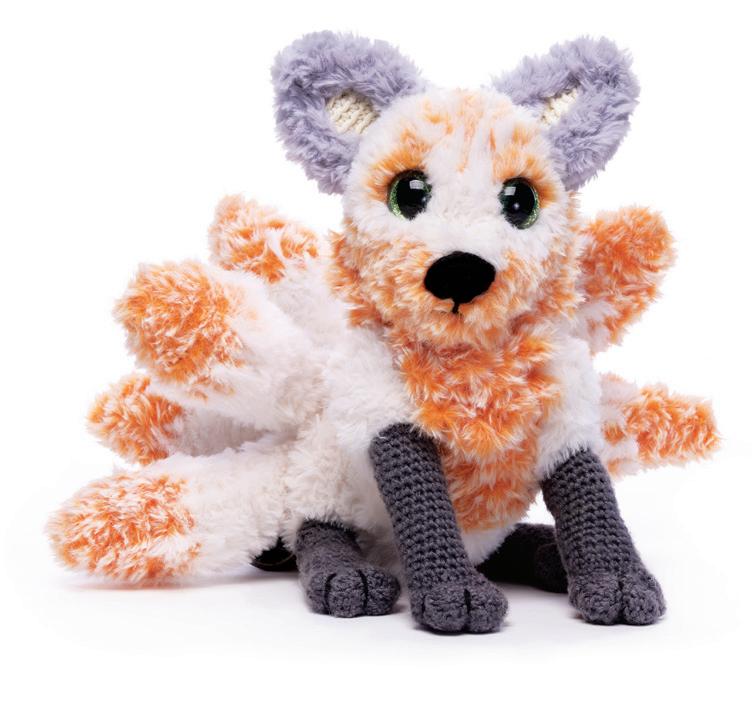
Kitsune Kit 88
Luck Dragon Hatchling 140
Minotaur Calf 96
notes about patterns 17
Owl Gryphlet 112
T fins
Capricorn Kid 38
Kelpie Fry 80
talons
Basilisk Fledgling 130
Hippogriff Chick 60
Owl Gryphlet 112
Phoenix Chick 22 teeth
Pegasus & Unicorn Foals 48
Phoenix Chick 22
R resources 155
S scales
Basilisk Fledgling 130
Capricorn Kid 38
Kelpie Fry 80
Luck Dragon Hatchling
140
sculpting stitches 19
Squatchling 148
Jackalope Kit 104 tools and materials 8–11 W
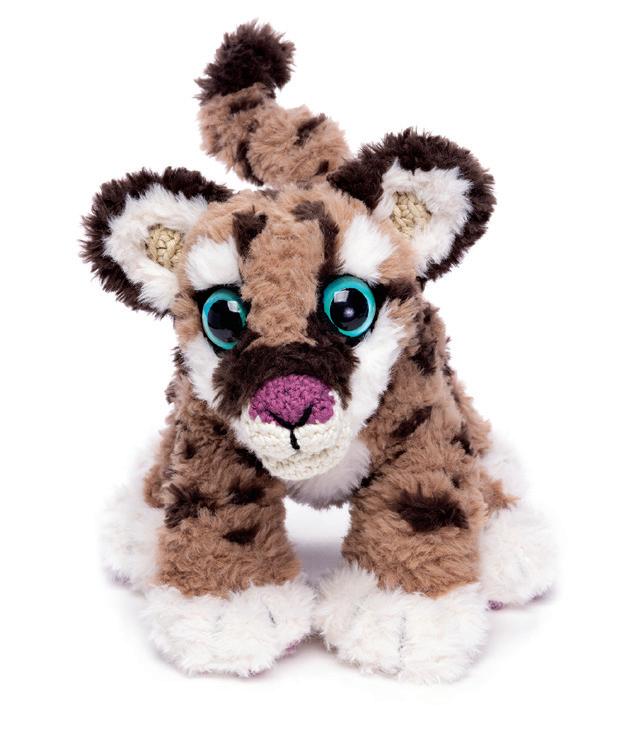
Wampus Kitten 122 wings
Basilisk Fledgling 130
Hippogriff Chick 60
Owl Gryphlet 112
Pegasus Foal 48
Phoenix Chick 22 Y
Yetling 72
Megan Kreiner is an independent knit and crochet designer who publishes patterns under MK Crochet & Knits. Her work has been featured in pattern collections, magazines, and crafting kits. She is the author of several crochet books.
Megan's professional credits span a variety of roles on over fifteen animated feature films. as well as short films, television shows, and theme-park attractions for world-renowned studios such as Sony Pictures Imageworks, DreamWorks Animation, and Walt Disney Animation Studios.

Get ready to create a mythical world of epic cuteness with the 16 adorable creatures found in Baby Beasts to Crochet. First, use chunky yarn and simple stitches to create a base. Next, stuff, shape, and assemble. Finish up by adding surface details such as fauxfur, scales, and even eyelashes. All that’s left is to adventure forth with the cuddliest baby beasties in all the land! Simple instructions, detailed illustrations, and a comprehensive how-to section ensure that crocheters from beginner to advanced can make phoenix chicks, unicorn foals, and more. Optional instructions for adding a wire framework are also included to make your beastly buddies extra posable. So, grab your most magical hooks. The time has come to bring these lovable legends to life!
$19.99 US • $25.99 CANADA
ISBN: 978-1-970048-13-1