
Remote Deposit Capture Guide


Table of Contents
Customer Responsibilities
Processing and Cutoff Times
Process Workflow
System Requirements
Maintenance and Cleaning
The Open Deposits Page
Creating a New Deposit
The Deposit View Page
Adding to a Deposit
Closing Deposits for Processing
Deleting a Deposit
Editing Approved Transaction Amounts
Voiding Transactions
Transactions
Results
Customer Responsibilities
As a business utilizing Remote Deposit Capture, it is important that you are aware of certain responsibilities that you have:
To review and prepare the checks for deposit
Retention of checks, locked for 60 days
Final destruction of checks by shredding under dual control
Maintain batch report or batch header records indefinitely
Reasonable security standards must be utilized to ensure proper controls are in place to prevent possible losses. All processes and procedures are subject to audit or review by a bank employee or designated third party.
It is imperative that the Administrator understand that sharing login credentials is a dangerous practice that places unnecessary risk on the business and has the potential to compromise information.
It is required that each user have their own user profile and secured token
It is the Company’s responsibility to ensure that all computers which will be used to access digital banking platform and all other ancillary services are kept up to date with all operating system security patches.
It is also the Company’s responsibility to ensure that all computers which will access digital banking platform and all other ancillary services are protected with an antivirus software package and that the virus signature files are kept up to date.
Wireless access to the Internet is not a secure method for access to digital banking platform, and accessing the product(s) through wireless means is not supported by Mascoma Bank
Both digital banking system and EPS systems are accessed and controlled by the company Administrator. The Administrator has the responsibility to allow and manage access to each program by creating users and setting permissions. Mascoma Bank is not responsible for user access and actions as set up by the Administrator.
Furthermore, the Administrator is responsible for ensuring all users know and comply with all security procedures.
Processing and Cutoff Times:
Any deposit made after 4pm EST will be dated on the next business date.
If a deposit is being scanned at the cutoff time, items will be separated into the Approved and Processed files.
File cutoff time is 4pm EST.
Deposits will be posted to accounts after nightly processing is complete
Process Workflow:
The below figure describes the process for making a deposit using Remote Deposit Complete.
1. User creates a deposit by scanning checks with RDC application and submits deposit for processing
2. Deposit is processed through keying/balancing and MICR repairs. Notifications are sent to users about the deposit as necessary
3. The deposit results are posited, and reporting is available.
System Requirements
For an optimal experience, a high-speed Internet connection is recommended In addition, the following components are required for working with the application(s).
Note: The application does not support Apple® Boot Camp® or any virtualization software.
For the PC:
Local administrative rights
USB port 2 0 or higher
NET® Framework 4 6 or higher For Microsoft® Windows®:
Windows 7 Service Pack 1: Microsoft Internet Explorer® 11 or Google Chrome™
Windows 8.1: Microsoft Internet Explorer 11 or Google Chrome
Windows 10: Microsoft Internet Explorer 11, Microsoft Edge®, or Google Chrome
Note: The current version of Chrome and its two previous versions are supported
Maintenance and Cleaning
Over time, as a scanner is used, dust particles build up on the camera lens causing the image and the time stamp printed on the back of the checks to blur, making research and item verification difficult Depending on the scanning volume, cleaning is recommended at least weekly
RECOMMENDED SUPPLIES: (Found at any office supply store)
Can of compressed air
Isopropyl alcohol wipes
Isopropyl alcohol
Lint-free cloth
Scanner cleaning cards
The Open Deposits Page:
Log in to the application and select Transactions from the left main menu.
Under Check Processing, select Remote Deposit Complete.
The Open Deposits page displays. There may be times when multiple batches will be listed on this page. The following features can prove helpful in navigating through deposit items. Note that these deposits on the Open Deposits page have not yet been submitted, but are still open.
Navigational Paging: Use the forward and backward arrows to navigate pages with lists of deposits You may also select a page number to navigate directly to that page
Per Page size: Indicate how many deposits you would like to have listed on each page.
Displaying Page prompt: The current page number and number of records in the deposit is displayed.
Sorting: Select a column header to organize information in either ascending order (upward arrow) or descending order (down arrow)
Requires Rescan Column: Displays value to indicate if the item in question needs to be rescanned Selecting this column header will immediately group items that need to be rescanned
Custom Batch ID: If displayed, this column will show the unique value for each deposit and may be configurable.
Creating a New Deposit:
From the Open Deposits page, select Create New Deposit.

If at this time Device Control has not already launched, the system will ask you to confirm launching Device Control Select Run to continue
The New Deposit page displays Complete the following fields as applicable:
Location: Select the account for which the batch is to be processed.
Payment Type: Select how the item was received, for example, Mailed In.
Deposit Name: System-generated. Includes the date and time the batch is being created along with a unique batch ID number
Custom Batch ID: If displayed, this is a required field that needs to be a unique value each time.
Number of Checks: Enter the number of checks in the batch.
Total Amount: Enter the total amount of the batch. This is a two-decimal-place field, to include the decimal point For example, $XX XX
Deposit Slip ID#: If displayed, enter your assigned deposit slip ID
Scanner Terminal #: This field will automatically populate from the Device Control.
Note: In the Scanner Interface section of the page, the system will automatically check for an installed scanning device. If the scanning device is not plugged in, connect the scanner, and select the Reset Scanner option
The Deposit View Page:
Once RDC and your scanner have begun scanning checks, the results will appear on the Deposit View page This page is one of two available to manage your deposit before it is submitted for processing The second page, the Data Entry View page, is covered in further detail in the next section, “The Data Entry View Page. ”

Note: Red question marks or yellow highlighted areas on this page may indicate there was a system difficulty in reading MICR line items, or that a manual key entry is required for a check. Keying and balancing and MICR repair will take place once this has been closed and submitted for processing
Once a deposit has been opened, the following features are available under the Deposit View tab from the top of the page.
Refresh: If at any time the Amount values for the check items do not immediately display, select the Refresh option to have values display.
Item List Filter: Organize deposits by All Items, Problematic Items, and Needs Attention
Items
Amount status of To Be Keyed –The amount field entry will be performed by EPS Keying & Balancing once the deposit is submitted for processing.
Scroll right of the listed items to see the Edit, Delete, and Rescan options available.

Invalid MICR and rescanned required indicators: The system will have an indicator for a check with an invalid MICR or a faulty scan. Rescan the item(s) in order to submit the deposit
Invalid MICR Indicator

Rescan Required Indicator

To rescan an item, select Rescan to the right of the item that needs rescanning.
A window will appear allowing you to rescan an item as needed. Place the check item in the scanner, and select the Rescan option in the window. The check will run through your scanner again
Alerts: If a particular check item has been scanned before, it will appear as a duplicate in the item list. RDC will not submit duplicate items for processing. An icon will also be presented in the Alerts column if the item has an invalid MICR, as shown below.
Duplicate MICR Indicator in Item List
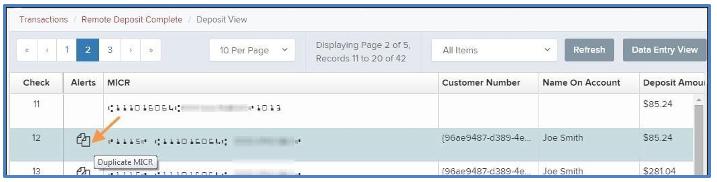
Invalid MICR Indicator

Remote Deposit Capture Guide
Select the Front of Check or Back of Check options near the check image to show the respective front and back images of the check created by the scanner you have installed. Under the Deposit Status section, the Scanned field presents the number of items as they are scanned. The total amount of all items displays when the deposit is complete.
NOTE: In the Scanner Interface section, the Terminal # for the scanner installed will display as a reference
The Complete Deposit option is located at the bottom of the page When you have finished scanning, select this option to begin the submission process.
NOTE: It is recommended that you enter information about this deposit on the Data Entry View page, described in the next section of this document The Complete Deposit option is available on either of these pages.

Near the top of the page, select the Data Entry View option to enter additional information about a customer and/or the transaction

When you are ready to submit the deposit, from either the View Deposit tab or Data Entry View tab, select Complete Deposit. The system will return to the open deposits page.
Complete Deposit Option

Adding to a Deposit:
1.
Log in to the system, and select Transactions from the left main menu.
Under Check Processing, select Remote Deposit Complete. 2.
3.
The Open Deposits page will appear. Under the Open column, select an open icon to open a deposit
4
The open deposit will appear Place the additional check item(s) to be deposited in your scanner. The check(s) will scan and the added amount displayed.
NOTE: If the amount of the additional check(s) you scanned are not displayed automatically, select the Refresh option at the top of the page.
Closing Deposits for Processing:
It is recommended that each deposit be closed as soon as a user has completed scanning and entering data However, a deposit can be submitted for processing at a later time
NOTE: An industry best practice includes merchants submitting their deposits at least one hour before their financial institution’s cutoff time, in the event that a batch needs additional attention.
1
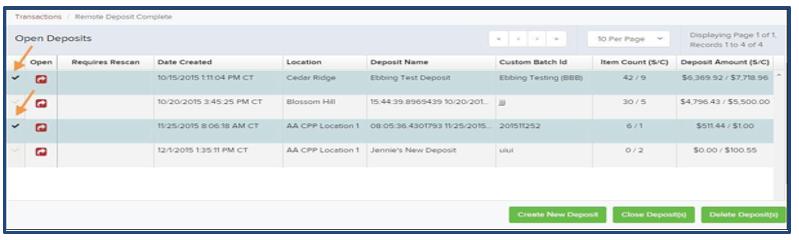
From the Open Deposits page, select the check box next to the Open column for each deposit you wish to close.
2.
3.
Select Close Deposit(s) from the bottom of the page.
The system will ask you to confirm closing your selected deposit(s). Select Close to confirm closing the deposit(s).
4
The results of the deposit display Choose OK to dismiss the message
NOTE: If you attempt to close a deposit with items that need rescanning, specifically if the MICR of an item was not read correctly, the system will not deposit that item
Deleting a Deposit:
A deposit can be deleted as soon as it has completed scanning, or at a later time.
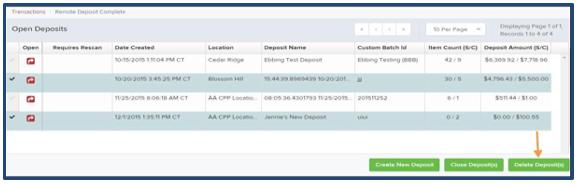
From the Open Deposits page, select the check box(es) next to the deposit(s) you wish to delete.
2.
1. Select Delete Deposit(s) as shown.The system will ask you to confirm deleting a deposit. Select Delete.
3
A confirmation of the deletion will display Click OK to continue to the Open Deposits page.
Selecting Deposits to Delete in the Application
Editing Approved Transaction Amounts:
1
Log in to the system, and select a status on the Current Transaction Summary that appears as a link and contains values. As in the example below, select Approved.
Current Transaction Summary with Approved Status Indicated

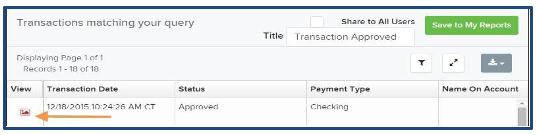
2. A report with all approved transactions generates. Notice the indication, Approved, in the Status column Select the view link to the left of the transaction you wish to edit
View Option for an Approved Transaction
3. The Transaction Details page appears. Select the edit pencil next to the Sale value (shown in the image below).
Edit Option for Approved Transaction

4. The Sale amount will become a editable field where you can enter a new amount. Enter a new amount and a reason for changing the amount. Select the save link when finished.
Reason for Editing Sale
Amount and Editing
Confirmation Options

Voiding Transactions: As a user working with Remote Deposit Capture, you may need to void a transaction that has been made.
This can only be done when a deposit has been made and is in the Approved Status, displayed on the Current Transaction Summary page once you have logged in. Recall that an approved transaction will be moved to the processes status at the end of the closing day for your financial institution.
1. From the Transaction Details page, select Actions | Void.
Transaction Details Page with Void Transaction Option

2 The system will ask you to confirm voiding the transaction Select Void The transaction will be voided and appear with a Voided status on the Current Transaction Summary page until it is resolved.
Confirm Void Option
Resolving Transactions:
Resolving a transaction means indicating a reason why the transaction was voided for communication and auditing purposes. Once a transaction has been voided, it will appear with a Voided status, where you can opt to resolve the transaction.
Log in to the application and select the Voided status from the Current Transaction Summary on the Dashboard page of the application.
Select View for the transaction you wish to resolve From the Transaction Details page, select Actions.
Mark Transaction Resolved Option
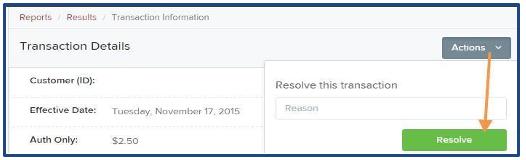
Enter a reason for resolving the transaction. For example, the transaction was deposited in the wrong account. Select Resolve. The transaction will now appear under the Resolved status in the Current Transaction Summary
Deposit Results Report:
The Deposit Results Report displays a date range of deposit batches created with Remote Deposit Complete This report can monitor the status of current-day batches, the items within a batch, or display a previous day’s batches and items
NOTE: Batches created using Remote Deposit Complete can represent a deposit or be part of a multi-batch deposit.
Log in to the system, and select Reports from the left main menu.
Under Remote Deposit Complete Reports, select Deposit Results
Reports Page with Deposits Results Option

Designate a Location for the report Select a pre-defined date range for the report next to the Quick Pick option, or specify a Start Date and End Date.
Direct Results Report Criteria

Select Get Deposits
Example Deposit Results Report

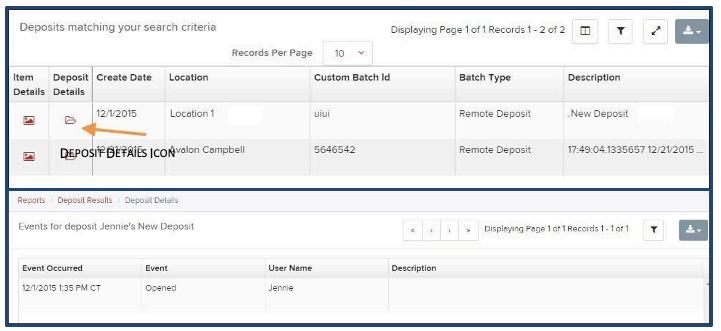
Viewing Transaction Details:
From the Deposit Results page, select the icon under the Item Details column to view events about that transaction in the deposit
Item Details Option

The Items in deposit will appear. To view batch details, select the icon under the Item Details column.
View Option for an Item in Deposit

Batch Item Details
Page
The following table describes the Batch Item Details available when viewing a transaction, listed in alphabetical order
Field
Definition
Amount
Check #
The amount of the check after being reviewed. A value of $0.00 signifies that the check was either rejected or a duplicate and will not be included in the batch/deposit total.
The serial number of the check taken from the MICR line.
Customer Name
Deposit Item
The field contains the optional Name on Account data, if entered for the customer previously.
This field contains the links toeither view or print an image of the check, orview the specific automated steps the check has gone through or is in theprocess of going through
This field identifies whether a check image is good or not.
Image Quality Pass
Item Date
This field contains the date the check was scanned.
Field Definition
Deposited – The item has processed through CAR/LAR, the proof function, and is part of a closed deposit. It has been sent to transaction processing for end-of-day processing at the designated cutoff time.
Error – The item has been sent to transaction processing, but an error occurred preventing the item from being processed Duplicate – The item was sent to transaction processing and rejected as a duplicate The item will not be processed with this batch/deposit.
Item Status
Routing/Account #
Scanned Count
Sequence #
In Review – The item is awaiting MICR repair or amount entry, and its status will change once those steps are completed. Needs Rescan – The item has a poor image quality or is a partial image The batch/deposit will be re-opened so that you can rescan this item again in order for the batch/deposit to be processed. Open – The item was scanned with no problems in an open deposit. Once the deposit status becomes Deposited, the item will be sent to transaction processing
Rejected – Indicates the item has been rejected and will not be processed due to any number of reasons (e.g. image quality, invalid MICR, invalid payment origin, etc.).
This field contains the routing and transit number of the check captured when the MICR line was scanned.
This field contains the number of times an item was scanned.
This field contains the sequence of the check within the batch/deposit.
Select Show Events at the top of the page to display a record of events for this item
Event History for a Batch Item
Viewing Deposit Details:
From the Deposit Results page, select the folder icon under the Deposit Details column to see processing details about the deposit. The details will display.
Deposit Details
Note: When navigating through the reporting functions, use the navigation buttons (Get Deposit) and Links (Credits & Debits to your settlement account) for the best results
VIRTUAL ENDORSEMENT: The system endorses the back of the check according to the account number and title selected at time of deposit. This endorsement is placed on the IMAGE during processing and not the physical item
FRANKING: This feature prints “Electronically Processed” or “Scanned” on the check so that the Item is identified as deposited. Most scanners have ink jet or franker ink rollers that print this. IF this feature is not used, it is required that all checks canned are stamped VOID on the front.