5 minute read
Restoring old photographs

Next Article

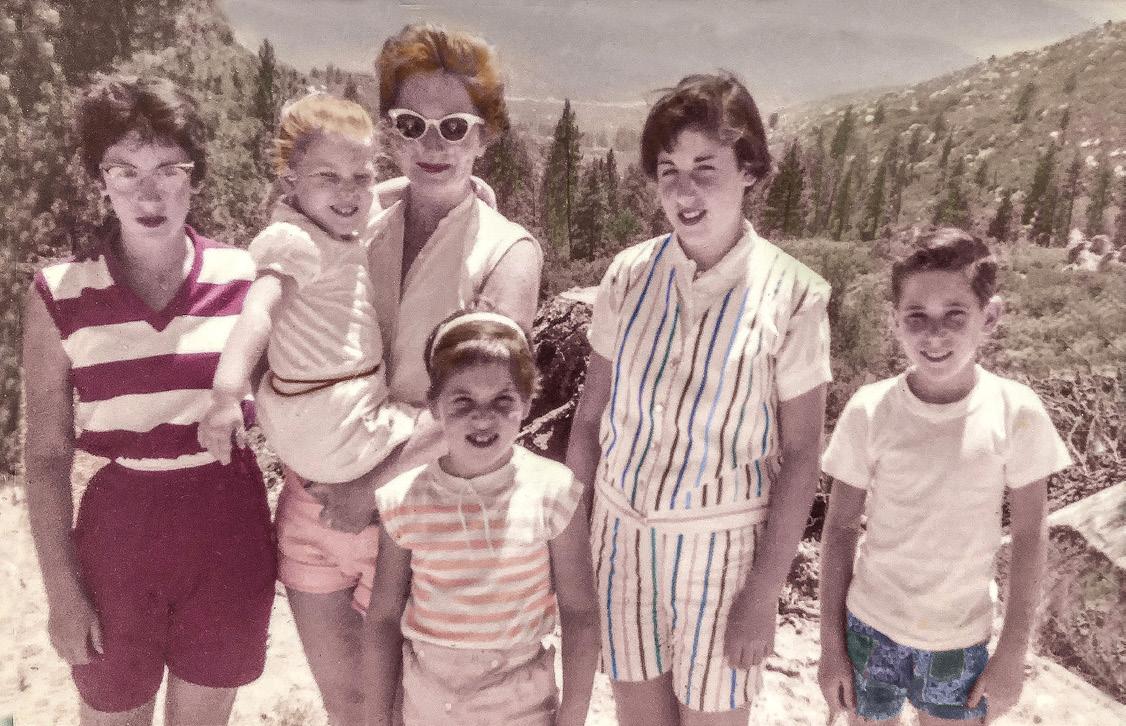
RESTORING OLD PHOTOGRAPHS E veryone knows that if their house was burning, besides saving family and pets, the next thing we’d save are family photographs. That’s how much we treasure them. Restoring old photos is a way to preserve priceless memories and, at the same time, hone your Photoshop skills. repairs depend on the type of damage there is. The 1958 family picture below (I am on the far right at 10 years old with my two younger sisters, two older cousins, and my mother) is a
The degree to which old photos are damaged varies widely. They can be discolored, torn, water damaged, scratched, faded, and defaced. They can also have pieces of the image itself missing if the emulsion has chipped away. This is the most difficult scenario to deal with. The tools and techniques needed to do the
AUSTRIA & the DOLOMITES Sept. 25 to Oct. 4, 2021

typical, unattractive, discolored print. It is low in quality, and the original negative has been lost. Here are the steps I used to make this better:
1. My sister photographed the 4 x 6 inch print with her iPhone and sent me the file which was about 30 megs. Obviously, it would be better to shoot the print with a better camera and macro lens, but that’s all she had to work with. The most important things are to 1) photograph the print in diffused light, and 2) make sure the back of the camera is parallel with the print to maintain complete edge to edge sharpness.
2. The most obvious problem with this 62- year old picture is the discoloration. There are many ways to alter color in Photoshop, and in this instance I used the pulldown menu command, Image > adjustments > hue/saturation. I identified the color shift had gone toward too much red, so in the dialog box I pulled the submenu down (it’s the tab that says ‘master’) and chose red. I then moved the saturation slider to the left to desaturate just the red color.
That took care of the heavy red tint, but all of the other colors were faded as well. Before I dealt with that, I repaired some scratches and blemishes.
3. Using the clone tool and the spot healing brush, I removed scratches and white specks that had occurred in the emulsion of the print. This is very easy to do, although it was time consuming.
4. I then brought the image into ACR (Filter > camera raw filter) and added sharpening and clarity. 5. The original colors of the clothing were lost when the print faded and discolored. To add color that made sense to me, I selected various areas in the print, one by one, with the magic wand tool or the lasso tool, feathered the edge of each selection by one pixel (Select > modify > feather), and then I opened the hue/saturation dialog box. By moving the hue slider in either direction, I was able to introduce various colors into the selection. Then I desaturated the colors so they didn’t look so unnaturally bright.
6. To add additional color to hair, in the trees, and on the hills, I used the brush tool on a lowered opacity. At 15%, I was able to add just a hint of color. The brush tool takes its color from the foreground color box. For example, to bring back my mother’s red hair, I chose a dark orange color by simply clicking in the foreground color box and making the selection with the color picker. With the lowered opacity of the brush tool, I was able to make it look like I remembered.
7. I used the pulldown menu command Image > adjustments > levels to adjust the contrast. In the dialog box that opened, I moved the left-hand slider to the right which darkened the shadows. This added a bit more ‘punch’, i.e. contrast.
8. Finally, the original print was photographed in such a way that the horizontal and vertical edges didn’t align with the edges of the frame in the camera. This occurred because my sister, who photographed the print, didn’t hold her camera dead-center above the print with the back of the camera parallel to the plane of the print. Therefore, I chose Select > all and then Edit > transform > distort. The box that formed around the image gave me handles, and I then dragged the various handles to square-up the image.
that’s not what I wanted. If original color can’t be recovered, then you have to essentially paint the color back into the picture.
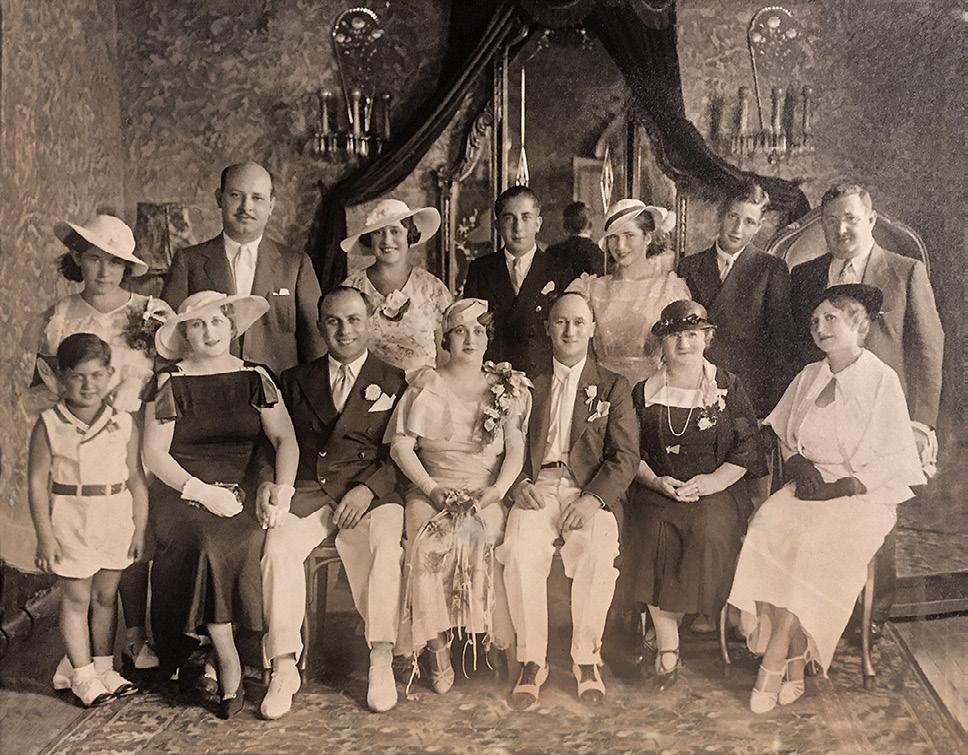
The photo below is another family portrait. It was taken in 1934 when my mother was 12. She is in the back row, third from the right.
For the restoration, I brought the image into ACR and applied clarity and contrast. This addressed the fading problem. To repair the carpet, I used the clone tool and the content aware feature in Photoshop. The most challenging area was the overexposed portion in the bottom-center of the print. I cloned the correctly exposed portions of the carpet from the left side to cover up the overexposure. I also used the clone tool to eliminate the white border around the print. In essence, I extended the image to cover that border. This gave a little ‘breathing room’ on either side of the group.
The last thing that needed to be done was to square-up the image. Just like with the previous restoration, I chose Select > all and then Edit > transform > distort. Grabbing the upper right handle, I made the right side of the image parallel with the frame. I then did the same thing by moving the lower right corner down so the bottom edge was now perfectly horizontal. §