Jim Zuckerman’s
PH OTO I N S I G HTS
February 2021
Parallelism and DOF Blacklight photography L Brackets Photo tours Student showcase Ask Jim Subject index
1
4. 7. 13. 21. 23. 24. 25. 27. 33. 38.
2
Parallelism and DOF Blacklight photography L Brackets What’s wrong with this picture? Short and Sweet Ask Jim Photo tours Student showcase Back issues Subject index for Photo Insights
On the cover: Spiral staircase in the Monastery of Melk, Austria. This page: Boat-billed heron, Costa Rica.
W
hen you look at formal photographic portraits from the 19th and early 20th centuries, virtually none of the people -- from anywhere in the world -- smiled for the camera. There are two reasons for this. First, film was exceptionally slow back then. Photographers who shot with 8 x 10 and 11 x 14 inch glass plates coated with film emulsion worked with an ISO equivalent to 6! In today’s world, that seems unbelievable. That forced shutter speeds to be excessively slow, and subjects couldn’t move a muscle during the long exposure for fear the portrait wouldn’t be sharp. They even had headrests that fit the back of a person’s head to help prevent movement. Smiling, therefore, was out of the question. Even when the photographer used the equivalent of a flash -- which was, shockingly, igniting a tray of gunpower during the long exposure -- movement would have degraded the photograph. By 1870, film became faster and a shutter speed of 1/50th of a second was possible. For the sake of sharpness, though, movement was still precluded. The second reason people didn’t smile for the camera in the past was that no one felt it necessary to pretend to be happy. They wanted to capture realism for the first time, something a painting could only approximate. A formal portrait was considered to be real and honest; an artificial smile wasn’t. How times have changed. Jim Zuckerman photos@jimzuckerman.com www.jimzuckerman.com 3
PARALLELISM and DOF T
here are several factors that influence depth of field. One of them is the distance from the subject to the camera. As the subject moves away from the camera, depth of field increases. Conversely, as the subject moves closer to the camera, depth of field decreases. This is true for any focal length lens. When doing macro photography or when using a long lens to capture subjects fairly close to the camera, the distance factor is very important in determining how much of the subject is in focus. Consequently, the angle the camera is held relative to the plane of the sub-
4
ject becomes very relevant. To illustrate this point, look at the picture below and notice the depth of field. Most of the butterfly is sharp except the ends of the antennae and the furthest tips of the hind wings (red arrows). The reason this happened was because the camera was angled relative to the plane of the wings. As you can see in the graphic on the next page, the plane of the digital sensor was oblique to the plane of the butterfly’s wings. Therefore, over the surface of the sensor the distances to the subject varied. The dashed green lines represent
this. Light traveled further from the butterfly’s wing to the far left corner of the sensor than it did to the far right corner of the sensor. This variance contributes to limiting the amount of depth of field in an image. In the closeup shot on the next page of a pearly crescentspot butterfly, I used a relatively large aperture of f/8. However, the entire butterfly is sharp because I slowly positioned myself over the insect so the back of the camera (i.e. the plane of the digital sensor) was parallel with the wings.
raphy tours I’ve led is when we are in the field and I explain to clients about making the plane of the digital sensor parallel with a flat subject, it’s hard for some people to do that. As I stand off to the side and watch the client taking a closeup, I can see the two planes are not parallel with each other.
This works, of course, if the subject is flat. If you are photographing a small turtle with a rounded shell, making the back of the camera parallel with the subject won’t increase the depth of field.
Therefore, I suggest you practice at home without the pressure of having to shoot quickly. Use a tripod and set the camera parallel to a leaf, a rock face, tree bark, or whatever is handy. Lock the camera in place and step away from the tripod to view the camera from the side. In this way, you can see how close you are in making the plane of the digital sensor parallel with the surface you are using. Do this a few times until you feel confident you’ll be able to angle the camera for maximum advantage.
One of the things I’ve noticed on the photog-
Sometimes it’s not possible to make the two
5
planes perfectly parallel. For example, butterflies are so sensitive to movement that if they see your form moving over them, they will immediately take flight. Even if you can change the angle from severely oblique to moderately oblique, you will affect the depth of field in your favor. Ideally, a small lens aperture and moving back from the subject helps a great deal in achieving the depth of field you want. But if you are using a long lens with limited DOF and/or if the working distance to the subject is close, f/32 won’t produce as much depth of field as you might think. The chameleon at right, for example was taken with f/32 and look how the rear of the reptile became soft. Had I moved back a few inches or angled the camera differently, I could have shown the entire animal with sharp detail. §
6
A
Black Light Photography
n unusual approach to photographic lighting is to use a blacklight. They emit a moody, purple illumination that normally photographs cobalt blue. In addition, certain types of colors respond to blacklights in a way that makes them super saturated as if they are glowing. Blacklights can be purchased online or in some specialty stores like Hobby Lobby. They come in bulbs and fluorescent-shaped tubes as well as other designs. I bought a 24-inch blacklight tube from Sweetwater.com for $25.
Because the light from a blacklight is so dim, you must use a tripod. The settings for the image below, for example, were .3 seconds, f/7.1, and 640 ISO. The settings for the art object on page 9 were 10 seconds, f/22, and 200 ISO. These numbers give you a sense of the types of exposures you’ll encounter, so I always use a tripod and either the self-timer feature built into the camera or a cable release to insure sharp pictures. Camera meters are not designed to read blacklight illumination. Therefore, you’ll need to
7
8
take one or more test shots to determine the correct exposure. You can shorten the exposure times by adding another blacklight to the setup as well as moving the light(s) closer to the subject. The Inverse Square Law states by cutting the subject-to-light source distance in half, the amount of illumination increases by four times (i.e. two f/stops). Adding color The stylized horse-like object below is actually a medicine holder made of pewter I bought in Bali, Indonesia. I painted it with glow-in-thedark (phosphorescent) paints and illuminated it with the 24-inch blacklight tube. I applied the paint with a brush, but in the picture on page 7 I spray painted a white poster board with phosphorescent paint and used that for the background. I find the best colors in the photo come from using tungsten white balance.
The paints are available at Hobby Lobby and Amazon. I bought spray cans as well as a paint kit with multiple colors designed for application by a small paint brush. Click HERE to check out the kit of colors on Amazon. There are many variations of the types of subjects to use for blacklight photography and how to paint with the color. Faces, art objects, leaves, flowers, fabric, sea shells, beads, and glassware are all capable of providing fascinating photos when painted with glow-in-the-dark paints. The paint itself is water soluble so you can wash up easily. For the portrait on page 11, I painted beads with a small brush and then adorned my wife with them. The blacklight made the colored beads glow in the dark but the skin photographed typical cobalt blue. In the adjacent picture, I spray painted leaves with orange phosphores-
9
PERU PHOTO TOUR Sept. 24 - Oct 4, 2021
10
cent paint. Notice how effective the black background is. I photograph most of these subjects against black velvet because this material absorbs light better than any other fabric. For the portrait at right, I used two blacklights. One of the lights illuminated my wife, and the other was directed to a poster board I had sprayed with several phosphorescent colors. I placed the poster board behind textured glass, and the glass was positioned a couple of inches behind my wife. I then ran the image through Topaz Impression to add a painterly texture. Don’t think you are limited to the blacklight colors. Alter the colors in Photoshop using this pulldown menu: Image > adjustments > hue/ saturation. For the shot on the next page, for example, I first made a selection of the face and then desaturated the glass and used the hue slider on the portrait. § 11
12
I
L-brackets
have used L-brackets for years. I consider them essential gear. The brackets are made specifically for each camera. It is secured by a bolt or hexagonal set screw at the base of the camera, and the bracket covers the bottom of the camera as well as one side of it as you can see in the photo below. Mine is from reallyrightstuff.com. You can also find online less expensive Chinese copies. The primary purpose of the bracket is to easily switch from a horizontal composition to a vertical one when using a tripod. The flat parts of the bracket (red arrows below) are designed to fit onto the ball head. Instead of using one small plate affixed to the bottom of the camera,
which is how most photographers shoot, with the L-bracket you can secure the camera for horizontal pictures as well as vertical shots. The point, though, is when you change from one orientation to the other, the alignment of the camera doesn’t change. In other words, if you’ve composed a horizonal picture of a landscape in which the horizon line is perfectly parallel with the top and bottom of the viewfinder and then you decide to also take a vertical shot, you can remove the camera from the ball head, rotate it 90 degrees in your hands, and reattach it to capture the vertical shot without changing the parallel horizon. A camera’s weight will often cause it to loosen
The red arrows point to the areas of the L-bracket that fit into the ball head. They are 90 degrees relative to each other so when you switch from horizontal to vertical, the horizontal and vertical lines in the shot are still oriented correctly.
13
NAMIBIA PHOTO TOUR May 22 - June 1, 2021 Monster dunes Wildlife Walvis Bay cruise Dead trees Milky Way
14
ONLINE BEGINNING PHOTOGRAPHY 2 Live Sessions on Saturdays Starting Feb. 21, 2021 by Jim Zuckerman
Jim starts at the beginning, assuming you know nothing about photography. With a screen sharing meeting using GoToMeeting software, Jim clearly explains the relationship between shutter speeds, lens apertures, and ISO. He goes over the camera’s controls, showing how to understand and use controls like exposure compensation, focus points, white balance, high speed continuous shooting, exposure modes, and focus modes. Jim also explains what camera settings to use for different situations and what lenses should be chosen for various subjects. He discusses exposure, the scenarios in which camera meters fooled, and basic compositional guidelines. If you’ve been insecure about your understanding of basic photographic principles and how to make beautiful pictures, this course shouldn’t be missed. Click HERE for more information and to register. 15
a ball head when used to shoot a vertical picture, and the L-bracket solves that issue as well. If you don’t use an L-bracket, when you remove the camera from the ball head to change the shot from horizontal to vertical, most likely the alignment will be skewed. The horizon will no longer be parallel with the top and bottom of the viewfinder, and it will require several moments to correct this and orient the camera for the correct composition. L-brackets also protect two sides of your camera should you drop it. The strong aluminum material used in their manufacture is tough enough to protect the sensitive mechanics and electronics in the camera should it fall. The L-bracket does add a little weight (about 5 ounces or 142 grams), but in my opinion it’s well worth it. It saves time and frustration and allows you to shoot faster in quickly changing situations. §
16
w
UPCOMING PHOTO TRAINING Beginning Photography Online In the comfort of your home, enjoy this 2-part online training to really understand the basics of photography explained in a clear, easy to understand manner. Depth of field; the relationship between shutter speeds, aperture, and ISO; what camera settings to use in various situations; exposure; what lenses to own; and more.
Feb. 21, 2021
Frogs & Reptiles Workshop This is a macro workshop to photograph beautiful, colorful, and intriguing frogs and exotic reptiles. Learn how to use flash with closeup work, how to use extension tubes, and how to take perfect exposures. Held indoors in a hotel conference room in St. Louis.
June 12 - 13, 2021
Winter Wildlife Workshop Stunning pictures of North American animals including wolves, red foxes, arctic foxes, mountain lion, Canada lynx, and more. The animals will be in their winter coats and very beautiful. This is based in Kalispell, Montana.
February 2 - 5, 2022
10
17
Expand your photographic artistry with
eBooks
Click on any ebook to see inside
18
eBooks continued Click on any ebook to see inside
19 19
W i n t e r W i l d l i f e Workshop February 2 - 5, 2022 Based in Kalispell, Montana
20
23
What’s wrong with this picture?
L
ook at this picture closely. These are collared aracari toucans from Costa Rica, and the one on the left is out of focus. It is a few inches closer to the camera position than the one on the right, and that made all the difference. I was shooting with a Canon 500mm f/4 telephoto, and given the relatively close proximity to the toucans (I was about 40 to 50 feet away) the depth of field with the long lens was insufficient to render both subjects in focus. When there are two subjects in the frame, both have to be sharp. It doesn’t matter if the subjects are people, flowers, animals, pieces of fruit, architectural details, or whatever. In my opinion, if there are two elements in the picture that are prominent enough to be subjects, they both must be sharp. In this situation, since the light level was low and I had to have a fast enough shutter speed to freeze the birds, I was forced to shoot with an f/4 lens aper-
21
ture. That meant it was impossible to render both toucans sharply. There were four options to address this issue: 1) Wait for both birds to be equidistant to the camera. This might never happen, but it’s the ideal solution. If and when this occurred, both birds would have been in focus even with a large aperture. 2) Wait for one of the birds to fly away. 3) Use Photoshop to clone the out of focus bird out of the frame. 4) Take two separate pictures -- one of each bird in focus -- and then using Photoshop composite them together. Some people still think Photoshop is cheating because it can create images that didn’t exist in reality. But digital manipulation can also be used to circumvent the limitations of optics by fixing problems (like an out of focus bird) and making the composite look like the image you saw with your eyes. §
22
SHORT AND SWEET 1. One way to avoid distracting backgrounds is to get
low and shoot upward with the sky behind the subject. This eliminates the horizon, trees, mountains, other people, and buildings that could divert attention away from the subject. This is an eagle hunter in Mongolia with his golden eagle.
2. You can create silhouettes by selecting the subject and then filling it with black using the command: Edit > fill in Photoshop. Poster-like images can then be made by filling in other areas with a solid color. The sun, for example, was made by making a circular selection and then filling it with yellow.
3. When photographing animals, keep in mind they
4.
have depth. If you want to see all of their intriguing detail with tack sharp clarity, use a small enough lens aperture for the depth of field you want. I shot this iguana in Brazil at f/13. Even if the light is low, raise the ISO to get the DOF needed.
Wide angle lenses provide an unusual perspective when used looking downward. Using a 14mm lens, I stood on a chair above the bed for this shot in Venice, Italy, during carnival. Notice how the vertical lines converge at the bottom of the frame, not at the top as they would if shooting upward. ยง
23
ASK JIM
Every month, Jim will answer a question from his online students, from people who participate in his tours and workshops, or from subscribers to this magazine. If you have a question you’d like Jim to answer, please drop him a note at photos@jimzuckerman.com.
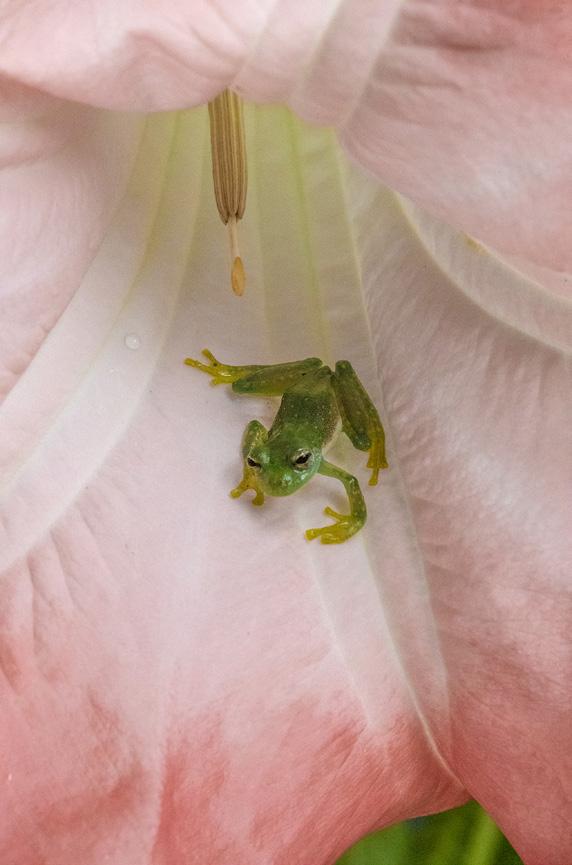
Q:
Jim . . . Do you think I should have moved in closer to the frog and filled more of the frame with it? Sometimes I’m not sure what to include and what to exclude in a shot. Nelson Fuller, Carlsbad, California
A:
You often don’t have a lot of time to analyze a shot with respect to composition. Especially with wildlife, things can happen fast and an animal may only stay in a good position for fractions of a second. Therefore, don’t hesitate to take a lot of pictures and decide later which one or ones you like. Compose closeup, then take another shot that shows the environment. Shoot both horizontally and vertically and change angles. Unlike film, it doesn’t cost anything to take a lot of frames -- except the time it takes to edit. In this case, I think both scenarios would be appropriate. I like the flower environment because this shot gives a sense of place and shows how small the frog is, but a closeup would look good, too. Often, you will like more than one composition of a particular subject.
24
Partial list of Photography Tours 2020 - 2021
NAMIBIA May/June 2021
MOROCCO Jun. 2021
LAVENDER FIELDS (France) June/July 2021
INDONESIA July/August 2021
NORWAY/DENMARK Sept. 2021
PERU NATURE Sept/Oct. 2021
POLAR BEARS Nov.. 2021
WINTER WILDLIFE Jan. 2022
ETHIOPIA Mar. 2022
SPAIN/PORTUGAL Apr. 2022
PATAGONIA PHOTO TOUR May 2022
ICELAND July 2021
For a complete list of all the photo tours/workshops Jim conducts, go to his website: www.jimzuckerman.com.
25
Iceland Photo Tour jJune 29 - July 5, 2021
jAwesome waterfalls
26
Dramatic landscapes Birds Horses Ice beach
Student Showcase Each month, Jim features one student who took beautiful and inspiring images on one or more of his photography tours or workshops. It’s really fascinating how photographers see and compose such different images even though we may go to the same places. Everyone gets great photographs on Jim’s trips.
April Austin, Carrollton, Missouri Babies wildlife workshop, Winter wildlife workshop.
© 2021 April Austin
27 27
Student Showcase, continued
Š 2021 April Austin
28 28
Student Showcase, continued
Š 2021 April Austin
37
31 33 35
33 29
Student Showcase, continued
Š 2021 April Austin
30 34
33
POLAR BEARS from Ground Level! November 6 - 12, 2021 Based in Churchill, Canada
31
INDONESIA PHOTO TOUR July 29 - August 10, 2021
32
Click on the past issues of
PH OTO I N S I G HTS you would like to read.
Nov. ‘12
Dec. ‘12
Jan. ‘13
Feb. ‘13
Mar. ‘13
Apr. ‘13
May. ‘13
Jun. ‘13
Jul. 13
Aug. ‘13
Sept. ‘13
Oct. ‘13
Nov. ‘13
Dec. ‘13
Jan. ‘14
May ‘14
Jun.‘14
Feb. ‘14
Mar. ‘14
Apr. ‘14
33
Click on the past issues of
PH OTO I N S I G HTS you would like to read.
Jul.‘14
Aug. ‘14
Sept. ‘14
Oct. ‘14
Nov. ‘14
Jan. ‘15
Feb. ‘15
Mar. ‘15
Apr. ‘15
Dec. ‘14 Jim Zuckerman’s
PH OTO I N S I G HTS January 2015
• Topaz Glow • A different approach to composition • Photographing puppies • Kaleidoscopic images • Online photo course • Student showcase • Photo tours
1
May ‘15
Jul.‘15
Jun ‘15
Aug.‘15
Sept.‘15
Jim Zuckerman’s
PH OTO I N S I G HTS June 2015
• Realistic HDR • Selective focus • Simulating bokeh • Sepia & Dark Contrast • Online photo courses • Student showcase • Photo tours 1
Oct.‘15
34
Nov. ‘15
Dec. ‘15
Jan. ‘16
Feb. ‘16
Click on the past issues of
PH OTO I N S I G HTS you would like to read.
Mar. ‘16
Apr. ‘16
May ‘16
Aug. ‘16
Sept. ‘16
Oct. ‘16
Jan. ‘17
Feb. ‘17
Jun ‘17
Jul. ‘17
Mar. ‘17
Aug. ‘17
Jun ‘16
Jul. ‘16
Nov. ‘16
Dec. ‘16
Apr. ‘17
May ‘17
Sept. ‘17
Oct. ‘17
35
Click on the past issues of
PH OTO I N S I G HTS you would like to read.
Nov. ‘17
Dec. ‘17
Jan. ‘18
Feb. ‘18
Mar. ‘18
Apr. ‘18
May ‘18
Jun ‘18
Jul ‘18
Aug ‘18
Sept. ‘18
Oct. ‘18
Nov. ‘18
Dec. ‘18
Jan. ‘19
Feb. ‘19
Mar. ‘19
May ‘19
Jun ‘19
Apr. ‘19
36
Click on the past issues of
PH OTO I N S I G HTS you would like to read.
37
Jul. ‘19
Aug. ‘19
Sept/Oct. ‘19
Nov. ‘19
Dec. ‘19
Jan. ‘20
Feb. ‘20
Mar. ‘20
Apr. ‘20
May ‘20
Jun. ‘20
July ‘20
Aug. ‘20
Sept. ‘20
Oct. ‘20
Nov. ‘20
Dec. ‘20
Jan.. ‘21
Feb.. ‘21
Subject index for past Photo Insight issues 1/3 focus law Jul. ‘15 3D sphere Mar. ‘16 90 degree finder Mar. ‘13 Abstracts in soap Feb. ‘15 Abstracts, Shooting Mar ‘19 Aerial photography Jun. ‘13 Aerial photography Jan. ‘21 African safari May ‘16 Airplane windows Mar. ‘16 Alien landscapes Jan. ‘13 Anatomy of 8 photographs Jan. ‘16 Angled perspectives Jan. ‘19 Aperture vs. shutter speed May ‘14 Aperture priority Sept. ‘14 Aurora Borealis Apr. ‘17 Auto white balance Dec. ‘13 Autofocus, when it fails Apr. ‘15 Autofocus failure Aug. ‘15 Autofocus failure Jan. ‘17 Autofocus challenges Apr. ‘18 Auto ISO Nov ‘17 Autumn Foliage Sep. ‘18 Autumn Color Sep. ‘20 Back button focus Oct. ‘18 Backgrounds, wild Nov. ‘12 Backgrounds, busy Apr. ‘13 Backlighting Apr. ‘16 Birds in flight Aug. ‘13 Birds in flight Jan. ‘14 Birefringence May ‘18 Birds in flight Mar. ‘16 Bird Photography Jun ‘19 Blacklight photography Feb. ‘21 Black velvet Mar. ‘14 Black and white conversions Mar. ‘17 Black and white solarization Sep. ‘17 Black and white with color Jan. ‘20 Blown highlights Feb. ‘18 Blur, field Nov. ‘18 Blur technique Oct. ‘17 Bokeh Jun. ‘15 Butterfly photography Jul. ‘14 Camera setting priorities Jun. ‘17 Capturing lightning Jun. ‘13 Catchlights Jul. ‘16 Cheap flash stand Apr. ‘13 Children photography Jun. ‘14 Choosing a telephoto lens Dec. ‘20 Chromatic aberration May ‘13 Chrome Dec. ‘18 Cityscapes Aug. ‘14 Cityscapes May ‘16 Clone tool, fixing an issue Sep. ‘17 Clone tool technique Jul. ‘20 Composites and Light Dec. ‘17 Compositing images Apr. ‘19 Composition, different approach Jan. ‘15 Content-aware, New Aug. ‘20 Contrast vs. exposure Jul. ‘15 Creating a star field Jan. ‘14 Creating a Sketch Dec. ‘17 Creative blurs Jan. ‘14
38
Dark backgrounds Dawn photography Dawn photography Dead center Dealing with smog Decay photography Define Pattern Depth of field Depth of field confusion Depth of field and distance Depth of field, shallow Depth of field vs. sharpness Double takes Drop shadows Dust, Minimizing
Nov. ‘19 Jan. ‘17 Feb. ‘17 Jan. ‘13 Oct. ‘16 Sep. ‘15 Sep. ‘18 Aug. ‘16 Jan. ‘20 Dec. ‘18 Apr. ‘20 Nov. ‘20 Apr. ‘20 Apr. ‘19 Aug. ‘19
eBook, how to make Embedded in Ice Energy saving bulbs Exposing for the sun Exposure, the sun Exposure technique Exposure, snow Exposure triangle Exposure, to the right Exposure compensation Extension tubes
Jan. ‘13 Oct. 17 Sep. ‘14 Sep. ‘16 Jul. ‘13 Sep. ‘13 Jan. ‘14 Nov. ‘14 Apr. ‘15 Sep. ‘16 Dec. ‘13
Festival photography Sep. ‘20 Fill flash Sep. ‘13 Filter forge Feb. ‘13 Fireworks Jul. ‘13 Fireworks, Compositing Jun ‘20 Fisheye lenses May ‘13 Fisheye lenses Feb. ‘15 Flash backlighting May ‘15 Flash, balancing exposure Oct. ‘15 Flash, balancing off-camera Dec. ‘18 Flat art Sep. ‘16 Flexify 2 Mar. ‘20 Flood fixes problems Nov. ‘19 Flowers May ‘15 Flowers in harsh light Jul. ‘16 Focus on the eyes Dec. ‘20 Focus points Mar. ‘15 Focus points Sep. ‘20 Focus stacking Mar. ‘17 Focus stacking Aug. ‘19 Focusing in the dark Oct. ‘16 Foreign models Jun. ‘13 Fractals, generating Sep. ‘13 Fractals Jul. ‘19 Framing May ‘17 Freezing ultra action May ‘17 From Terrible to Beautiful Aug. ‘19 Fun with paint Oct. ‘16 Fundamental ingredients Apr. ‘13 Fundamentals That Make Great Photos Jan. ‘19 Fun With Christmas Lights Jan. ‘21 Graphic Design Garish imagery
Jul. ‘20 Dec. ‘15
Subject index for past Photo Insight issues Great subjects Apr. ‘15 Great ceilings & HDR Panos Jul. ‘19 Green screen Mar. ‘13 Grunge technique Feb. ‘13 HDR, one photo Apr. ‘13 HDR at twilight May ‘13 HDR, realistic Jun. ‘15 HDR, hand held Dec. ‘16 HDR, hand held Nov ‘17 HDR, hand held Jul. ‘18 HDR panoramas Jun. ‘16 High wind Apr. ‘17 Highlights Apr. ‘14 Highlights, overexposed Feb. ‘15 Histograms, Why I Don’t Use Jun ‘19 Histogram problems Apr. ‘20 Hotels with a view Mar. ‘20 Humidity Oct. ‘13 Hummingbird photography Apr. ‘13 Hyperfocal distance Jul. ‘13 Image resizing Aug. ‘18 Implying motion Sept.‘14 Impossible DOF Feb. ‘16 Impossible DOF Jan. ‘17 Indestructible camera bag Dec. ‘14 Infrared photography Jul. ‘14 Interiors Oct. ‘15 iPad: Loading photos Aug.‘17 Jungle photography
Dec. ‘14
Kaleidoscopic images Kaleidoscopis images Keystoning, correcting
Jan. ‘15 Aug. ‘20 Aug. ‘15
L Bracket Feb. ‘18 L Bracket Feb. ‘21 Landscape photography Dec. ‘12 Landscape photography Apr. ‘14 Landscape photography Nov. ‘16 Light fall-off Feb. ‘14 Lighting a face Oct. ‘13 Lightning photography May ‘20 Liquify Feb. ‘18 Liquify Distortions Sept/Oct. ‘19 Long lens portraits Oct. ‘18 Long Lenses for Flowers Jul. ‘20 Low light photography May ‘15 Luminar 4 Jan. ‘20 Macro flash Nov. ‘12 Macro flash Sep. ‘14 Macro flash Aug. ‘15 Macro trick May ‘19 Mannequin heads Apr. ‘16 Metering modes Nov. ‘16 Meters, How They Work Jul. ‘18 Meters, when they fail Dec. ‘16 Metering situations, Impossible Jul. ‘19 Middle gray Nov. ‘15 Mirrors Jan. ‘19 Model shoot Jan. ‘17
Moon glow Oct. ‘16 Mosaics Jun. ‘17 Mundane to Ideal Nov. ‘19 Museum photography Mar. ‘13 Negative space Jan. ‘16 Neon edges on black Aug. ‘14 Neutral Density filters Jun. ‘18 Night photography Feb. ‘14 Night Safaris Jun. ‘18 Night to Twilight Dec. ‘17 Noise reduction Feb. ‘17 Oil and water Optical infinity Organization of photos
May ‘20 Jun. ‘16 Mar. ‘18
Out of focus foregrounds
Jan. ‘20
Paint abstracts May ‘13 Painting with light Sep. ‘15 Panning motion Dec. ‘16 Pano-Mirrors with a twist Jan. ‘18 Parades Sep. ‘13 Parallelism Nov. ‘19 Parallelism and DOF Feb. ‘21 Photography to Art Dec. ‘17 Photography solutions Jan. ‘18 Photoshop, content Aware Nov. ‘12 Photoshop, sketch technique Apr. ‘13 Photoshop, replace background Apr. ‘13 Photoshop, actions palette Dec. ‘13 Photoshop, layer masks Feb. ‘13 Photoshop, the clone tool May ‘13 Photoshop, soft foliage Oct. ‘13 Photoshop, mixer brush tool Sept. ‘14 Photoshop, b & w with color Jun. ‘14 Photoshop, drop shadows Jul. ‘14 Photoshop, creating texture Feb. ‘14 Photoshop, face mirrors Feb. ‘14 Photoshop, liquify Mar. ‘14 Photoshop, face mirrors Aug. ‘14 Photoshop, digital spotlight Sep. ‘14 Photoshop, enlarge eyes Nov. ‘14 Photoshop, darken the periphery Dec. ‘14 Photoshop, mirror images Dec. ‘14 Photoshop, beam of light Apr. ‘15 Photoshop, polar coordinates Mar. ‘15 Photoshop, chrome May ‘15 Photoshop, actions palette Nov. ‘15 Photoshop, cut and paste Nov. ‘15 Photoshop, geometrics Oct. ‘15 Photoshop, plugins Oct. ‘15 Photoshop, multiple selections Apr. ‘16 Photoshop, sharpening Apr. ‘16 Photoshop, Flood plugin Apr. ‘16 Photoshop, Desaturation Aug. ‘16 Photoshop, making a composite Aug. ‘16 Photoshop new tool May ‘20 Photoshop, place one element behind Aug. ‘18 Photoshop, the pen tool Feb. ‘16 Photoshop, canvas size Jan. ‘16 Photoshop, using the earth Jun. ‘16 Photoshop, define patterns May ‘16
39
Subject index for past Photo Insight issues Photoshop, paste into Nov. ‘16 Photoshop, b & w with color Feb. ‘17 Photoshop, open a closed door Apr. ‘17 Photoshop, palettes May ‘17 Photoshop, My favorite plugins Jan. ‘20 Portrait options Jan. ‘19 Portrait techniques Nov. ‘15 Portraits Mar. ‘13 Portraits, mixed lighting Aug. ‘14 Portrait Professional Nov. ‘19 Portraits, Lens choice Sept/Oct. ‘19 Portraits, side lighting Sep. ‘17 Portraits, window light Mar. ‘15 Portraits, outdoors May ‘17 Post-processing checklist Dec. ‘13 Post-processing: Contrast Aug. ’17 Predictive Focus Sep. ‘18 Problem/solution Apr. ‘17 Problem with cruises Jan. ‘18 Protecting highlights Dec. ‘12 Puppies Jan. ‘15 Puppy photography Feb. ’18 Reflections Feb. ‘13 Restoring old photos Jun ‘20 Safari May ‘13 Safari strategies Jul. ‘15 Seeing as the lens does Nov. ‘14 Seeking Cool Snow Photos Jan. ‘21 Selective filtering Mar. ‘18 Selective focus Jun. ‘15 Self-critiques Jul. ‘13 Self-critiques Oct. ‘13 Self-critiques Nov. ‘20 Sensor cleaning Jun. ‘18 Sepia and dark contrast Jun. ‘15 Shade May ‘14 Shady side Jun. ‘18 Shadows, Paying Attention to Mar. ‘18 Sharpness problems Mar. ‘14 Shooting through wire mesh Sept. ‘14 Shooting into the light Jun ‘20 Silhouettes Jun. ‘13 Silhouettes, Exposing for Sept/Oct. ‘19 Silvered landscapes Mar. ‘20 Sketch, How to Make Jun ‘19 Sky replacement Nov. ‘20 Snow exposure Nov ‘17 Snow exposure Nov. ‘19 Soft light Jan. ‘13 Smart phone photography May ‘19 Stained glass Mar. ‘17 Star photography Jul. ‘16 Star photography and noise Jan. ‘18 Stock photography Sep. ‘14 Sunrise & sunset Jan. ‘19 Tamron 150-600mm Ten reasons photos are not sharp Texture, Adding
40
Apr. ‘14 Jan. ‘19 Mar ‘19
Topaz AI Gigapixel Mar ‘19 Topaz glow Jan. ‘15 Topaz glow Sep. ‘17 Topaz Impression Sep. ‘15 Topaz Remask 5 Oct. ‘17 Topaz Simplify 4 Dec. ‘12 Topaz simplify 4 Jun. ‘14 Topaz Studio Apr. ‘18 Translucency & backlighting Nov. ‘18 Travel photography Feb. ‘13 Travel portraits Mar. ‘14 Travel tips Apr. ‘14 Travel photographer’s guide Jun. ‘17 Twilight photography in the rain Apr. ‘19 Tripods Mar. ‘18 Two subject sharp rule May ‘14 Two subject focus rule Jan. ‘20 Ultra distortion
May ‘18
Warm fingers in winter Nov. ‘15 Water drop collisions May ‘18 What NOT to do in photography Apr. ‘18 White on White Dec. ‘20 White vignette Aug. ‘15 White balance Feb. ‘15 White balance, custom Mar. ‘16 Wide angle conundrum May ‘19 Wide angle lenses Mar. ‘13 Wide angle portraits Nov. ‘14 Wide angle lenses Jun. ‘17 Wide angle keystoning Nov ‘17 Wildlife photos with wide angles Mar. ‘15 Window light Dec. ‘15 Window light portraits Aug. ‘18 Window frames Feb. ‘16 Winter photography Dec. ‘12 Winter bones May ‘13 Winter photography Dec. ‘15 Winter photography Nov. ‘18 Wire Mesh, Shooting Through Jul. ‘18 Workflow May ‘13
PHOTO INSIGHTS® published by Jim Zuckerman, All rights reserved
Great blue heron, middle Tennessee
© Jim Zuckerman 2021 email: photos@jimzuckerman.com
38 39 41 41