

ENGLISH CONTENTS EPILEPSY WARNING...........................................................................................................................3 FOR YOUR HEALTH............................................................................................................................3 SEROEASBACPLAPLAEASTCSPABOABOPWARNING.............................................................................................................................................4RECAUTIONSFORUSE...................................................................................................................6UTYOURSEGASATURN............................................................................................................7UTTHELITHIUMBATTERY.........................................................................................................8OWERCORD...................................................................................................................................11TEREOSCARTCABLE....................................................................................................................11ONNECTINGTHESEGASATURN.................................................................................................12HESEGASATURNCONTROLPAD................................................................................................15YSTART!.....................................................................................................................................16YINGSEGASATURNCDGAMES..............................................................................................16YINGAUDIOCDS........................................................................................................................17ONTROLSCREENSANDBUTTONFUNCTIONS..........................................................................18CKUPFUNCTIONSANDSYSTEMSETTINGS.............................................................................22YSTEMSETTINGS...........................................................................................................................24DVANCEDCDFUNCTIONS............................................................................................................25RRORMESSAGES..........................................................................................................................26THERPROBLEMS...........................................................................................................................27ESETTINGTHESEGASATURN.....................................................................................................28GASATURNHARDWAREINFORMATION...................................................................................28
§ Rest for at least 10 minutes per hour while playing a video game.
§ Preferably play the game on a small television screen.
Some people are susceptible to epileptic seizures or loss of consciousness when exposed to certain flashing lights or light patterns in everyday life. Such people may have a seizure while watching certain television images or playing certain video games. This may happen even if the person has no medical history of epilepsy or has never had any epileptic seizures. Certain conditions may induce undetected epileptic symptoms even in persons who have no history of prior seizures or Iepilepsy.fyouoranyone in your family has ever had symptoms related to epilepsy (seizures or loss of consciousness) when exposed to flashing lights, consult your doctor prior to playing. We advise that parents should monitor the use of video games by their children. If you or your child experience any of the following symptoms: dizziness, blurred vision, eye or muscle twitches, loss of consciousness, disorientation, any involuntary movement or convulsion, IMMEDIATELY discontinue use and consult your doctor. YOUR HEALTH
§ Avoid playing if you are tired or have not had much sleep.
§ Make sure that the room in which you are playing is well lit.
EPILEPSY WARNING
FOR
§ Do not stand too close to the screen. Sit a good distance away from the television screen, as far away as the length of the cable allows.
8. Water and Moisture: Do not use the Sega Saturn near water, for example, near a bath tub, wash bowl, kitchen sink, washing machine or swimming pool or in a wet basement and the like. If you do, it may cause electric shock or damage the unit.
9. Lightning: For added protection for the Sega Saturn during a lightning storm, or when it is left unattended and unused for long periods of time, unplug it from the wall socket and disconnect the antenna or cable system. This will prevent damage due to lightning and power-line surges.
14. Do not let small children stick their fingers in any openings on the Sega Saturn console. Misuse of the Sega Saturn in this way may lead to electric shock and damage to the unit.
2. Do not disassemble or alter the Sega Saturn and its peripherals in any way. No parts inside the unit can be serviced by the user. Misuse of the Sega Saturn in this way may lead to electric shock and damage to the unit. If you have a problem, contact your Sega dealer.
1. Do not expose the Sega Saturn to water, rain or moisture, as this can result in electric shock or fire.
5. Turn off the Sega Saturn when not in use. Leaving the Sega Saturn with the power on may constitute a risk of fire.
7. Heat: The Sega Saturn should not be situated near sources of heat, such as radiators, heat registers, stoves or other products (including amplifiers) that produce heat. Failure to comply with this can result in a risk of fire, electric shock or damage to the unit.
WARNING
4. Disconnect the power when connecting the Sega Saturn. Unplug the Power Cord when connecting the Sega Saturn. Also ensure that the television and VCR to which the Sega Saturn is connected are switched off. If you do not, it may cause electric shock.
13. Battery Disposal: Do not recharge, disassemble or dispose of in fire.
12. Keep the Lithium Battery out of the reach of children. If a child swallows a Lithium Battery, consult a doctor immediately. Failure to comply with this can result in a risk of suffocation or poisoning.
15. This product is fitted with a non-rewirable plug. If the plug is unsuitable for your mains socket outlet then it should be cut off and DESTROYED, and an appropriate plug fitted. Never insert this cut-off plug into your mains socket outlet as the wires leading from the plug are live and hazardous.
3. The Sega Saturn console operates at 220 - 240 V AC, ~ 50/60 Hz. Using incorrect voltage can result in a risk of electric shock, fire or damage to the unit.
6. Power-cord Protection: The Power Cord should be routed so as to avoid being walked on or pinched by items placed on or against it. Pay particular attention to the area near the plug, outlet or receptacle, and the point where the Power Cord exits the Sega Saturn. A frayed, perforated or stripped cord can result in electric shock or fire.
11. Ventilation: Slots and openings in the console are provided for ventilation, to ensure reliable operation and to protect the Sega Saturn from overheating. Do not cover your Sega Saturn during use as heat may build up internally.
10. Object and Liquid Entry: Never push objects of any kind into the console through openings, as they may touch dangerous voltage points or short out parts that could result in fire or electric shock. Never spill liquids of any kind on the product.
The wires in the mains lead are coloured in accordance with the following code:
BLUE: NEUTRAL BROWN: LIVE If the colours of the wires in the mains lead of this appliance do not correspond to with the coloured markings identifying the terminals in your plug, proceed as follows:
The Sega Saturn is a Class 1 Laser Product Class I Lasers are defined as devices which emit radiation levels "below which biological hazards have not been Cautestablished".ion-useof controls, adjustments or performance of procedures other than those specified herein may result in hazardous radiation exposure.
IMPORTANT FOR LASER PRODUCTS
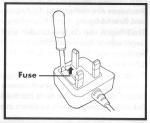
WHEN USING POWER CORDS IN THE U.K. FOR YOUR SAFETY PLEASE READ THE FOLLOWING TEXT CAREFULLY If the plug supplied is not suitable for the socket outlets in your home, it should be cut off and an appropriate plug fitted in accordance with the following instructions.
The fuse fitted to this appliance is 3A and replacement fuses should be A.S.T.A. approved to B.S.1362. If you need to replace the fuse, proceed as follows: Open the fuse compartment with a screwdriver and replace the fuse. Remember to re-fit the orange fuse cover back into the fuse compartment.
Connect the BLUE wire to the BLACK terminal (or the terminal marked with an "N"). Connect the BROWN wire to the RED terminal (or the terminal marked with an "L"). Do not make any connection to the earth terminal marked with the letter E or symbol or coloured GREEN or GREEN/YELLOW.
Requiring Service: Unplug the Sega Saturn from the wall socket and refer servicing to qualified personnel under the following conditions:
§ When cleaning the Sega Saturn, do not use benzene, thinner or any other strong chemicals. Use water or neutral cleanser.
Damage
Console
§ Condensation may accumulate on the surface of the Sega Saturn if it is subjected to sudden changes in temperature. In this case, allow the Sega Saturn to rest for about one hour before use.
PRECAUTIONS FOR USE
§ Do not open the CD door when a CD is playing.
§ Do not touch the lens inside the CD door. If the lens is dirty, wipe it with a soft, dry cloth.
(e) If the Sega Saturn has been dropped or damaged in any way; (f) If the Sega Saturn exhibits a change in performance.
(a) If the Power Cord is damaged; (b) If liquid has been spilled or objects have fallen into the Sega Saturn; (c) If the Sega Saturn has been exposed to rain or water; (d) If the Sega Saturn does not operate normally despite following the operating instructions; Adjust only those controls that are covered by the operating instructions as an improper adjustment of other controls may result in damage and will often require extensive work by a qualified technician to restore the product to its normal operation.
§ Do not disconnect the Control Pad or any other peripheral during gameplay as it may result in malfunction.
§ Do not drop the Sega Saturn or any other parts or subject them to shock.
Location § Avoid the following conditions during use or storage: high temperatures, such as direct sunlight or near a heater; extreme cold; steam vapour, such as near a kitchen stove; dust; areas where the Sega Saturn may be splashed with water; humidity; slanted, unstable or vibrating surfaces.
§ Make sure there is no CD in the CD drive when moving the Sega Saturn console.
§ Do not use any software peripheral equipment that was not specifically designed for the Sega Saturn.
§ Do not let the terminals get dirty, as it can damage the Sega Saturn. If they do get dirty, wipe them with a soft, dry cloth CD Drive
§ Do not use excessive force when opening the CD door.
§ Always close the CD door to avoid accumulation of dust.
§
§
Lithium
§
Manual
ABOUT
§
§
Lithium
Sega Saturn is the most powerful home gaming system ever built, and takes you beyond the limits of conventional gaming. Sega Saturn brings home the most realistic sports and arcade gameplay and 3D worlds. Its multifunctional abilities allow you to enjoy a full multimedia entertainment experience. Sega Saturn package should contain the following components: of Instructions (this booklet) Safeguards Sheet Sega Saturn unit Saturn Control Pad Sega Saturn Stereo A/V Cable Sega Saturn Power Cord Saturn Sticker Warranty Card Battery CR2032 (inserted, with insulation sheet)
Sega
§
Power Cord and Supply Do not forcibly bend or pull the Power Cord. Do not place heavy objects on the Power Cord. Hold the Power Cord by the plug when disconnecting. Do not allow the plug or terminals to come into contact with metallic objects or water. Use only the Power Cord supplied with the Sega Saturn. Never use the Power Cord with any other products as it can cause damage. Never touch the plug with wet hands as it may result in electric shock. Battery Make certain the positive side of the Lithium Battery is facing upward Reversing polarity may cause the battery to leak. Do not disassemble, heat, charge or ignite the battery. When the battery is low, replace it as soon as possible. A run-down battery adversely affects the performance of the Sega Saturn. Wipe the surface of the Lithium Battery before use. Note to Owners of Projection Televisions
Still pictures or images may cause permanent picture-tube damage or mark the phosphor of the CRT. Avoid repeated or extended use of video games on large-screen projection televisions. Consult your owner's manual before playing video games on your projection television. YOUR SEGA SATURN
§
§
§
§
§
Sega
Your
ABOUT THE LITHIUM BATTERY The Lithium battery (type CR2032) powers the internal backup memory and clock. Change the battery about once a Byear.efore replacing the battery, switch off the power to the Sega Saturn unit and unplug ' the Power Cord to avoid electric shock. Wipe the upper surface of the battery with a dry cloth before installing. Replacing the Battery (a) Remove the Battery Cover. (b) Remove the battery. (c) Insert a new battery, keeping the positive side upwards, and close the Battery Cover. Notes § If you start a game with no battery installed or if the battery power is too low, you cannot save game data. § When you remove the Lithium battery, all saved data is erased To keep data while replacing the Lithium battery, purchase a Back-Up Memory (see page 16). § Make sure to dispose of the Lithium Battery in the appropriate waste receptacle or waste disposal area. You can use an array of software on your Sega Saturn: § Sega Saturn game CDs § Audio CDs § CD+G (audio with graphics) discs § CD+EG (audio with extended graphics) discs § 8-centimeter audio CD singles Note: You cannot use Mega Drive, Mega CD or Mega Drive 32X games or peripheral equipment with your Sega Saturn.

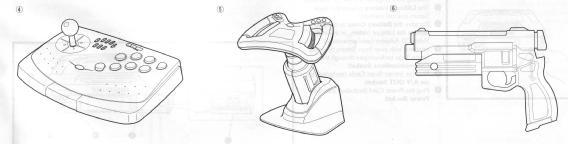
SEGA SATURN PERIPHERALS This is just a sample of the exciting Sega Saturn peripherals available now at your Sega dealer. In addition to the peripherals shown above, you can also play video CDs, photo CDs and electronic books on your Sega Saturn with the use of adaptors and/or software that is sold separately. And there's more on the way! 1. Sega Saturn Control Pad 2. Back-up Memory 3. 6-Player Adaptor 4. Virtua Stick 5. Arcade Racer 6. Virtua Gun Future peripherals for Sega Saturn... § Keyboard § Floppy Disk Drive § Hard Disk Drive § Infra Red Control Pad

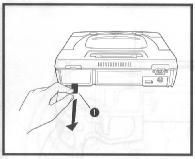
THE SEGA SATURN UNIT FRONT VIEW 1. Press the OPEN Button to open the CD door. 2. Insert a CD in the unit and close the CD Door. 3. The Cartridge Slot is used to insert accessories, such as the Back-up Memory. 4. Press the RESET Button to restart a game. 5. Press the POWER Button to switch the power on and off. 6. The Power Light lights when power is on. 7. Plug in a Sega Saturn Control Pad or other Sega Saturn peripherals in Control Port 1. 8. Use Control Port 2 to connect a Control Pad or other peripherals for multi-player games. Rear View 1. Remove the Insulation Sheet before starting your Sega Saturn for the first time. 2. The Lithium battery powers the Sega Saturn internal memory. 3. Remove the Battery Cover in order to replace the Lithium battery, or insert the Video CD Adaptor (sold separately) 4. Interface with your Sega Saturn by using future Sega technologies through the Communications Socket! 5. Plug the Stereo Scart Cable (included) into the A/V OUT Socket. 6. Plug the Power Cord (included) into the Power Socket.


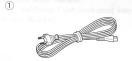
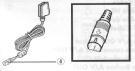
POWER CORD Your Sega Saturn package includes a Power Cord. Use this to connect the Power Socket on the console to a standard AC outlet. 1. European countries except U.K. 2. For U.K. 3. For Australia and New Zealand STEREO SCART CABLE Your Sega Saturn package includes a Stereo Scart Cable, which connects the Sega Saturn console to a television, or VCR. If your TV is not equipped with a Scart (Euro Connector) facility, please contact your local Sega Saturn Dealer to obtain an optional Sega Saturn RF Unit. (Not available in France) 4. To A/V OUT Socket Note: When connecting the Stereo Scart Cable, make sure that the arrow on the plug faces upwards.


1. To enjoy full stereo sound, connect your Sega Saturn to a stereo TV.
2. When using a Stereo Scart Cable, some TVs may display a "black border" on the left-hand side of the TV screen.
1. Plug the Stereo Scart Cable into the A/V OUT socket on the right side of the console.
Make sure that your Sega Saturn is turned off and unplugged from the electric socket before connecting any cables.
3. Select the audio/video input setting on your TV or monitor when playing Sega video games on the Sega Saturn. Some TVs may automatically switch to this setting when the Sega Saturn is switched on.
2. Connect the Stereo Scart Cable directly to your TV.
After marking all connections, remember to re-insert all plugs.
CONNECTING THE SEGA SATURN
Plug your Sega Saturn Control Pad into Control Port 1 on the Sega Saturn console.
Connecting to a TV with Scart Input
Note:

Connections to a TV/Monitor and Antenna
1. Unplug the antenna cable from the TV, and plug it into the RF Unit.
(Not available in France)
Note: If your television is connected to a VCR, check to see if your VCR has audio and video plugs to which to connect.
TV with Connected VCR
1. If a VCR is already connected between the antenna and TV terminal, use a Sega Saturn RF Unit (sold separately).
2. Plug the RF Unit antenna cable into the TV terminal.
Unplug the antenna cable of the VCR from the TV terminal. Then, plug this cable into the RF Unit.
3. Plug the RF Cable into the A/V OUT socket on the back of the Sega Saturn console.
2. Plug the RF Unit antenna cable into the TV.
If an antenna cable is plugged into your TV (or if you have cable TV), use a Sega Saturn RF Unit (sold separately).
3. Plug the RF cable into the A/V OUT socket on the back of the Sega Saturn console.
Connecting to a TV or VCR without Audio/Video Sockets

Setting the TV Channel (Except French models) If you are using an RF Unit, see below. 1. Set your TV to the channel 36. 2. Set the channel switch on the RF Unit to I (United Kingdom only)/ G (all other countries). 3. Turn on the TV and fine-tune to locate the MODEL ideal picture. Note: If your TV has automatic fine-tuning control (AFC), turn it off and manually adjust the picture. However, if you have a colour TV that turns black and white when the AFC is turned off, leave the AFC on. 1. Side View 2. Select I-G (CH 36)

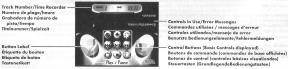
5. The Start Button (START) starts/pauses games (or audio playback).
THE CONTROL PAD
7. Button X cycles through audio playback repeat options. Button Y stops audio playback. Button Z pauses and resumes audio playback.
§ For information on the button functions for specific games, check the game manual.
1. Connect the Terminal to Control Port I or 2 on the Sega Saturn unit.
3. The Right Shift Button (Button R) skips and searches forward through audio CD tracks.
SEGA SATURN
The Sega Saturn Control Pad controls gameplay when using Sega Saturn game CDs, and controls other functions when playing audio CDs.
6. Buttons A and C make selections, and Button B cancels selections.
Connecting the Control Pad When using one Sega Saturn Control Pad, plug it into Control Port 1. If you are using a second Control Pad (MK80313, MK-80301, sold separately), plug it into Control Port 2. Always plug in the Control Pads before switching on the power to the Sega Saturn unit, otherwise the Control Pad(s) may not respond.
§ Plug the Control Pad into Control Port 1. § For two-player games, a second Control Pad (sold separately) is required.
4. The Directional Button (D-Button) moves the cursor up, down, left and right on screen.
Notes § Remember to turn the power to the Sega Saturn off before connecting the Control Pad, otherwise the Control Pad may not respond.
2. The Left Shift Button (Button L) skips and searches backward through audio CD tracks.

1. Press the RESET button while holding down Button A.
EASY START! INITIAL SETTINGS
Starting a Session
Ending a Session
You can choose to view Sega Saturn screen messages in English, German, French, Spanish, Italian or Japanese. Press the D-Button to highlight a language and press Button A or C. The Set Clock screen appears next.
4. If you want to return to the game's Title screen during play, press Buttons A, B and C and START simultaneously, or press the RESET button.
2. Press the OPEN button to open the CD door and take out the CD.
3. Press Start to start the game.
SET LANGUAGE
When you're finished, Select EXIT and press Button A or C to input the new settings. The next screen that appears is the Audio CD Control screen. CD
2. Insert CD (label up!), shut the CD door and turn on the Sega Saturn.
3. Switch off the POWER button on the Sega Saturn unit.
PLAYING SEGA SATURN
GAMES
SET CLOCK Press the D-Button left or right to move between DATE and TIME, and press up or down to change the numbers.
When you switch on the Sega Saturn for the first time, or after you change the Lithium battery, the Set Language screen appears, followed by the Set Clock screen.
1. Press the OPEN Button on the Sega Saturn unit to open the CD door.
Note: Before you remove the CD, check that the CD Control screen appears (which means the CD has stopped spinning and is safe to remove from the Sega Saturn). Important: Do not use CD Game ROMs designed for other machines, as they may damage the Sega Saturn.

2. Press the OPEN button to open the CD door and take out the CD. 3. Switch off the POWER button on the Sega Saturn unit.
Starting a Session 1. Insert CD (label up!), shut the CD door and turn on the Sega Saturn. In a few seconds, the Audio CD Control screen appears.
Note: Before you remove the CD, check that the Audio CD Control screen appears (which means the CD has stopped spinning and is safe to remove from the Sega Saturn).
PLAYING AUDIO CDS
2. Press START or Button Z, or highlight Play/Pause on screen and press Button A or C to start the CD.
Your Sega Saturn can play various types of audio CDs including CD+G, CD+EG and audio tracks on Sega Saturn CD Games. (For more on Audio CDs, see 25.)
Ending a Session 1. Highlight Stop on the Audio CD Control screen and press Button A or C, or if the Audio CD Control screen is not displayed, press the RESET button.
page
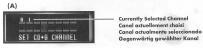
The channel function allows you to program up to 16 channels per disc.
When a Sega Saturn CD is inserted: If the power is off, press the POWER button while holding down Button A; if the power is on, press the RESET button while holding down Button A.
Basic Controls
(A) CD+G Channel Window
When a CD other than a Sega Saturn CD is inserted: If the power is off, press the POWER button; if the power is on, press the RESET button.
1. Multi-Button For Sega Saturn Game CDs, select this to start the game. For CD+G and CD+EG discs, press to open the Set CD+G Channel window.
The way to access the Audio CD Control screen depends on the type of disc inserted.
The Audio CD Control Screen
CONTROL SCREENS AND BUTTON FUNCTIONS
1. Highlight the Multi-Button and press Button A or C to open the Set CD+G Channel.
3. When you're finished, press START to return to the Audio CD Control screen.
2. Press the D-Button to highlight a channel, and press Button A or C to select. Press Button B to reset the channels to the default.
The Audio CD Control screen is the main control panel for audio CDs and CD+G discs. Error messages and other information are displayed here, as well as various control functions.
2. System Settings Button Press to see the System Settings screen (see page 24). You can also use the System Settings Button to access the Memory Manager screen (see page 22). 3. Hide Controls Button This hides the Audio CD Control screen, and displays the screen saver. When using a CD+G disc, the disc's graphics are displayed. To return to the Audio CD Control screen, press Button A, B or C, or the D-Button. 4. Play/Pause Button Press to play, press to pause! 5. Stop Button Press to stop playback. 6. Skip Forward Button Press to skip a track. Press and hold to search through the current tracks. 7. Skip Backward Button Press to jump back a track. Press and hold to scan backward through current tracks. 8. Repeat Button Choose from 1 (repeat one track), All (repeat all tracks) and Off (to cancel the Repeat function) Press Button A or C to select your choice. 9. Change Controls Button This switches from Basic Controls to Advanced Controls.
1. Program Sequence Program a customized play list! Use the D-Button to select a track from the upper list and press Button A or C to place the track in the lower list. Select the next track the same way. To delete selections (one by one), press Button B. When done, press START. Press Button Z to start/ pause program play. § Upper list shows tracks available on the disc. § Lower list shows tracks selected for playback.
• Increase 3D audio effect
Note: Setting the Adjust Surround level too high may cause distortion in certain types of music. This is not a fault with your system. Set to a more suitable level.
2. Shuffle Tracks
This function arranges the audio tracks at random. Press Shuffle Tracks again to resume normal play order. (Shuffle Tracks cancels other programmed sets.)
Note: Mute Vocals suppresses the central portion of the audio signal. For stereo recordings, a trace of the vocals will remain. Mute Vocals is not effective on mono recordings, and may not be effective for such genres as classical music, duets, choral music, various forms of ethnic music and recordings with such effects as echo.
3. Repeat A-B This repeats a section of a track. Press once to determine the starting point and again to fix the end point. Press Repeat A-B again to return to normal play. (Repeat A-B cannot be used with Scan Intros.)
Advanced Controls
4. Scan Intros
6. Pitch Set the pitch of audio playback tracks or mute vocals. Press the D-Button left or right to raise or lower the pitch. Press Button A or C to mute the vocals, and press Button B to reset to the default (restoring the vocals). Adjust Pitch cannot be used with Adjust Surround. Press START to exit. § Raise Pitch
Use the Advanced Controls to make various adjustments to your audio CD listening environment.
Listen to the first 10 seconds from each track in the play list in order. To return to normal play, press Scan Intros again. (This function cannot be used with Repeat A-B.)
5. Adjust Surround This simulates a three-dimensional audio effect. Use the D-Button to increase or decrease the effect. Press Button B to reset to the default level. (Adjust Surround cannot be used with Adjust Pitch or Mute Vocals.) When done, press START to exit.
7. Clear All Settings Resets all Audio CD Panel settings to default. Press Button A or C to clear settings. 8. Change Screen Select the time display format of your choice. TRACK TIME ELAPSED tells you how much time has elapsed in the current track. TOTAL TIME ELAPSED tells you how much time has elapsed since the play list started. TRACK TIME REMAINING is the time left in the current Ttrack.OTAL TIME REMAINING is time left until the end of the play list. 9. • Change Controls Button This switches from Advanced Controls to Basic Controls.

BACKUP FUNCTIONS AND SYSTEM SETTINGS
Many games have a backup option which allows you save game data to continue later. Consult the game manual on how to save games. The Sega Saturn also has an auto save system backup memory that saves some data automatically. However, this only works if a Lithium battery is inserted in the unit (see page 8).
If the system power is off, press the POWER button while holding down Buttons L and R. If the power is on, press the RESET button while holding down Buttons L and R. In either case, Systems Settings screen appears. Highlight "Memory Manager" and press Button A or C to open the Memory Manager screen.
1. Open the Memory Manager as described above.
When you first use the Sega Saturn, the system backup memory initialises automatically. However, you can re-initialize at any time by clearing all data in the system backup memory.
Note: If the message NOT CLEARED! appears, there is a problem with your system backup memory, please consult your Sega dealer.
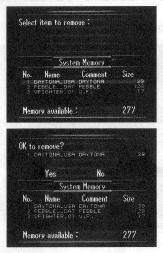
The Memory Manager Screen
2. Select CLEAR in the System Memory box and press Button A or C. When the Confirmation window appears, select YES and press Button A or C to erase the internal memory, or select NO to cancel.
Initializing
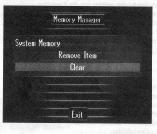

Erasing Data 1. Open the Memory Manager screen. Select item to remove. 2. Select REMOVE ITEM and press Button A or C to open the Delete screen. 3. Highlight the file you wish to delete and press Button A or C. The item's name and information appears at top of the screen, and a YES and NO confirmation. Select YES and press Button A or C to erase the item, or NO to cancel the erasure. 4. When you're done, press Button B to return to the Memory Manager screen. Note: If the message NOT REMOVED! appears, there is a fault with your system backup memory. Please consult your Sega dealer. When you are finished initializing or erasing, select Exit at the, Memory Manager screen and press Button A or C to return to the Audio CD Control screen. Caution Do not switch off the power while initializing or deleting, or you may damage the data in your system backup memory and need to re-initialize. The RESET button is disabled during, these operations.
SYSTEM SETTINGS You can change the time, date and language settings on your Sega Saturn at any time, in the System Settings screen. Highlight System Settings in the Audio CD screen and press Button A or C to open the System Settings screen. Highlight an option and press Button A or C to access. Select Clock to change the clock settings (see page 16). Select Language to change the displayed language (see page 16). Select Other Settings to change the following options: Button Labels Choose whether or not to display button information on the Audio CD Control Ascreen.udioOutput: Choose to have stereo or mono audio output when playing CDs and CD+G and CD+EG discs. (If you are using a Sega RF Unit, output will be mono regardless of Ssetting.)oundEffects: Choose to have sound effects on or off in the Audio CD Control screen.

2.
ADVANCED CD FUNCTIONS
Playing Standard Audio CDs
Press START or Button Z, or highlight Play/Pause on screen and press Button A or C to play the CD.
3. Select Hide Controls and press Button A or C to hide the Audio CD panel and display the Sega Saturn screen saver. (Press Button A, B, or C or the D-Button at any time to access the Audio CD panel.)
1. Insert the CD (label up!), shut the CD door and turn on the Sega Saturn. In a few seconds, the Audio CD Control screen appears.
Your Sega Saturn can play various types of audio CDs.
Playing Sega Saturn CDs
Playing CD+G and CD+EG Discs
Press START or Button Z, or select Play or Pause on screen and press Button A or C. In a few seconds, the track number and time appear, and music and graphics begin.
3. Select Hide Controls and press Button A or C to hide the Audio CD panel and display the Sega Saturn screen saver. (Press Button A, B, or C or the D-Button at any time to access the Audio CD panel.)
2.
1. Insert the CD (label up!), shut the CD door and turn on the Sega Saturn. In a few seconds, the Audio CD Control screen appears.
A CD+G is a music and graphics CD, and CD+EG is the next generation, featuring extended graphics with up to 256 colors! Both types of discs can be played on Sega Saturn.
You can listen to your Sega Saturn CD game soundtracks. If the power is off, press the POWER button while holding down Button A. If the power is on, press the RESET button while holding down Button A.
ERROR MESSAGES In the event of a problem, error messages appear on screen. Please check the following to check possible causes. DISC UNSUITABLE FOR THIS SYSTEM § Is the type of CD suitable for your Sega Saturn? § Is the surface of the CD dirty? GAME DISC UNSUITABLE FOR THIS SYSTEM § Is the type of CD suitable for your Sega Saturn? DRIVE EMPTY § Is a disc inserted in the Sega Saturn? § Is the disc badly damaged? § Is the disc dirty? § Is the disc label side up? § Is the type of CD suitable for your Sega Saturn? DISC REQUIRES SYSTEM APPLICATION § Do you have the additional hardware or software required to play the disc? Sega Saturn CD game will not start § Is the disc the right way up? § Is the disc clean and free from damage? The colour does not look right § Are the TV colour controls set properly? Sound is mono but should be stereo § Is the audio output set to mono on the § TV? § Are the audio sockets properly connected, § to the TV? The date and time revert to default settings. § Is the Lithium battery running low?
§ Have you removed the Insulation Sheet from the Lithium battery? Cannot save. § Is the Lithium battery running low? § Have you removed the Insulation Sheet from the Lithium battery? The screen is blue or black. § Is the Scart Cable connected properly? If other problems arise, first try pressing the RESET button or switching the POWER button on and off. If the problem remains, follow the instructions on page 28 and carefully reset your Sega Saturn. If the problem persists, consult your Sega dealer. OTHER PROBLEMS No picture or sound. § Is the TV securely connected to the power source? § Is the power to the TV switched on? § Is the TV set to Audio/Video mode? § Is the Power Cord securely and correctly connected? § Is the Sega Saturn POWER button switched on? § Is the RF unit set to the correct channel?
1. Switch off the power to the Sega Saturn and unplug the Power Cord from the outlet.
If the reset button fails to function, or the CD Audio Control screen fails to appear after following the operating instructions in this manual, follow the instructions below to reset the Sega Saturn unit. Note that all internal settings revert to the default, and all internal memory data is erased.
RESETTING THE SEGA SATURN
SEGA SATURN HARDWARE INFORMATION Model Number: MK-80200A-50 Power Source: 220 - 240V AC, r\-) 50/60Hz Power Consumption: 20W Operating Conditions: Temperature 0°C to 40°C Humidity 20% to 90% RH Dimensions: Width 260 mm (10.2 inches) Length 230 mm (9.0 inches) Height 86 mm (3.2 inches) CSpecificationsPU: Main SH2 (28.4 MHz, 25 MIPS) x 2 Sound 68EC000 (11.3 MHz) Memory: § Work RAM 16 Mbit § Video RAM 12 Mbit § Sound RAM 4 Mbit § CD Buffer RAM 4 Mbit § IPL ROM 4 Mbit § Backup RAM 256 Kbit
2. Remove the Battery Cover and remove the lithium battery. After waiting for one minute, replace the lithium battery, replace the Battery Cover, plug in the Power Cord and turn on the power to the Sega Saturn unit.
3.
Graphics: Resolution 320 x 224 Colours 2,048/1024 (16,770,000 simultaneous transmission) Sprite enlargement, reduction, rotation, transformation Scroll: 5 screen maximum XY Scroll 4 Rotation 2 Enlargement/reduction 2 Window 2 Special features Vertical cell scroll Lateral line scroll Enlargement/reduction CG Functions: Polygon specialized hardware Special features Wire frame Flat shading Gouraud shading Sound: § PCM & FM sound sources § 32 channels § 16 bit sampling § Sampling rate 44.1 KHz max. Audio DSP CD-ROM: § Intelligent double-speed CD drive Note: Characteristics and specifications may be changed without notice.

