
About Render
Designing and Realising Plaster Surfaces

006 Of hog hair and shell sand, Annette Spiro
014 RENDERING TECHNIQUES AND SURFACES, Pinar Gönül
020 SINGLE-SKIN WALL CONSTRUCTION
022 Project 1 — Lime render: Zur Weid Work and Residential Centre, Mettmenstetten
032 Project 2 — Lime render: Farmhouse conversion and renovation, Kloten
042 Lime render – A practical guide, Ruedi Krebs
064 Project 3 — Scraped finish: Alteration and extension of a villa, Zurich
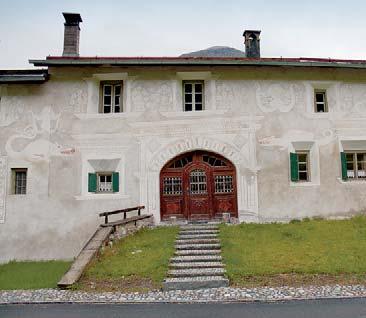
074 Sgraffito – A traditional render technique in the Engadin, Hartmut Göhler
090 Project 4 — Sgraffito: Commercial building and hotel Weinstrasse, Munich
106 Project 5 — Washed finish: Bündner Herrschaft retirement and nursing home, Maienfeld
116 Project 6 — Wormser roughcast finish: Bachmättli residential development, Hochdorf
128 See – Recognise – Understand – A conversation about historical rendering techniques between Oskar Emmenegger, his son Rafael Emmenegger and Silke Langenberg
136 RENDERED EXTERNAL THERMAL INSULATION
138 Project 7 — Air lime render: Villa, Berlin Westend
148 Project 8 — Pit lime smooth finish: Youth hostel extension, Zermatt
158 Project 9 — Scraped finish: envia retirement and care home, Alvaneu Dorf
168 Project 10 — Embedded finish: Apartment building Grüngasse, Zurich
180 Render in architecture – An interview with Andreas Hild
190 Almost ten years later … – Continuation of the 2012 interview with Andreas Hild, Dionys Ottl and Matthias Haber
198 Project 11 — Rendered stucco elements: Apartment building on Reichenbachstrasse, Munich
212 Project 12 — Decorative trowel-thrown finish, washed finish: Werkhof, Weinfelden
224 Project 13 —Textured finish: Waldorf School, Freiburg im Breisgau
234 Project 14 — Striated finish: Renovation Escher and Lavater Buildings, Zurich
244 The interplay of render and paint, Matteo Laffranchi, Lino Sibillano and Stefanie Wettstein
256
DOUBLE-SKIN WALL CONSTRUCTION
258 Project 15 — Washed finish: Apartment block Bärengraben, Baden
270 Project 16 —Trowel-thrown finish: School building Mattenhof, Zurich
280 Project 17 — Rough finish: Klostergarten Lehel, Munich
294 Rough finishes – History and techniques, Petra Dariz, Sophie Wolf and Wilhelm Glaser
302 REAR-VENTILATED WALL CONSTRUCTION
304 Project 18 — Rubbed finish: Residential development Hegianwandweg, Zurich
314 DIGITAL RENDERING TECHNIQUES
316 Robotic plaster spraying – Crafting surfaces with adaptive thin-layer printing, Selen Ercan Jenny
322 Synergies between digital and analogue craft tools – Extended methods for plaster surfaces, Dieter Geissbühler
328 TEN RECIPES
330 Recipe 1: Pit lime
332 Recipe 2: Dry-slaked lime with silvergrass
334 Recipe 3: Pit lime with stone dust
336 Recipe 4: Pit lime with coloured pigments
338 Recipe 5: Lime-cement render, trowel thrown
340 Recipe 6: Wormser roughcast finish
342 Recipe 7: Washed finish
344 Recipe 8: Washed finish with coloured glaze
346 Recipe 9: Washed finish with pigmented lime slurry
348 Recipe 10: Scraped finish 350

Rendering techniques and surfaces


RENDERING TECHNIQUES AND SURFACES
The appearance of every render or plaster surface is closely linked with the craftsman’s methods of application and finishing of the mortar. The methods used and the tools chosen generally determine the name of the finish.
The following pages introduce and describe the many types of finishes based on how the mortar is applied and subsequently treated. The enclosed folding plan gives an extensive overview of rendered surfaces related to their grain size and layer thickness.
THROWN AND SPRAYED
Trowel-thrown finish
For a trowel-thrown finish, the mortar is thrown with a trowel. The characteristic surface texture arises from the mortar quality, in particular the aggregates, and the craftsman’s manual throwing technique. One variant of the traditional trowel-thrown finish involves taking off some of the mortar in the thicker areas with the trowel and re-throwing it at areas where the coat is thinner or missing.
Wormser roughcast finish
The mortar was originally sprayed onto the substrate using a manual spraying device known as a Wormser (see p. 359) to achieve this roughcast finish. Today it is applied by machine. Spraying on a thin-flowing, fine-grained (grain size between 1.5 and 4 mm) mortar creates a homogenous yet grainy surface texture. The spraying operation must be repeated several times to fully cover the whole of a substrate without thin or missing areas. All the layers may be sprayed one after the other or the first one smoothed with a trowel before the second is sprayed onto the still-moist substrate. In both methods the aggregate sticks to the still-moist render substrate to create the characteristic grainy surface. The hand-operated spraying device can be used to fill in missed or uneven areas.
RUBBED, TROWELLED AND SMOOTHED
Rubbed texture finishes
With rubbed finishes, the freshly applied final coat of mortar is rubbed flat with a wooden or plastic float using medium pressure and a circular motion. The contrast between the flattened areas and the deeper marks due to the larger aggregate particles being dragged along by the rubbing action is responsible for the characteristic appearance of these finishes. The type, size and grading of the aggregate in the mortar and the various rubbing motions create different surface textures.
Some fine-grain premixed mortars, often labelled “Vollabriebputz”, can be fully rubbed down to produce a uniformly even finish.
A striated or “Kretzli” finish is produced by rubbing the freshly applied mortar in alternating directions using short, circular movements. The mortar is finegrained with a small proportion of large, rounded aggregate. These larger particles are dragged beneath the float in the direction of rubbing to leave behind short striations or furrows.
Trowelled finish
A trowelled finish is produced from mortar with grain sizes between 0.5 and 2.5 mm. It has a rustic appearance and a finely textured surface. Depending on the intended texture, the surface may be worked with a Milanese spatula, tongue gauging trowel or smoothing trowel with rounded edges. The applied mortar is smoothed with the smoothing trowel, the trowel marks remain visible and can be made in horizontal, vertical, fan, shingle or curved shapes. By using various types of trowel, the render can have a highly textured, smooth floated, slightly brushed surface or be given a smoothing coat of lime slurry.
Klosterputz
Klosterputz is a lightly washed trowelled finish. Dating back to the Middle Ages as the word “Kloster” (monastery) suggests, this technique involves covering trowel-smoothed lime mortar with several wet-on-wet coats of thin pit lime milk. The enhancement of the rendered surface with lime binder and fine aggregate creates an even, dense, slightly wavy, white finish.

SGRAFFITO – A TRADITIONAL RENDER TECHNIQUE IN THE ENGADIN
Hartmut GöhlerWhat is sgraffito?
Originating in Italy, sgraffito is a scratched render technique in which the mortar layers are applied wet-on-wet onto the substrate. 1
A base coat is applied to the masonry to even out the irregularities of the wall and ensure a good bond over the whole surface. A dark mortar, traditionally pigmented with soot or wood ash, is then applied as the scratchwork. Finally a light-coloured lime slurry is applied as a scratch coat, a top layer to be selectively scratched away. Depending on the complexity of the image or ornamentation, more than one coat may be applied, each of different colours and no more than 4 mm thick. 2 The design is then scored from the drawing into the top coat with a nail or similar tool. This preliminary marking out can be a freehand sketch or a stencil. “The technique is relatively simple. Applying a lime paint to a freshly thrown mortar layer and drawing on it is no problem. It is precisely the same as drawing on a sheet of paper but by other means.” 3
The damp lime slurry is scratched off following the marks on the drawing as lines or over whole areas with cuts angled in such a way so as to protect their edges from weathering. 4 This exposes the surface of the dark base coat and creates a light relief (see p. 86). Carbonation of the lime creates a strong bond between the two layers, which makes the render and the ornamentation very durable and weather-resistant. Durability is one advantage of sgraffito. Sgraffito lettering lasts considerably longer than script applied only in paint and left exposed to the weather. 5
Sgraffito finishes in the Engadin – creation and origin
A forerunner to modern sgraffito in the Middle Ages: Pietra rasa pointing with a flush-pointed trowel-line finish (Fig. 2). The joints between the stones in a masonry wall are flush-pointed, delineated with the trowel edge and marked out with trowel strokes in mortar. 6 This technique was used in the Middle Ages on the Chesa Madalena tower in Zuoz, dating from 1305. This trowel-stroke flush pointing could have been an early type of decoration.
The origin of the European sgraffito technique lies in Rome, Florence and northern Italy, where it achieved a high level of cultural significance during the Renaissance between the 14th and 17th centuries (Fig. 3). The technique travelled north on the trading routes over Alpine passes and spread among plaster craftsmen in Silesia. The Engadin region in the Swiss Alps offered perfect
conditions for the Italian craftsmen’s work: The dry climate, which would preserve the sgraffiti for centuries, the traditional stacked, interlocked timber outside walls, which for fire safety reasons had to be clad in natural stone, and local sources of lime. The technique went on to become well-established in the region.
Because the masonry walls consisted mainly of rubble or cut stone, sealing them required a full-surface coating of mortar. The window reveals of the thick masonry walls were chamfered and whitewashed to allow more light to enter the building. Whitewashing not only improved interior illumination, it also played a part in architectural composition and design. 7 The three-dimensional Renaissance facades with their tectonically structured reliefs were translated into flat building surfaces. Built using very cheap labour, the farmhouses bore a powerful significance – they were, in effect, evidence of early cosmopolitanism. What emerged there was an amazing phenomenon, a blend of countries, peoples and cultures.” 8 (Fig. 4)
At its heart is the need humans feel to embellish their homes. Architect HansJörg Ruch, who is based in the Engadin, points to some examples in Turkey, Rajasthan and Yemen: Although there was no cultural exchange, they share numerous features, including with sgraffiti in Ardez in the Engadin. The similarities in design stem from the tools used. “The geometric games with the compass are also found in fine joinery work.” 9
The sgraffito scratched render technique was used on many types of buildings, although during the Renaissance it was mainly found on grander urban residences. In Germany there are buildings, mainly in the Art Nouveau style, where the technique has become more complex: Multicoloured sgraffiti that can be compared to a woodcut. Munich, for example, has department stores from the 1950s with sgraffito facades.
Three phases of popularity in the Engadin
Sgraffiti were used in Bergell and on the Splügen route in the first phase starting in the 16th century (Fig. 5). Following the destruction from 1621 to 1623 during the Thirty Years’ War, almost all the facades of the houses in the Engadin were decorated with sgraffiti from the middle of the 17th century to the middle of the 18th century. Building activities decreased with the migration to the towns and cities as did the amount of sgraffiti. 10 The second phase started from 1880 in historicism. Many village experienced fires in the 19th century, among them Tschlin, Ramosch, Sent, Ftan-Grond, Lavin and Zernez, which triggered a busy period of rebuilding. Old techniques were rediscovered in the Engadin, most notably by Nicolaus Hartmann the Younger from St. Moritz. With the construction


Project 8
Pit lime smooth finish
Youth hostel extension Zermatt


ARCHITECTS
Bauart Architekten und Planer AG, Bern
PROJECT PARTICIPANTS
Client: Schweizerische Stiftung für Sozialtourismus, Zurich
Specialist advice: Renzo Gregori, Fixit SA, Bex
External thermal insulation: Gipserei Passeri Roberto AG, Herbriggen
Rendering and plastering: Malergeschäft Burgener, Fiesch; Sorrenti AG, Bern
COMPLETED 2003
In 2001, the Swiss Youth Hostels organisation commissioned a study into the renovation and extension of its youth hostel in Zermatt. The building, which dates from the 1950s, no longer met today’s changed requirements: The sanitary facilities and social areas needed modernisation and the range of rooms was to be altered and expanded. The main building was renovated and new buildings added. The local conditions, financial and time constraints, the difficult plot on sloping ground and the requirement to preserve the unique location with a view of the Matterhorn led to the principle of reduction becoming the most important design consideration. The main building was extended with two simple buildings each with an acute-angled corner, sized to make the most of their locations and the existing dispersed development of the area. Through their position and volumetry, they combine with the main building to form an ensemble and create an open courtyard arrangement. The external appearance of the new buildings interprets Valaisan architecture in a contemporary style. The traditional tall, narrow volumes without balconies and with minimal canopies appear as deliberately unadorned, lucid monoliths. The reserved facades with flush-mounted windows find their richness in materiality: The rendered facade, with a smooth pit lime finish applied by the hands of expert craftsmen and the bronze-coloured window frames, varies its appearance with changing light conditions.
The facades have rendered external thermal insulation, which has been coated with a traditional lime fine marmorino render. The flush window reveal detail required very careful design and construction because it is far from risk-free. The final coat is a pure, timberburned pit lime render. The mortar was applied in four layers, wet-on-moist, over a period of two days. On the first day, the first layer with small-grain aggregate was applied and felted, this was repeated on the second day but in this case left as trowelled. Then followed two layers of a pit lime hard smoothing mortar applied wet-on-moist with a stainless steel smoothing trowel using a traditional Venetian plastering technique. The fully mineral rendered facade was then made slightly water-repellent by applying and pressing soap onto the surface. The definitive colour of the surface, which shimmers and markedly changes its appearance depending on the weather, does not become established until after carbonation.
Wall construction from outside to inside:
Seal:
— Soap, pressed onto the surface using a Venetian plastering technique, compacted with a stainless steel smoothing trowel;
Fixit SA: “Settef Savonite”
Final coat: 3 mm
3rd and 4th layer marmorino lime smoothing mortar
— Pit lime smoothing mortar, grain size 0.4 – 0.6 mm, coloured, with fungicidal film protection, two layers, wet-on-moist
— Aggregates: Marble dust grain size 0 – 0.3 mm
— Additives: Bonding agent, linseed oil, mineral pigment, volcanic ash;
Fixit SA: “Settef Rasalit Fine”
2nd layer marmorino lime smoothing mortar
— Pit lime smoothing mortar, grain size 0.7 mm, coloured, with fungicidal film protection, applied using a Venetian plastering technique
— Aggregates: Marble sand grain size 0 – 0.7 mm, marble dust
— Additives: Bonding agent, mineral pigments, volcanic ash;
Fixit SA: “Settef Marmoris Liscio”
1st layer marmorino lime smoothing mortar
— Pit lime hard smoothing mortar, grain size 0.7 mm, coloured, with fungicidal film protection, applied using a Venetian plastering technique
— Aggregates: Marble sand grain size 0 – 0.7 mm, marble dust
— Additives: Bonding agent, mineral pigments, volcanic ash;
Fixit SA: “Settef Marmoris Fine”
Bedding mortar with mesh fabric: 8 –10 mm
— Reinforcement with double layer of mesh fabric; Fixit SA: “Fixit 445 MFP Combi”
Base coat: 15– 20 mm
— Lime-cement base coat, fibre-reinforced; Fixit SA: “Fixit 420 MFP Fasergrundputz”
Thermal insulation: 160 mm
— Mineral wool; Flumroc AG: “H165 Flumroc-Dämmplatte Compact”
Brick masonry: 150 mm
— Ziegeleien Freiburg und Lausanne AG:
“Backstein MXE 15”
Base coat: 5 – 7 mm
— Mineral base coat; Siegfried Keller AG “Afrasil”
Final coat: 2 – 3 mm
— Mineral base coat, grain size 0.5 mm; Siegfried Keller AG “Afrasil”
Paint:
—Silicate paint; Keimfarben AG: “Keim Biosil”
Plinth from ground level to the load-bearing external wall:
Seal: See wall construction facade
Final coat: 3 mm, see wall construction facade
Bedding mortar with mesh fabric: 8 –10 mm, see wall construction facade
Base coat: 15 – 20 mm
— Lime-cement plinth render
Thermal insulation: 160 mm
— Extruded polystyrene rigid foam board, up to 500 mm above ground level
Waterproofing:
— Bituminous protection layer
Waterproof concrete: 220 mm
U-value: 0.16 W/(m2K), MINERGIE-P-STANDARD 2003
Facade costs:
486 CHF/m2 render, including the load-bearing wall
Address: Staldenweg 5, Zermatt

Facade section 1:20
Wall construction from outside to inside:
Seal
Pit lime smoothing mortar, four layers 3 mm
Bedding mortar with mesh fabric, two layers 8– 10 mm
Lime-cement base coat, fibre-reinforced 15– 20 mm
Silicate paint
Total thickness approx. 350 mm
Plinth wall construction from ground level, from outside to inside:
Seal
Pit lime smoothing mortar, four layers 3 mm Bedding mortar with mesh fabric, two layers
Lime-cement plinth render
Extruded polystyrene rigid foam board
mm
CHOICE OF RENDER SYSTEM
A compact facade was chosen based on the limited space available on the plot. Thicker wall constructions were ruled out in order to fulfil the requirements of the accommodation schedule. A relatively small budget for the construction costs also restricted the scope of the works. The client required moreover a high-quality architecture and the facade was to achieve MINERGIE®-P standard. The rendered facade offers a simple and cost-effective way of durably protecting a building envelope. The material has great potential in the many different ways it can be coloured and textured.
The render system was developed for the youth hostel buildings and its performance backed by a full warranty from the participating firms and material suppliers. The client supported the use of a prototype but requested a warranty from the contractors and material suppliers. A system warranty was provided by the participating firms for the insulation, plastering and rendering works. The surface quality was determined by a 2 x 3-m trial panel made in the workshop.
THE MATERIAL AND ITS CHARACTERISTICS
The render consists of a very high-quality, timberburned pit lime. It had been stored for 7 to 9 years in a pit and consistently watered. The resulting pasty material was good to apply and work. The final coat was pigmented with soot. This pigment is light-stable and cost-effective when added to lime.
The coating is fully mineral and breathable. The shimmering surface changes its appearance in response to the weather. When it is damp, it looks predominantly dark and very smooth. Applying the render in four layers gi ves the surface optical depth. The render chalks as it ages and becomes lighter with time.


The colour chosen for the new buildings is intended to set them apart from the existing building, a masonry structure rendered in a light colour in the 1950s. The anthracite-like colour of the new buildings makes reference to the local rock and the natural stone masonry farm and utility buildings in the region. The lime render was pigmented so that it did not require to be coated with a paint to achieve the desired colour.

PROCESSING OF THE RENDER ON SITE

The facades required no expansion joints because of their small dimensions. The thickness of the base coat was 15 to 20 mm. This intermediate coat conceals any trace of the individual insulation boards in the smooth final coat.
The final coat was applied in four layers wet-on-moist. Because of the size of this project and the fact that there are only a few craftsmen in Switzerland who are skilled in this rendering technique, the project was working at the limit of what was practically possible. The works were completed by a specialist company.
At an altitude of 1,600 metres, the pit lime mortar could be used without a fungicidal additive. However, one was added by the manufacturer just to be sure. In accordance with the SIA Standard 243, the plinth render was applied up to a height of 500 mm instead of 250 mm above the moisture-resistant thermal insulation. The rendered surface becomes darker when it absorbs moisture as a result of rain or snow, but this discolouration disappears again upon drying out.
The signatures of the various craftsmen’s work can be recognised in the facade surface. This brings with it an architectural quality but also puts that quality to some extent at risk. Moreover the prevailing wind and relative humidity at the time of application can affect the appearance. This was the reason for one of the facades having to be rendered a second time.
The render can be applied only during the summer. During the drying time, the facade must be protected with sheeted scaffolding to prevent rapid drying out or damage from heavy rain.
Editors
Annette Spiro, Hartmut Göhler, Pinar Gönül
Project editing
Steffi Lenzen, Anne Schäfer-Hörr, Katja Pfeiffer (project management), Valerie d’Avis (editorial assistance)
Translation into English
Raymond Peat, Alford (GB)
Copy editing (English edition)
Stefan Widdess, Berlin (DE)
Proofreading (English edition)
Meriel Clemett, Bromborough (GB)
Layout and cover design
Nadine Rinderer, Frauenfeld (CH)
Drawings and folding plan
Annina Baumgartner, Basel (CH), Anabell Fritsches, Zurich (CH)
Production and DTP
Roswitha Siegler
Reproduction
Küenzi & Partner
Printing and binding
Gutenberg Beuys Feindruckerei, Langenhagen
Paper
Munken Pure Rough
Font
Grotesque MT
Cover image
Finish samples, produced in-house by Gebrüder Beck AG, Triesenberg
Pit lime render comprising ground brick and river sand (Coccio pesto) treated in different ways:
Top: Coccio pesto à fresco glazed with red ochre and smoothed
Middle: Coccio pesto washed
Bottom: Coccio pesto smoothed
Photo Björn Siegrist Photographie
Title of the original German language edition
Über Putz. Oberflächen entwickeln und realisieren
© 2021, 6th edition, new, revised and expanded gta Verlag, ETH Zurich
English language first edition
© 2023, first edition
DETAIL Business Information GmbH, Munich (DE) detail.de
ISBN 978-3-95553-617-6 (Print)
ISBN 978-3-95553-618-3 (E-book)
This work is subject to copyright. All rights reserved. These rights specifically include the rights of translation, reprinting and presentation, the reuse of illustrations and diagrams, the reproduction on microfilm or on any other media and storage in data processing systems. Furthermore, these rights pertain to any and all parts of the material. Any reproduction of this work, whether whole or in part, even in individual cases, is only permitted within the scope specified by the applicable copyright law. Any reproduction is subject to remuneration. Any infringement will be subject to the penalty clauses of copyright law.
Bibliographic information from the German National Library: The German National Library lists this publication in the Deutsche Nationalbibliografie (German National Bibliography); detailed bibliographic data is available on the Internet at http://dnb.d-nb.de.
The contents of this textbook were researched and developed with great diligence and a conscientious effort to reflect the best available knowledge. We assume no liability for any errors or omissions. No legal claims may be derived from the contents of this book.