
hats · cardi · pompoms Issue 17 TESTING OUT YARNS & KNITTING HATS BULKY YARN HATS perfect winter knitting Busting Clothes Moth Myths NO-COUNT CABLES chemo cap How to make a DIY jumbo POMPOM Knitting a lacy cardi KNITmuch ...to K, is to Uptown Worsted Hues Be Wool Multi Posh Alpaca Truva Hue and Me Mandala Baby DK Feels Like Butta Wool Ease KNITTING with
EDITOR-IN-CHIEF, ART DIRECTOR
Carla A. Canonico Carla@KNITmuch.com
ADVERTISING SALES
John De Fusco John@KNITmuch.com


PUBLISHER
A Needle Pulling Thread
PHOTOGRAPHERS
John De Fusco, Carla A. Canonico, Contributors
BLOGGERS/CONTRIBUTORS
Cindy O'Malley cindooknits.blogspot.com
Fiona Stevenson www.fionaknits.com
Cynthia MacDougall ktogdesign@gmail.com
GRAPHIC DESIGN
Carla A. Canonico Carla@KNITmuch.com Sondra Armas Sondra@KNITmuch.com
SOCIAL MEDIA and WEB Sondra Armas Alejandro Araujo
WEBSITE / BLOG : KNITmuch.com Like us on Facebook : KNITmuch Follow us on Twitter : @KNITmuchmag
WHERE TO GET YOUR COPY
KNITmuch is a quarterly eMagazine published by A Needle Pulling Thread. It is available free for personal use online at KNITmuch.com
A limited number of printed copies of KNITmuch are available for purchase at select yarn shops and specialty stores. Ask for it at your local shop. KNITmuch is not available by subscription.
YARN SHOPS

If you are interested in carrying KNITmuch in your store, please email John@KNITmuch.com
EDITORIAL
Bloggers, designers, and other contributors who would like to be considered for future issues please email Carla@KNITmuch.com with a brief description of your work and your proposed project.

©2023 KNITmuch. All rights reserved. Issue 17. ISSN 2368-5913

No part of this publication may be reproduced without written permission from the publisher.
All designs, patterns, and information in this magazine are for private, non-commercial use only, and are copyrighted material owned by their respective creators or owners.
2 KNITmuch | issue 17
KNITmuch .com Visit and download our free ebook: Cynthia MacDougall's Knitting Essentials! FREE! ALL { daily blog { weekly giveaways { monthly newsletter { quarterly magazine { Facebook page { Pinterest page { ALL of the above! KNITmuch ...to K, is to
KNITmuch
...to K, is to
Contents 6 A Needle Pulling Thread KNITTING 10 Busting Clothes Moth Myths 12 7 secrets to choosing the right yarn for your knitting project 15 4 steps to knitting a SIMPLE and PERFECT gauge swatch (free pattern) 17 Lace knitting – Why [and how] it’s easier than you think 19 When it’s important to knit two swatches per project 20 Binding off the icord way: The BEST knitting finishing touch 22 Knitting with the NEW TRUVA Universal Yarn is TRULY luxurious 23 Knitting needles for the new Truva yarn: How to pick the right size 24 Knitting a knit-purl design with Truva (start with a sample) 25 Knitting lace with the NEW Universal Yarn Truva (free pattern!) 27 Knit a NO-COUNT cables chemo cap (It’s so soft!) 32 Hats knit with Bulky yarn - perfect winter knitting 33 Knitting the classic chunky Pike Street Hat (beginner) 36 Pomfret Hat, double the pompoms, double the fun (free pattern) 39 Be Wool Multi and the Basketweave Hat | free pattern 42 Autumn Oak knitted hat keeps you warm in the winter too!
3 KNITmuch | issue 17 contents


4 KNITmuch | issue 17 Includes the Premier issue and the latest issue FREE for a limited time only! Download the FREE KNITmuch App! P.S. If you've already downloaded our app, make sure you download our latest issue for FREE, for a limited time only…
editor's letter

I have a fascination for hats for every season and occasion. Hats of centuries ago were absolutely works of art! Edwardian-era hats and those of the 1920s are my favorite. Fortunately, it's still stylish to wear winter and summer hats! My knitting repertoire wouldn't be complete without a few knitted hats covering several knitting techniques! I've done some with lacework, interesting knit stitch patterns, and of course, short rows, and most resemble the cloche hats I love so much.
I've also knitted the Fan Vaulting Beret by Denise Powell shown here for my mother. Our Spring 2013 Issue of A Needle Pulling Thread magazine featured it . I am now knitting one for myself in a deep gray version. In this issue, you'll find colorful hats that are quick to make using chunky/bulky yarn. My favorite hats in this issue are the Autumn Oak Hat, knitted using Universal Yarn Posh Alpaca, and Cynthia's MacDougall's chemo hat, sporting delicate cables on a cloche-style hat. The latter can also be worn as a light covering in spring or autumn.
Having a good hat pattern repertoire is always an asset. They are quick to make even if using lightweight yarn making them ideal lastminute gifts, and they work up perfectly for charitable donations.


And what's not to love about pompoms?! I have fond memories of my mother making them for my hats as a child, you might have the same memory too.

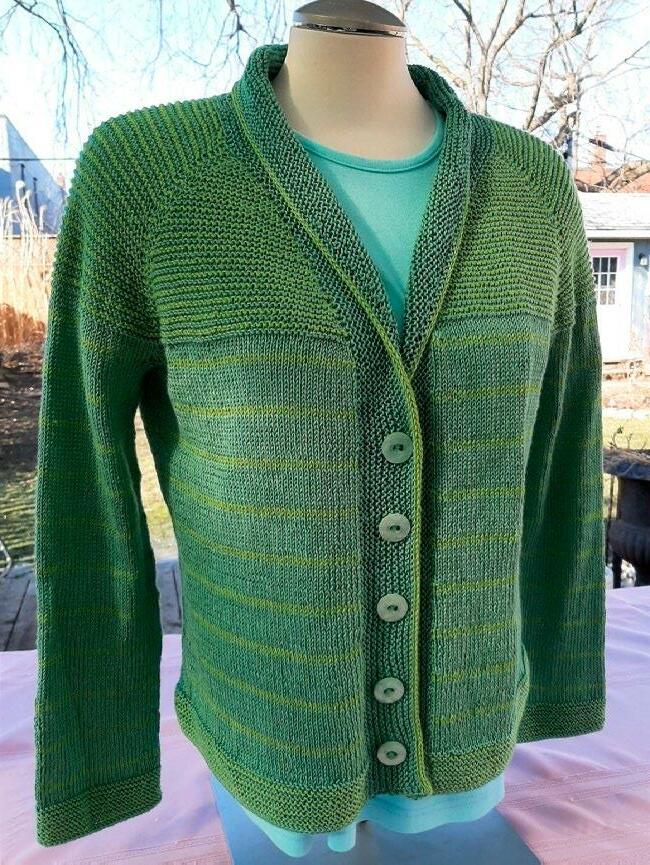
Fiona Stevenson proposes a lovely lacey cardi for a little girl which is well...Cute as a Button. Wishing you all the best in your knitting, until the next KNITmuch issue!
Cheerfully,


follow me
KNITmuch | issue 17


6 KNITmuch | issue 17 Selected projects from ANPTmag Knitting Click on the photos to buy patterns Issue 60 Seafaring Cables Pullovers Cynthia MacDougall A needle pulling thread SHOP


Issue 61 Soft Tiles Cushion Cover Nancy Lekx Issue 61 Tiles and Tesserae Wrap Nancy Lekx Issue 60 Aran Inspired Scarf Nancy Lekx KNITmuch | issue 17 7


8 KNITmuch | issue 17 Issue 59 Leafy Vines Wrap Nancy Lekx Learn a variety of knitting techniques in every issue! Experience the JOY of creating fabulous knits! Issue 59 Fractured Flower Trivet Cynthia MacDougall
needle pulling thread
A


Knit Together Busting Clothes Moth Myths
Decades ago, when spring cleaning was an all-out ritual, housewives would wash all the winter woollies. Then they would wash down all the cupboards before replacing the winter garments. Woollen rugs were draped over the clothes line and beaten soundly. Walls were washed and baseboards scrubbed or vacuumed. One of the reasons such care was taken was to avoid an infestation of clothes moths.
Myth No. 2 Moths will only attack clothes with dirt specks on them.
Moths are attracted to body oil, traces of food, and other dirt on garments, but they will munch on clean clothing, too. Cleaning clothes thoroughly before storage is a good preventative, but it is not a guarantee that moths won’t stop by for a bite.
Cynthia MacDougall

Knit Together Design Studio

PO Box 562 Stn Main
Orillia, ON L3V 6K2
ktogdesign@gmail.com ravelry name: macknitnow
The webbing clothes moth, tineola bisselleilla, is a small creature, about 6mm [¼ inch] long. Like other moths, it has a four-stage life cycle: egg, larva, pupa, and flying adult. The adult lays eggs in clusters in a place that will provide a food source for the larvae. Eggs hatch in four to ten days. The larval stage usually lasts just over 35 days, but it can last up to twoand-a-half years! At the end of this stage, the larvae leave the food source and travel to dark crevices to pupate. Pupation lasts from 4 to 28 days, depending upon the season. Overall, the life cycle of the clothes moth lasts from four to six months.
There are a number of myths circulating about clothes moths. Let’s dispel a few of them:
Myth No. 1 Moths only like wool.
Moths like any protein fiber, even silk. The only times I have found moths they were in exotic fibers – camel down, qiviut, and angora. It seems the clothes moth is not a cheap date!
Although moths don’t like bast (plant) fibers, they have been known to eat through cotton, especially if they will be rewarded by a feast of protein fibers.
Myth No. 3 Herbs and other plants can be used to kill moths.
There are dozens of herbs that can be used as ‘moth deterrents’ including lavender, cedar, eucalyptus, mint, tea tree oil, and several members of the artemesia family. Contrary to common belief, none of them kill moths. These odiferous plants are used to mask the odour of the wool products, in the same way an air freshener is intended to mask the smell of the family dog.
Myth No. 4 Mothballs kill moths.
Mothballs are known to kill the adult moth, and sometimes larvae, but they don’t kill all stages of the insect. Moreover, the primary chemical in mothballs, naphthalene, is toxic to humans, so mothballs must be used with care anywhere children or pets are present. Given their toxicity, and the fact that they are not environmentally friendly, alternatives to mothballs are recommended.
10 KNITmuch | issue 17
with Cynthia MacDougall
Photo by Mike Guilbault.
Myth No. 5 Freezing woollens kills moths.
Freezing can be an effective way of interrupting the life cycle of the moth. It will kill the adult moths, and possibly the larvae, but there’s doubt as to whether the eggs can be killed by freezing. Some textile experts recommend a freezethaw cycle: Freeze for a week to ten days, thaw for seven days (to allow eggs an opportunity to hatch), then repeat. However, if the thawed goods are out for seven days and the eggs hatch in four to seven days, larvae that hatched on day five have two days to nibble before they are frozen. If freezing is attempted, opt for a chest freezer, which tends to maintain a colder, more even temperature than the refrigerator freezer. The optimal temperature for freezing is below -18°F (-28°C), maintained for several days.
Myth No. 6 Heat can’t be used to kill moths.
There’s a misconception that wool cannot be washed in hot water. In fact, the lanolin (grease) is removed from raw wool by "scouring” it in water that is at least 120°F (49°C). [The process is called scouring, but the fibers are actually soaked in a detergent solution without any agitation. - Ed.] So, soaking woollens in hot water is an option. The water kills larvae and any adults that may be present, and it loosens and washes away the eggs. The keys are to use water that is rubber-glove hot, and keep the rinse water the same temperature as the wash water, as sudden changes in water temperature can cause shrinking. One of the best ways to remove the water from woollens is to use the spin cycle on the washer. Some front load washers don’t have a spin-only cycle. Some front load washers have a spin only cycle hidden in the rinse/ spin cycle. Dry heat, used with extreme care, can also be employed to ‘smother’ moth larvae. When applying
heat, the temperature should be maintained at or over 120°F (49°C) for 20 to 30 minutes.
Myth No. 7 Leave-in wool washes prevent moths.
Leave-in wool washes perform the same function as storing woollens with herbs: they mask the odour of the wool which means that hopefully the adult moth will just fly by. The benefits of leave-in wool washes are that the clothes are obviously clean when they go into storage, and they often have a fragrance that is more appealing to the human nose than some herbals and mothballs.
Myth No. 8 Clothes moths can be found flying around the front door light.
Clothes moths are attracted to darkness: they hide in dark spaces. This doesn’t mean that leaving woollens out on open shelves will prevent an infestation – the moth will work its way into dark crevices in the folded garment. Moth larvae are so sensitive to light, they will release themselves from garments hung in bright sunshine. This is probably another reason why rugs and coats were taken outside for airing, brushing and beating on a sunny day.
Myth No. 9 Storing woollens in plastic bags is a good idea.
For short periods of time, woollens can be stored in plastic, however storing woollens in plastic for long periods of time (over 6 months), keeps the clothing from ‘breathing.’ If woollens are headed for plastic bags, make sure they are thoroughly dried to prevent the formation of mildew - perhaps include some silica gel packets from handbags or shoes. Some exotic fibers, such as angora, can felt when stored in plastic.
Discovery of a moth infestation can sink the heart of the most stalwart householder. What can be done to keep moths at bay?
The best action is pro-action. Cleanliness is king. Make sure any clothing headed to off-season storage is cleaned thoroughly. Dry cleaning is an expensive alternative to hand washing, but it is a thorough cleaning method. Delve into deep storage areas and inspect items that aren’t used regularly – this includes stored yarn, spinning fibers, quilt fabrics and rug fabrics!
Take any woollen rugs out for beating, steam, or dry cleaning. Vacuum baseboards, the crevices and underside of large furniture pieces, the inside of cupboards, heaters, air vents, and, most importantly, closets. Dispose of the vacuum bag immediately to prevent an infestation in the broom closet!
If desired, spray an insecticide in any suspect crevices and the vacuum canister. Look for an insecticide that contains pyrethrums, chemicals that do not leave toxic residues.
These actions can also be employed if an infestation is discovered. After an infestation, check the affected area more frequently to try and catch any possible recurrence in its early stages. Other alternatives are fumigating with dry ice, or hiring a pest control specialist.
Moth prevention takes considerable work, but anyone who has had an infestation can vouch for the worthiness of the effort!
Sources: www.lanolin.com www.ipm.ucdavis.edu/PMG/PESTNOTES/pn7435.html
11 KNITmuch | issue 17
7 secrets to choosing the right yarn for your knitting project

 Fiona Stevenson
Spring is in the air! Bees are buzzing among the crocuses and daffodils, and the forest has come alive with birdsongs. It’s time to knit the perfect light cardigan for the kiddo in your life. The Cute as a Button Cardi is a free pattern you can download, cast-on, and knit up easy-peasy. The yarn I’m using for my wee cardigan is Uptown Worsted Hues in the colorway Pink Sand (#3305) by Universal Yarns. It’s 100% anti-pilling acrylic which is perfect for this project. I’ll go into yarn fiber content more in-depth in this article and share with you how I choose the best yarn for my projects to make perfectly crafted hand knits.

As a professional knitter and teacher, I’ve discovered tricks and techniques to take my knits from nice to WOW! Over the next few days, I’ll reveal to you some of my secrets for making this sweet little spring cardigan - how to make an easy to measure swatch, lace knitting, keep tension perfectly even, and add a special little bind-off (not in the original pattern) to make this sweater something truly special!
 Photos by Fiona Stevenson
The Cute as a Button Cardi knit with Universal Yarn Uptown Worsted Hues in color Pink Sand
Knit the Cute as Button Cardi with Uptown Worsted Hues yarn and a free pattern from Universal Yarns.
Photos by Fiona Stevenson
The Cute as a Button Cardi knit with Universal Yarn Uptown Worsted Hues in color Pink Sand
Knit the Cute as Button Cardi with Uptown Worsted Hues yarn and a free pattern from Universal Yarns.
12 KNITmuch | issue 17
Understanding yarn labels like this can help you choose the right yarn for your Cute as a Button Cardi.
Understanding yarn labels like this can help you choose the right yarn for your Cute as a Button Cardi.
How to choose the best yarn for the job
My first secret to exceptional knitting is making sure I have the right yarn. It sounds basic, but I’m telling you the wrong yarn can ruin a project before you even cast on the first stitch. I work and teach at a local yarn store, and I’ve seen what happens to knits if the wrong yarn is used. From adult sweaters shrunk to child-size because untreated wool was thrown in a washing machine, to a child’s sweater stretched to near teen size because it was knit loosely with bamboo yarn. Through experience, often painful, I’ve learned the secrets to choosing the yarn that matches the needs of my project instead of just choosing yarn because of the way it looks, feels, or costs.
Read the label
It’s not rocket science, but understanding the information on the label helps you ensure you have the right yarn for the job. There are 4 main bits of information to look at:
• Yarn Weight
• Gauge/Recommended Needle Size

• Fiber Content
• Washing Instructions
Weight

Yarn weight describes the thickness of the yarn strand from laceweight, which is almost like thread, to jumbo which is knit on 35mm needles (see chart above).
Gauge/Recommended Needle Size
This tells you how many stitches are needed to get a 4” swatch, and recommended needle size.
Fiber Content
This information tells you what fiber or fiber blends are in the yarn.
Washing Instructions
This tells you if a yarn is machine washable or hand wash only, dryer safe or needs to lay flat to dry.
For more detailed instructions on how to read a yarn label, check out this photo tutorial: How to Read a Yarn Label
The Craft Yarn Council’s yarn weight standard’s size chart helps you choose the right weight of yarn for your project. The Cute as a Button Cardi is a #4 Medium yarn.
Craft Yarn Council’s yarn weight standards size chart
13 KNITmuch | issue 17
Secrets to choosing the perfect yarn
Based on the information on the label, I have a few rules I follow to make sure I have the right yarn for my Cute as a Button Cardi.

1. Very simply, if you can, buy the exact yarn recommended in the pattern. This is the surest way to ensure what you knit looks like the photos that made you fall in love with the pattern in the first place. It’s what I did by choosing Uptown Worsted Hues. Although the pattern called for Uptown Worsted, Uptown Worsted Hues is exactly the same weight and has exactly the same fiber content. It’s essentially the same yarn with a different color palette.
2. Match fiber content exactly or very closely to the recommended yarn. If your project calls for 100% acrylic, choose a substitute yarn that’s acrylic or an acrylic blend. If you want to have natural fibers, you can use a superwash wool as a substitute. To get good results, make sure the fibers you choose have similar properties to the yarn the pattern designer recommends.
3. Get yarn with the right fiber memory. What is fiber memory? It’s the ability of the yarn to bounce back into shape after getting wet or being stretched out. Does the yarn bounce back into shape or does it just grow and grow? Wool and most acrylics have good fiber memory and will retain their shape, so they’re perfect for fitted projects like sweaters, hats, and socks. Silk and alpaca have very poor fiber memory, but have wonderful drape, so they’re good for shawls. Make sure your substitute yarn has a similar fiber memory to the original.
4. Choose a fiber to match the season of the project. Does it need to be warm and cozy, or cool and breezy? Wool, alpaca, and silk are excellent warm fibers. Cotton and linen are great for cooler knits. Try to substitute a yarn with a similar level of warmth.
5. Choose yarn to match the needs of the person for whom you are knitting. I almost always knit baby stuff in acrylic, so parents can just throw them in the washing machine. Some people prefer natural fibers, so superwash wool makes a good substitute.
6. Make sure you’re able to get gauge with your yarn. Try to choose a yarn in the same weight category. Go just one size up or down in yarn weight, and you’ll struggle to adjust.
7. If you’re not sure about your yarn choice, pop into your Local Yarn Store, or bring your choices to a knitting group or experienced knitter. It’s always wise to get an informed second opinion. The perfect yarn for the Cute as a Button Cardi Uptown Worsted Hues yarn is the perfect choice for my Cute as a Button Cardi. I’m knitting for a baby, so it needs to be easy to care for. Machine washable - CHECK! It’s an anti-pilling acrylic, so it won’t pill up and look messy. Acrylic is a strong fiber - that should mean it won’t rip or tear as the little one scoots around. It’s cozy, but not super warm for a lighter spring sweater. Finally, I can be confident my project has the best chance of success because this cardigan pattern was designed using this exact yarn. Now you know the first secret to creating the perfect knits: choosing the right yarn. Next, I’ll share the pattern I created to make sure my gauge swatches are easy to measure. I use it every time with great results.
14 KNITmuch | issue 17
Universal Yarn’s Uptown Worsted Hues in color Pink Sand was my perfect choice for the Cute as a Button Cardi.
4 steps to knitting a SIMPLE and PERFECT gauge swatch (free pattern)
I’m sharing a simple pattern for making an accurate swatch to make sure you knit the right sized cardigan for that special little one in your life.

Why swatch at all?
I’m not gonna go into a long rant on why gauge swatching is important, because I think I may do that every time I write a piece for KNITmuch I’ll just say that if you want this sweater, or any sweater, to fit as you intend, you must get the gauge recommended in the pattern. The needle size in the pattern information is helpful, and the gauge measurements are essential. You can change your needle size to get the right gauge, but never assume that the recommended needle size will magically achieve gauge. I know doing a swatch is like having to eat your vegetables before you get your dessert, but it’s the only way to ensure a healthy stress-free knitting lifestyle with well-fitted sweaters to bring you joy.
Knitting a simple perfect gauge swatch
Now that I’ve explained why they’re important, let me share with you the secrets to a simple and accurate gauge swatch.
1. Use the pattern to make sure the edges of the swatch are flat and even.
2. Block your swatch before measuring.
3. Measure your gauge swatch properly. wikiHow has great instructions on how to check the gauge
4. If you have too many stitches, go up a needle size and swatch again.
5. If you have too few stitches, go down a needle size and, you guessed it, swatch again.
Use my simple and effective swatch pattern to get the right gauge for your knitting!
Knit the Cute as a Button Cardi to fit with Uptown Worsted Hues yarn and a simple, accurate gauge swatch.
15 KNITmuch | issue 17
It’s time to learn how to knit up this lace quick and easy!
The Cute as a Button Cardi swatch pattern
Cast on 27 stitches.
Knit 4 rows.
Row 1: (Wrong side) Knit 3, Purl 21, Knit 3.
Row 2: (Right side) Knit 27.
Repeat rows 1 and 2 twelve MORE times for a total of 26 rows.
Next row: Knit 3, Purl 21, Knit 3.
Knit 4 rows. Bind off all sts.
Before you measure, block your swatch. Using a bit of wool wash soap, immerse your swatch in a bowl of cool water until the fibers are saturated. Gently press out the excess water, but don’t wring it. Roll the swatch in a towel to make it even drier, so it’ll dry faster. On a blocking mat, pin down the swatch stretching it out so the stockinette stitch section measures 4” x 4”. When it’s dry, you can measure your gauge swatch
Now you’re ready to cast on!
You’ve got the right gauge, and you can be sure the cardigan will fit right. It’s time to cast on and knit the lace yoke.
Keep reading to get your lace on the right track, and make knitting it a breeze especially with using Uptown Worsted Hues from Universal Yarn. Once you figure out the lace pattern, you’ll want a bit of advice on keeping your tension even over the rest of the project.

16 KNITmuch | issue 17
Lace knitting: Why and how it’s easier than you think
Now you're ready to cast on and start the lace yoke. I’ll share a few tricks I use to make sure the lace sections of my cardigan are easy to knit and look beautiful. Ready, let’s go!
Reading charts
Knitting flat

The tricky part of the Larkspur Chart in this pattern is that it changes from being knit flat to being knit in the round. This means that for the yoke and hem of the sweater, you read the chart from right to left on the odd rows, and left to right on the even rows. There’s a right side and a wrong side to the chart, so make sure to note the legend to see what your stitches are, on the wrong side. For example, the chart legend says a blank square means to knit on the right side, and purl on the wrong side. So, when you’re knitting flat in the yoke and hem sections, make sure you’re following the chart from right to left, then on the next row, left to right taking care to get the right stitch according to the RS (right side) and WS (wrong side) instructions in the legend below the chart.
Knitting in the round
When you get to the cuffs of the sleeves, you knit using the same Larkspur Chart, but now you read it for knitting in the round. This is very different from reading the chart to knit flat. When you’re knitting in the round, there’s no knitting on the wrong side. Every round is a right-side round! You read the chart from right to left for each round. Also, according to the legend, since every round is a right-side round, the blank square is always a knit stitch. Using this chart, every odd round will be a lace stitch round and the even rounds will be plain knit stitches.
How to read a chart when you’re knitting flat. Pay close attention to the legends for RS and WS stitches.
How to read a chart when you’re knitting in the round

17 KNITmuch | issue 17
Mark your lace section with stitch markers

In the chart, you’ll see a section marked in red called ‘patt rep’. This means these nine stitches of the lace pattern are repeated over and over throughout the row or round. To help you keep track of this pattern, place a stitch marker between each lace section. It’s important to make sure you’re accurate with your lace stitches because each row relates to the next. If you make a mistake in a row below, the whole pattern will be off. Until you’re confident, count your stitches in between the markers in every row. If there aren't nine stitches in a particular section, you can be sure you missed a yarn over or a decrease stitch. It’s so much simpler to check each small section, demarcated by your stitch markers, then have to hunt through the whole row! You can then easily tink (knit back) to fix your mistake.
Lifelines can save your lace
However, if you still manage to miss a mistake only to discover it after knitting more than a few rows, I have another pro tip to help you get quickly back on track without pulling back your work to the start - the lifeline. A lifeline is a strand placed on a row to hold the stitches of that particular row, so if a mistake is made further along in the project, you can pull back to that spot without fear of losing a stitch. You can use a very thin strand of yarn or unscented dental floss (which can be removed easily because it’s smooth) to make your lifeline. Make sure to mark down on which row you placed it, so you know where you are in the pattern when you pick up the stitches off the strand. How often you place a lifeline is up to you. If you’re new to knitting lace, I suggest you place one every four rows. Well, now you’re ready to knit the lace yoke and hem of the Cute as a Button Cardi with confidence. I’ll share a pro knitter’s secret to ensuring your stitches stay smooth and even throughout your project.
 Add stitch markers in between lace pattern repeats to help keep track of your work.
18 KNITmuch | issue 17
The lace hem with a sweet bind off detail you’ll want for your Cute as a Button Cardi
When it’s important to knit two swatches per project
I’ll share with you how to avoid a mistake many knitters, even experienced knitters, make without even knowing it. Even with a swatch, gauge isn’t guaranteed.

It took many years of knitting before I realized my gauge can change within the same project. For example, my gauge in a colorwork yoke will be different from the stockinette stitch in one color section just below it in the body. It’s true! In our project for the Cute as a Button Cardi, we switch from knitting flat to knitting in the round. If you want your stitch size in the body of the sweater to match the size in the sleeves, you need to do another swatch. Don’t hate me. You do.
only using the knit stitch so my tension is tighter. I can see a visible line in my work if I forget to change my needle size. If you want to make sure your projects have a perfectly even tension throughout, do a gauge swatch in the round before moving to the sleeves.
How to make a knit in the round gauge swatch
Swatch In the Round pattern
Cast on 48 stitches.
Row 1: Knit.
Row 2: Purl.

Repeat rows 1 and 2 one MORE time for a total of 4 rows.
Row 3-28: Knit.
Row 29: Knit.

Row 30: Purl.
Repeat rows 29 and 30 one MORE time for a total of 4 rows.
Bind off all sts. Block your swatch.
to go up a size from the needles you’re currently using for the sweater. If you have fewer stitches than your flat swatch, then you’re knitting looser in the round, and you need to go down a needle size. If it’s the same, you continue on with the needles you already have. Once you know this for one project you can apply it to future projects. I don’t ever do the second in the round swatch anymore, because I know my tension is always tighter in the round, so I automatically go up a needle size, switching to in the round or down a needle size if I’m going from round to flat knitting. I can’t believe a little detail like this can make such a huge difference, but it really does!
When I move from knitting flat to knitting in the round in Stockinette Stitch, I need to go up a needle size, because I knit tighter in the round. Why is that, you ask? Simply put, I knit my purl stitches looser than I make my knit stitches. When I’m knitting flat, I’m making one row of knit stitches and one row of purl. But when I’m knitting Stockinette in the round, I’m
Measure and adjust
Now that you blocked your swatch, measure it and adjust your needle size if necessary. If your gauge in the round has more stitches, it’s tighter than your flat knitting, and you need
Take the time to do your gauge swatch in the round, and you can apply what you learn to your future knits, and wow everyone with your beautifully knit sweaters. I know it wasn’t exciting to have to make another swatch, but I hope you delight in the knowledge that you’re knitting just became better with this little secret so few knitters know.
Make sure your tension is even as you move onto the sleeves of your Cute as a Button Cardi.
Swatch in the round to ensure an even tension for your sweater.
KNITmuch | issue 17
I’ll show you the edging I added to this Cute as a Button Cardi and we’ll choose buttons to finish it perfectly.
Binding off the icord way
The BEST knitting finishing touch

Last part of our Cute as a Button Cardi knit along using Universal Yarn Uptown Worsted Hues

The icord bind off tutorial


This is a crisp, clean, decorative bind off I use a lot on shawls and cowls. Be aware that it uses approximately three times as much yarn as a regular bind off, so make sure you have enough yarn left to make it. I used it for the hem and the sleeves of this cardigan.
abbreviations
BO - Bind off
K - Knit
K2tog - Knit two stitches together
LH - Left hand
RH - Right hand
St(s) - Stitch(es)
Icord Bind Off
1. Cast on 2 sts at the beginning of the next row.
2. K2, k2tog.
3. Slip 3sts purlwise from the RH needle onto the LH needle.
4. K2, k2tog.
5. Repeat steps 3 and 4 until 3 sts remain on the LH needle.
6. With the needles tip to tip, slip the 3sts on the LH needle onto the RH needle.
7. K2, BO1, k1, BO1. Cut yarn and pass yarn through the remaining loop and pull tight.
Steps 2 and 4 - K2, k2tog.
The Cute as a Button Cardi knit along continues with perfect finishes. Use the icord bind off to make your Cute as a Button sweater something truly special. Step
1 - Cast on 2 sts.
20 KNITmuch | issue 17
And, now, the final touch - buttons!
Which buttons do you like best?
All the hard work is done. Time for a little fun! Let’s choose some fun buttons for our Cute as a Button Cardi. I asked my FB and Insta fans to choose their favorite button, and they did! I shared the photo here so you too can decide which buttons you think goes best on my sweater. The most popular button was the little white hearts on the bottom right of the photo, but the second favorite were the ducks on the top left-hand corner. Since the ducks were my favorite buttons, I went with those. Hey, my vote’s gotta hold more weight than anyone else’s, right?

Thanks for joining in!
Thanks for joining the ‘Cute as a Button Cardi knit along’ using Universal Yarn Uptown Worsted Hues


 Fiona Stevenson www.fionaknits.com
is!
Step 3 - Slip 3sts purlwise from RH needle to the LH needle.
Step 4 - K2, k2tog.
Repeat steps 3 and 4 and watch your icord bind off grow!
Here it
My Cute as a Button Cardi!
21 KNITmuch | issue 17
Knitting with the NEW Universal Yarn TRUVA is TRULY luxurious
One of the most interesting things about this soft yarn is its fiber content: it’s an equal mix of cotton and cashmere - an unusual pairing, but one that has merit.
Why is this an unusual pairing? In part, it’s because the two fibers are poles apart. Truva has the cool smoothness of cotton and the cozy softness of cashmere.
Cotton is a plant (or bast) fiber, one that doesn’t offer much in the way of insulation and one that is usually used for summer knits or in warmer climes. Cotton is grown in warm countries like India, Egypt, and the southern United States.

Cashmere, on the other hand, is a protein (animal) fiber. It’s shorn off of goats that originate in the cold, mountainous region of Nepal. Cashmere fibers are warmer than wool in terms of insulation value. The two fibers couldn’t be further apart, but they have some things in common.
One is that neither fiber has much body, which means, in order to achieve elasticity in places like cuffs and neckbands, ribbing is pretty well essential. For an all-over close fit, heavily textured designs like cable, mosaic, all-over rib, and slip stitch patterns will help. The choice must be made wisely though as the heathery tones in Truva command a strong stitch pattern to shine through the heather. This lack of body
can work well for a knitter, as it means Truva will make beautiful, drapey garments like shawls and tunics.
Another thing the two fibers have in common is that they’re soft – in the case of cashmere, extremely soft. So, Truva is perfect for knits worn close to the skin – even a camisole would be great. As I knitted my first sample, I came up with another application for which Truva is perfectly suited: chemo caps. It’s that soft.
The way Truva is spun and twisted (plied), adds to the visual interest of the yarn.

Because of its 50% cashmere content, the recommended care for Truva is to hand wash, and dry flat, so it might not be the ideal yarn for your next babyknit, unless you know mom is prepared for the extra care. In a project for yourself, however, Truva feels very luxurious!

In this series, I’ve dusted off one of my favorite stitch dictionaries: Barbara G. Walker’s first book, A Treasury of Knitting Patterns. I purchased this original printing in the early 1980s. It’s one of three knitting books that would be replaced immediately if my library ever met a disaster.

22 KNITmuch | issue 17
These 3 balls of Truva yarn in Chambray (top), Medallion (left), and Sandcastle (right) show the heathery tones in each of the colors.
Each ply of Truva contains all the colors in the yarn. Both the singles and the final twist are spun in the ‘S’ direction.
A Treasury of Knitting Patterns by Barbara G. Walker
Cynthia MacDougall
Knitting needles for the new TRUVA yarn: How to pick the right size

Yarn labelling has come a long way since I started to knit over 40 years ago. Back then, there were no symbols for care, they were only written in text. The weight of the yarn (in grams and/or ounces) was always on the label, but yardage? Not so much. There was usually a recommended tension with the size of needles needed to get that gauge. There’ve been some vast improvements since then!
A new trend with some yarns is they give a range of needle sizes and a range of stitches and rows to 4” [10cm]. I’m finding, though, that some new yarns I’ve tried tend to work up too loosely when I use the recommended needles.
Truva is labeled as a light yarn, which equates to me a worsted weight. In my wonderful knitting world, a worsted weight yarn has a gauge of 20 sts and 24 rows to 4” [10cm] when I use size 7 [4.5mm] needles.


The information provided on the Truva label is 19-21 sts and 24-26 rows to 4” [10cm] on needles size 6-8 [4-5mm]. This is consistent with a worsted weight yarn. When I use my ‘knitterly’ instincts, though, I consistently come up with a gauge of 23 to 24 sts to 4” [10cm], except for one sample, which I blocked quite heavily.
Whether we pick up a ball of old yarn, or grab a ball of leftovers from an old project, I learned a neat trick years ago to guide me to the right needles for sampling. All I need is a length of the yarn and a needle gauge (and trust me, I have a dozen needle gauges!).
Ordinarily, I only use one loop of yarn, but for the purpose of illustration, I put a length of Truva through several holes.
As I suspected, with size 6 [4mm] needles, I got a tension of 23 sts to 4” [10cm] which is a closer fit to what I call tension for a double knitting weight yarn. In my knitting opinion, Truva is well suited to this gauge as the finished fabric is soft and has good integrity. If I were knitting a sweater, I’d want the fabric to look like this, but I’d go to larger needles if looking for a garment with more drape such as a shawl or tunic.
I’m quite captivated by the richness and depth in each of Truva’s colors. Here is Aegean (top), Medallion (left), and Sandcastle (right).

The yarn looks very loose in the holes on the right (size 8 [5mm]). I prefer the second from the right. It’s always good to make a sample when you’re trying a yarn you never used before. This ‘vanilla’ sample of Truva proves to me that this yarn is soft and drapey.
Photos by Cynthia MacDougall
23 KNITmuch | issue 17
Knitting a knit-purl design with Truva (start with a sample)

Along the way, I’ve employed some of the wonderful stitch patterns found in Barbara G. Walker’s first knitting book, A Treasury of Knitting Patterns. Any good stitch dictionary offers as many or more opportunities to explore. I’ve chosen two knit-purl designs: the double seed stitch, which I’ll use for the borders, and the squared check pattern from page 19 of my copy of the Walker Treasury.
As I did with the stockinette stitch sample I made in my previously, I used 4mm needles, and came up with a gauge/ tension of 23 sts to 4” [10cm].
To create my sample, I took the repeat of the pattern (multiple of 10 + 2) and added my borders, each of which has 10 stitches. I decided to put 3 repeats of the pattern (32 stitches) in the center, so I cast on a total of 52 stitches. The following instructions and two or three balls of Truva make a satisfactory dress scarf as written. A confident knitter who wants to make a wider scarf can cast on an additional 10 sts and purchase 4 or 5 balls of Truva. Also, they must remember to make adjustments to the bottom, top, and side borders to maintain the double seed stitch ‘frame’.
Bottom border
Row 1: *k2, p2; rep from *.
Row 2: *k2, p2; rep from *.
Row 3: *p2, k2; rep from *.
Row 4: *p2, k2; rep from *.
Rep Rows 1-4, then work rows 1 and 2.
Body
Row 1: (p2, k2) twice, p2, k to last 8 sts, (p2, k2) twice.
Row 2: (p2, k2) twice, p to last 10 sts, (k2, p2) twice, k2.
Row 3: (k2, p2) twice, k4, *p8, k2; rep from * to last 10 sts, (p2, k2) twice, p2.
Row 4: (k2, p2) 3 times, *k8, p2; rep from * to last 10 sts, (p2, k2) twice, p2.
Row 5: (p2, k2) 3 times, *p2, k4, p2, k2; rep from * to last 10 sts, (k2, p2) twice, k2.
Row 6: (p2, k2) twice, p4, *k2, p4, k2, p2; rep from * to last 10 sts, (k2, p2) twice, k2.
Row 7: (k2, p2) twice, K4, *p2, k4, p2, k2; rep from * to last 10 sts, (p2, k2) twice, p2.
Row 8: (k2, p2) three times, *k2, p4, k2, p2; rep from *to last 10 sts, (p2, k2) twice, p2.
Row 9: as Row 5.
Row 10: as Row 6.
Row 11: as Row 3.
Row 12: as Row 4.
Repeat these 12 rows as long as desired. Work Rows 1 and 2 to balance the bottom and top ends of the body.
Top border
Beg with Row 1, work 10 rows as for the bottom border. Cast off all sts and weave in ends.
I believe that if a knitter never learns to do a yarn over or a cable, there are enough ways to combine knit and purl stitches to knit for a lifetime. I am thoroughly enjoying working with Truva by Universal Yarn.

24 KNITmuch | issue 17
I’ve turned the balls of Truva around so you can see their full, heathery splendor! From left to right, Medallion, Aegean, Sandstone, Chambray, Harbor, and Mandarin. The only two colors not in this photo are Crocus and Stormcloud!
The finished sample was not blocked. It shows that a bit of body can be knitted in, to add to the texture of Truva’s heathery tones.
Knitting lace with the NEW Universal Yarn Truva (free pattern!)
So far, I’ve done a deep dive into the yarn itself and began a series of samples: one plain, and one that uses knit and purl stitches to create a lovely check design suitable for a cozy winter scarf to wear in dressy or casual settings.
Every one of Truva’s 8 colors has an attractive, heathery quality to it, because of the way the colors are combined in the spinning.

I recently did a slide show of some of my vintage patterns. Lace panels were incorporated into many vintage knitting designs, and I was inspired to choose a pattern called Little Leaf Stripe, from page 196 of Barbara G. Walker’s first knitting book, A Treasury of Knitting Patterns, to see how the heathery shades of Truva interact with a lace design. Little Leaf Stripe only has 4 rows of pattern, and two of them are purl rows (also known as ‘resting rows).
As with the last sample, I’m adding a border to help my swatch lay flat. Because this pattern is stockinette stitch-based, it is apt to curl, even when I block it. Surrounding any stockinette stitch-based design with a 6-8 stitch/ rows of seed stitch helps make the sample lay flat. Seed stitch tends to spread out horizontally, so it’s a good choice for lace, especially if you block it, as I plan to do.
Little Leaf Stripe has a multiple of 8 stitches plus 1. This time, I did 4 repeats of the pattern (33 sts) flanked by 10 sts on each side in plain stockinette stitch. This gives me an idea of how the lace panel will look on the front of a pullover or the front of a cardigan.
I put 6 stitches of seed stitch on each side of the work, for a total of 12 border stitches, plus 20 stitches (10 on each side of the lace) and 33 stitches for the center panel 33 + 20 + 12 = 65 stitches.
I blocked this sample by pinning it to a wool pressing pad and then wetting it with a damp cloth. Truva blocked nicely!

25 KNITmuch | issue 17
I can see the green (Aegean) and coral (Mandarin) worked into a tulip border on a round yoke sweater, with Sandstone as the background color.
This might seem a lot for a test swatch, but if the goal is to make an adult-sized cardigan with 4 lace panels on each side, I want to know how the lace will look in a finished garment.
Here’s the pattern for the sample, which I made in Truva’s mandarin color.
Bottom border
Row 1: *k1, p1; rep from * to last st, k1.
Rep Row 1 for 6 more rows.
Body
Row 1 (WS): (k1, p1) 3 times, p to last 5 sts, (k1, p1) twice, k1.
Row 2: (k1, p1) 3 times, k11, *k2tog, yo, k3, yo, ssk, k1; rep from * 3 more times, k10, (p1, k1) 3 times.
Row 3: (k1, p1) 3 times, p to last 5 sts, (k1, p1) twice, k1.
Row 4: (k1, p1) 3 times, k13 *yo, s1, k2tog, psso, yo, k5; rep from * 3 more times, k 8, (p1, k1) 3 times.
Repeat Rows 1-4 for the desired length. Work Row 1, then work 7 rows as for the bottom border. Cast off all sts.
Truva exceeded my expectations. The lace design opened beautifully in blocking, and I finally got a worsted weight tension of 20 stitches to 4” [10cm] on the sides of the lace panels!
I think that if I worked this design into a cardigan set, I’d put three panels up each side of the cardigan, and center 5 repeats on the center of the pullover.
As I worked with Truva, I thought several times about how it would be a good candidate for colorstranded knitting. I tried it out and created this ‘Crocus Chemo Cap’ using leftover yarn and a ball of Aegean. There’s no pattern for it, but it shows how Truva lends itself to Fair Isle-style knitting.

26 KNITmuch | issue 17
Spring crocuses parade around the crown of this chemo cap made with Truva.
Knit a NO-COUNT cables chemo cap
(It’s so soft!)
It’s been wonderful using this cotton and cashmere blended yarn to create different knitting designs and see how versatile it is. The lace design I knitted exceeded my expectations!
Someone asked, or rather challenged me a while ago to create a project where they didn’t have to count the rows between the cables. When I started working with Truva by Universal Yarn in the first part of this feature, I decided to try this challenge out by knitting a chemo cap in the round. The heathery tones of Truva make a more subtle yarn, well suited to an all-over cable pattern.
Truva’s unusual blend of cotton and cashmere fibers makes it very soft, and the fact that it has little elasticity means it’ll be even more gentle on patients who have lost their hair due to chemo treatments. This is a great way to try out this newto-me yarn and end up with something to donate to a worthy cause.

This cap is knitted from the top down in the round, so it will appeal to no-sew knitters.

I tested my no-count cable challenge on flat knitting, too, and have included a small swatch for that as well. This could be applied to an all-over textured sweater.
The flat swatch is worked in the color Medallion with size 6 [4mm] straight needles. The cables are the same as for the hat: 4 stitch cables, crossed behind to form a right twist. The pattern repeats every 15 stitches and every 6 rows. The cables step to the left on every pattern row. This stepping makes it possible to work the pattern without counting the rows between each twist.
My tension on this piece measured 28 sts to 4” over the cable pattern.
Cast on 49 sts.
Once the first repeat is complete, the knitter can ‘read’ the pattern. When the third cable twists nearest to the needle, the next right side row cables twist on the first cable, and so on.

27 KNITmuch | issue 17
Truva yarn in Chambray (top), Medallion (left), and Sandcastle (right)
No-count cable swatch
The effect is subtle, but the cables continue twisting into the first few rows of the ribbed brim. This cap weighs exactly 48 grams, so it’s a squeaker for using up a full ball of yarn.


Bottom border
Row 1: *k1, p1; rep from * to last st, k1.
Repeat Row 1 8 more times.
Set up Row: (k1, p1) 3 times, k1, *p3, in next st work p1, k1; rep from * to last 6 sts, (p1, k1) 3 times (58 sts).
Row 2: (k1, p1) 3 times, *p1, c4b, (p1, k4) twice; rep from * twice, p1, (p1, k1) 3 times.
Row 3: (k1, p1) 3 times, k1, *p4, k1; rep from * to last 6 sts, (p1, k1) 3 times.
Row 4: (k1, p1) 3 times, *p1, k4, p1, c4b, p1, k4; rep from * to last 7 sts, p1, (p1, k1) 3 times.
Row 5: as Row 3.
Row 6: (k1, p1) 3 times, *(p1, k4) twice, p1, c4b; rep from * to last 7 sts, p1, (p1, k1) 3 times.
Row 7: As Row 3.
Repeat Rows 2 through 7 for desired length.
Top border
Decrease row: (k1, p1) 4 times, *k2tog, p1, k1, p1; rep from * 8 times more, (p1, k1) 4 times (49 sts).
Work Row 1 9 times. Cast off all sts, weave in ends. As I work these cables, I can feel the twist from the cable worked on the second last row (or round). I use this as a tactile cue that the next four knit stitches will need the cable needle.
The entire center panel of this sample, shown here, (after the first repeat of cables) was done while I socialized at a knitting gathering - no rows were counted! To block this sample, I pinned it out slightly on my wool pressing pad, gave it several shots of steam from my steam iron, then left it to dry.
The hat pattern has two options for the brim. On the gray one, I carried the cables down into the bottom band, incorporating them into the ribbing until the third cable of the repeat was complete. On the mandarin hat, I changed to larger needles twice and carried the cable pattern to the bottom edge of the hat to make the cables flare out and form the brim. To give the cast-off an extra bit of structure, I added a second strand of yarn and worked the cast off with two strands and the largest needles.
Changing needle sizes gives the brim of the hat a soft, bucket-style flare that flatters many face shapes.
28 KNITmuch | issue 17
In the interest of full disclosure, for the cloche brim, I needed about 10 yards of yarn from a second ball, so 3 balls of Truva make two chemo caps. This no-count cable challenge was very successful. I knitted one entire cloche hat while bingewatching an Italian drama series with English subtitles. And I had to read those subtitles because my Italian isn’t that good!
No-count Cable Chemo Cap materials
• 1 ball Universal Yarn Truva, 50% cotton, 50% cashmere, 1.75oz [50g], 164 yd [150m] per ball (Sample is in mandarin)
• Size 5 [3.75mm] double point needles - also size 6 [4mm] and size 7 [4.5mm] for cloche version
Tension: 30 sts to 4” in cable pattern using size 5 [3.75mm] needles.
abbreviations
K - knit P - purl
Kfb - knit into the front and back legs of the same stitch. M1 - lift the bar from the space between the stitches on the left and right needle, place the bar over the left needle so the left end of the bar is behind it and the right of the bar in front, knit the bar through the back of the loop.
C4b - slip 2 stitches onto a cable needle, knit the next 2 stitches, and knit stitches from the cable needle.
Rnd - round Sts - stitches
instructions
Cast on 4 sts onto one dpn, slide sts to the opposite end as for an i-cord.
Rnd 1: kfb in every st (8 sts), divide sts onto 3 or 4 needles.
Rnd 2: kfb in every st (16 sts).
Rnd 3: *p1, k1; rep from * around.
Rnd 4: *p1, k1, m1; rep from * around (24 sts).
Rnd 5: *p1, k2; rep from * around.
Rnd 6: *p1, k2, m1; rep from * around (32 sts).
Rnd 7: *p1, k3; rep from * around.
Rnd 8: *p1, k3, m1; rep from * around (40 sts).
Rnd 9: *p1, k4; rep from * around.
Rnd 10: *p1, k4, m1; rep from * around (48 sts).
Rnd 11: *p1, k4 p1; rep from * around.
Rnd 12: *p1, k4, p1, m1; rep from * around (56 sts).
Rnd 13: *p1, k4, p1 k1; rep from * around.
Rnd 14: *p1, k4, p1, k1, m1; rep from * around (64 sts).
Rnd 15: *p1, k4, p1, k2; rep from * around.
Rnd 16: *p1, k4, p1, k2, m1; rep from * around (72 sts).
Rnd 17: *p1, k4, p1, k3; rep from * around.
Rnd 18: *p1, k4, p1, k3, m1; rep from * around (80 sts).
Rnd 19: (p1, k4) around.
Rnd 20: *(p1, k4) twice, m1; rep from * around (88 sts).
Rnd 21: *(p1, k4) twice, p1; rep from * around.
Rnd 22: *(p1, k4) twice, p1, m1; rep from * around (96 sts).
Rnd 23: *(p1, k4) twice, p1, k1; rep from * around.
Rnd 24: *(p1, k4) twice, p1, k1, m1; rep from * around (104 sts).
Rnd 25: *(p1, k4) twice, p1, k2; rep from * around.
Rnd 26: *p1, c4b, p1, k4, p1, k2, m1; rep from * around (112 sts).
Rnd 27: *(p1, k4) twice, p1, k3; rep from * around.
Rnd 28: *p1, k4, p1, c4b, p1, k3, m1; rep from * around (120 sts).
Rnd 29: *(p1, k4) around.
Rnd 30: *(p1, k4) twice, p1, c4b; rep from * around.
Rnd 31: *(p1, k4) around.
Rnd 32: *p1, c4b, (p1, k4) twice; rep from * around.
Rnds 33, 35, and 37: *(p1, k4) around.
Rnd 34: *p1, k4, p1, c4b, p1, k4; rep from * around.
Rnd 36: *(p1, k4) twice, p1, c4b; rep from * around.
Repeat Rnds 32 through 37 until length from last inc measures 4½ - 5” [11-12cm], ending with a Round 37.
29 KNITmuch | issue 17
Cloche brim

Change to size 6 [4mm] needles and work Rounds 32 through 37, then change to size 7 [4.5mm] needles and work Rounds 32 through 37. To give the cast-off edge structure, join in a second length of yarn and cast off all sts with size 7 [4.5mm] needles.
Ribbed brim
Continue with size 5 [3.75mm] needles.
Rnd 1: Work Rnd 31. Rnd 2: As Rnd 32.
Rnd 3: *p1, k1, p1, k2tog, p1, c4b, p1, k4; rep from * around (112 sts).
Rnd 4: *(p1, k1) twice, (p1, k4) twice; rep from * around.
Rnd 5: *(p1, k1) 3 times, p1, m1, p1, k1, p1, c4b; rep from * around (120 sts).
Rnd 6: *(p1, k1) 6 times, p1, k2tog; rep from * around (112) sts.
L-R: Squared Check pattern in Crocus; ‘vanilla’ stockinette sample with ribbed borders in Sandcastle; Cable Chemo Cap in Mandarin; Little Leaf Lace; Cable Chemo Cap in Sandcastle and no-count cables swatch in Medallion.
Rnd 7: *p1, k1; rep from * around. Rep Rnd 7 10 times, cast off all sts. Weave in ends.
It would be great if we could all buy some Truva and create a wave of donations to our local cancer centers!
So, that’s a wrap for this feature. Hope you’ve enjoyed seeing the many designs you can knit with the new Truva Universal yarn, and how plentiful the possibilities are. From the editor: Here is a very informative article with more knitting ideas, including crochet and quilting, Decorate Your Home with Crochet, Knitting, and Quilting: The Experts Tell Us How to Do It
Cynthia MacDougall cgknitters.ca
30 KNITmuch | issue 17
Great new colors for a soft and cozy yarn

Substituting yarns when knitting from a pattern: How to make the switch

Mosaic knitting: Using two colors of yarn to knit a comfy sit-upon (EASY)
31 KNITmuch | issue 17
and there's so much more!
READ NOW
don't miss these FREE
projects & tutorials online!
READ NOW
READ NOW
KNITmuch ...to K, is to
Hats knit with Bulky yarn perfect winter knitting
Are you enjoying winter? Here in the Great White North, I LOVE winter, but you have to dress for it! Whether you love winter or hate it, a warm hat makes all the difference on a crisp cold day. I’m going to introduce you to four bulky and super bulky yarns that make knitting up a cute chunky hat fast and easy. Each day, I’ll share with you a new yarn and a free hat pattern that takes less than an afternoon to knit!

I’m making four hats using Universal Yarn Be Wool Multi and Posh Alpaca, as well as Lion Brand Yarn Wool-Ease Thick & Quick, and Hue + Me

Enjoy the opportunity to learn, not just about the yarns and patterns, but for helpful knitting tutorials like the DIY giant pompom tutorial and the cabling video tutorials too. You can follow along and make all the hats, or just check them out and pick your favorite. Grab your needles and notions!

32 KNITmuch | issue 17
Fiona Stevenson
Photos by Fiona Stevenson
Knitting with bulky yarn is quick & easy, cast on and get going!
Super bulky hats - super fun & super warm!
Knitting the classic chunky Pike Street Hat (beginner)
They say it’s bad luck to knit a boyfriend or girlfriend a sweater, but what about knitting them a hat? Chunky knitted hats with big pompoms are everywhere right now, so I thought I would highlight some of these very popular knitted hats. First up is the Pike Street Hat using Hue + Me by Lion Brand.
It's one of the simplest hat patterns and we all need a simple one in our pattern repertoire. Let’s begin with the yarn details:

» Color Peacoat
» Weight Bulky
» Amount 125g [4.4oz]

» Yardage 125m [137yds]
» Fiber Content 80% Acrylic, 20% Wool
» Machine Washable Yes!
» Machine Drying Yes!
Let me quickly go over the details of the yarn for this hat to make sure you have the right yarn for this project and so you can better understand yarn labels in general. The name of the yarn and manufacturer is the way you find the right recommended yarn for this pattern. If you were to go by just the name of the yarn you could find yourself encountering many manufacturers using the same or a very similar name. Make sure you get the name of the yarn, in this case Hue + Me matched with the manufacturer which for this yarn is Lion Brand Yarn.
I listed the color, Peacoat, so you’ll know how to make the exact same hat as mine. If you’re buying more than one ball of yarn in a particular color, check the label to make sure they’re the same dye lot. A dye lot number lets you know which balls of yarn were dyed together in the same vat. There can be significant differences between different dye lots. This isn’t important for our one ball hat projects, but no one wants a sweater with a noticeable block of differently hued color in the middle of the chest.

Knit
Knit
the classic chunky Pike Street Hat with Hue + Me yarn.
33 KNITmuch | issue 17
the classic chunky Pike Street Hat with Hue + Me yarn.
The weight of the yarn is helpful to ensure you get the right gauge for your project so the hat fits the way you want it to. But be careful. Just because it says the yarn is bulky doesn’t mean you’ll automatically get the right gauge. Bulky yarn has a range of thicknesses, so make sure you make your swatch with the pattern’s recommended needle and adjust your needle size if necessary. You can learn more about yarn weights at the Craft Yarn Council website

The amount of yarn gives you the total weight of each ball. It’s not the most helpful information, but it’s there. It’s better to judge how many balls of yarn you need by the yardage. This hat calls for 1 ball of Wool-Ease Thick & Quick which is 106yds [97m]. Since I’m using Thick & Quick for the Pomfret Hat, I switched to Hue + Me which is 137yds [125m] so one ball was enough to make the Pike Street hat. Fiber content is important when deciding what yarn to use for your knitted hats. I like having wool in my hat projects for the extra warmth. However, unless it’s superwash, wool cannot be thrown in the washing machine. If you’re looking for easy care knits, check if the label says the yarn is machine washable. In the case of Hue + Me, it can also be put in the dryer. Bonus! Let’s take a look at the information you need before casting on your Pike Street Hat. skill level Easy (beginner) - knitting in the round, knit, purl, k2tog finished measurements

20” [50cm] circumference, unblocked and unstretched materials yarn
• 1 ball of Lion Brand Hue + Me Yarn, color Peacoat needles
• Set of 5, US 11 [8mm] double pointed needles notions
• Clover Jumbo Locking Stitch Ring Markers
• Clover Tapestry Needles Jumbo
• UNIQUE SEWING Retractable measuring tape
• scissors

• thread and needle
• CLOVER Pom-Pom Makers Extra Large
Standard yarn weights by the Craft Yarn Council
My Pike Street Hat is finished and fabulous!
34 KNITmuch | issue 17
Note: It takes 5 minutes to make a pompom using Clover PomPom Maker! We describe it in detail with step-by-step photos in our earlier article, A knitted beanie is enhanced by twisting stitches in the ribbing gauge 10sts = 4” [10cm] in Stockinette Stitch knit in the round
The skill level information for this pattern is very useful, but not all patterns have this detail. In my designs, I started listing not only skill level, but required skills to complete the project. For the Pike Street Hat, you need to know how to knit in the round using double pointed needles (DPNs). You can knit the hat in the round on a 16” US size 11 [8mm], and switch to DPNs for the crown decrease. The other option for the crown of the hat is to use the Magic Loop technique which you can learn by watching my tutorial on the KNITmuch YouTube channel
You also need to know the knit (K) stitch and purl (P) stitch for the brim of the hat, and the knittwo-together (K2tog) decrease for the top of the hat. If you need to learn the K2tog decrease, I also have a YouTube video for how to make a knit two together decrease stitch
So far, we’ve discussed yarn and needles, now let's jump to notions. Notions are any other knitting accessories or other items that are helpful to finish a project. To knit this hat, you need a very large stitch marker to mark the beginning of your round because it has to fit an 8mm needle. To finish your hat, you also need a yarn needle to sew in the ends.
I like a large tapestry needle best, because the bent tip makes it easier to weave in and out of stitches. A measuring tape is necessary to let you know when to move from the brim to the body of the hat, and when to begin the decrease rounds. A pair of scissors is an obvious necessity for any knitting project.
The last, and arguably the most important, notion is a snap on fur pompom. You can make a pompom if you like, use snap on pompoms or skip a pompom altogether.
Finally, make sure this pattern fits by looking at the finished measurements. My head is 22” [56cm] in circumference, and this hat fits my head perfectly. If you want a slightly bigger hat, I suggest going up a needle size; for a slightly smaller hat, go down a needle size. Unless you’re experienced with knitting math, don’t just add a few stitches.
The other small detail in the finished measurements says unblocked and unstretched This means that I laid the hat flat on a table and measured it without blocking or stretching it out in any way. I don’t tend to block hats unless absolutely necessary. All these hats stretch quite a bit due to the elastic nature of the rib stitch on the brim, as well as the flexibility of the bulky yarn and looser large stitches. Even though the finished circumference may seem small, the hat should fit most adult sized heads.
Ready, set, KNIT!

With each one of these hats, I’ll let you know if I encountered any troubles with the pattern, or made any changes. I’ll also share with you exactly how long it took me to knit, and how much yarn was left over.
I knitted the Pike Street hat pattern without a single pattern correction, and I made absolutely no changes. From cast on to final finish, including the pompom attachment, it took me 1 hour and 44 minutes to complete. I was left with about ¼ of a ball of yarn at the end. This was a simple classic hat pattern that I’ll definitely knit again.
Now you have everything you need to get started on the simply perfect Pike Street Hat, so caston and enjoy!
Four more hats to go!
35 KNITmuch | issue 17
Pomfret Hat, double the pompoms, double the fun (free pattern)

I’m ready for my next super chunky hat, the Pomfret a free pattern by Lion Brand Yarn. Free Pomfret Hat Pattern. I’ve decided to go with the recommended yarn, Wool-Ease Thick & Quick. You need just one ball to make this hat, so grab your pattern and yarn to join me in this quick, cozy knit. Day two - Pomfret Hat
Let’s look over the yarn details.
» Yarn Wool Ease Thick & Quick – color Bedrock

» Weight Super Bulky
» Amount 140g [4.9oz]
» Yardage 80m [87yds)]
» Fiber content 80% Acrylic, 20% Wool
» Machine Washable Yes!
» Machine Drying Yes!
I taught you how to use the information on yarn labels. Since I’m using the exact yarn called for in the pattern, I can go straight to the pattern to find out what else I need to finish this project. If you’re substituting another yarn for your hat, make sure the weight, amount, and yardage are close to what is listed so you can get the required gauge.
Now, onto the pattern details. skill level Easy (beginner) - knitting in the round, knit, purl, K2tog finished measurements 20” [50cm] circumference materials
yarn
• 1 ball of Lion Brand Wool-Ease Thick & Quickcolor Bedrock
• Set of 5, US 15 [10mm] DPNs, and size 15 [10mm] 16” circular needle
Download this free
pattern at
36 KNITmuch | issue 17
The Pomfret Hat uses Wool-Ease Thick & Quick yarn.
Pomfret Hat
Lion Brand Yarn.
notions
• Clover Jumbo Locking Stitch Ring
Markers
• Clover Tapestry Needles Jumbo
• UNIQUE SEWING Retractable measuring tape
• scissors
• thread and needle
• CLOVER Pom-Pom Makers Extra Large
Note: It takes 5 minutes to make a pompom using Clover PomPom Maker! We describe it in detail with step-by-step photos in our earlier article, A knitted beanie is enhanced by twisting stitches in the ribbing gauge 9sts = 4” [10cm] in Stockinette Stitch knit in the round Again, if you’d like to learn more details about how to use this pattern information, pop back to information on yarn labels. Here is, if you need it, a link to my video tutorial for the K2tog technique. The 10mm circular needle is for the brim and body of the hat and the DPN’s (double pointed needles) are for the crown. Make sure your stitch marker is large enough to slip over a 10mm needle. The jumbo pompom maker is optional, because I’m sharing with you how I made my own DIY pompom maker, so you can too. Who knew that something I learned from my mom in my childhood would come in so handy!
Ready, set...wait a minute
Unlike the Pike Street hat, I wasn’t sure about following this pattern exactly. The tween girl in the photo made me wonder if this hat would fit an adult. I’m usually a woman’s medium size. Since there were no finished measurements, I couldn’t be certain of the size,
so I started my hat with 60sts instead of 40 sts. I should’ve done the math based on my gauge, because it ended up being way too big! I frogged it and started again with 52sts. NOPE! Then I tried 48sts for the cast on. That was only slightly too big, so if you’re trying to knit a woman’s large or men’s medium size, you may want to cast on 48sts. Just note that if you make this larger size, you’ll only need to increase 1st when you move from the ribbed brim to the stockinette stitch in the ‘Hat’ section for a total of 49 sts.
Ultimately, I went back to the original pattern, and cast on 40 sts. This ended up giving me a finished circumference of 8¾“ [22cm]. This hat has a lot of stretch, so it could be worn on a head a couple of inches bigger or smaller. The height of the hat did not permit me to roll up the brim like the girl in the photo, but with such a bulky yarn I wouldn’t want to wear it rolled up anyways. Ok, now you’re ready to cast on! This pattern is pretty straight forward - ribbed brim, stockinette body and crown. Just like the Pike Street hat, when the crown decrease is too small for the circular, you can switch to DPNs or use a long circular and the Magic Loop technique (video tutorial). I used a 10mm 32” circular and magic loop for the crown because I didn’t have the right size DPNs. This hat took me less than two hours to knit, but making the pompoms with a DIY jumbo pompom maker added a lot more time. However, it also added a lot more fun!
How to make a DIY jumbo pompom
Here’s a simple DIY for making a jumbo pompom.
1. Trace a circle of about a 6” [15cm] onto cardboard. I used a jumbo paper towel roll.
2. In the center of the large circle, draw another circle with a 2” [5cm] diameter.
3. Cut out the center holes. Holding the two cardboard rings together, make a single cut through them.
4. Wrap the yarn around both rings held together. Use a lot of yarn wrapped close together. Cut the end of the yarn.
5. Cut an 8” [17.5cm] length of yarn and put aside. Place the tips of your scissors in between the two rings of the cardboard and cut the yarn all the way around the outer circle.
6. Leave the cut strands inside the pompom hole.
7. Careful not to disturb the strands of yarn in the center of the pompom maker, gently slide the long strand of yarn between the two pieces of cardboard and tie very tightly around the strings of the pompom.
8. Remove the pompom from the cardboard, fluff, and trim any uneven ends.
9. Don’t cut the two long strands of the yarn used to tie off the pompom - use these ends to tie the pompoms on the hat.
37 KNITmuch | issue 17
Follow steps 1-9 to make your own DIY jumbo pompom maker.

It may take a few tries to get your pompoms right, but you can do it!

Once you have your pompoms ready, use a couple of locking stitch markers to decide where you want to place them on your Pomfret hat. I folded my hat in half and shifted the markers until they seemed evenly situated on either side of the crown.


Sew the pompoms in place by threading the two long ends of the pompom tie into the marked spots on the hat. Then you can tie a single knot, and tightly weave in your ends. Make sure you pull really tight, or your pompom will be too floppy. Weave in all your other ends, stand back, and admire your adorable and trendy new hat!
2 hats down, 2 to go!
Place two locking stitch markers to make sure your pompoms are placed evenly on your Pomfret Hat.
38 KNITmuch | issue 17
Ta-daaa! A brand new, hand knit double jumbo pompom masterpiece!
Be Wool Multi and the Basketweave Hat free pattern

Here we are at the third cozy, bulky hat –Basketweave! We’re going to add a little more visual interest with a textured knit pattern. So, download the free Basketweave Hat pattern from Universal Yarn. Then we’ll look over the Universal Yarn Be Wool Multi and pattern requirements before casting on our next gloriously thick, wooly hat.
Day three - Basketweave Hat
The yarn that the pattern calls for is Be Wool Multi, and I decided to go with the recommended yarn to make this knitting project easy-peasy. I even went with the same color as the photo on the pattern cover page! Here are the yarn specifications.
» Color 206 Rusted
» Weight Super Bulky
» Amount 6oz [170g]
» Yardage 80yds [73m]
» Fiber Content 60% Acrylic, 40% Wool
» Machine Washable Yes!
» Machine Drying Yes!
skill level Easy (beginner) - knitting in the round, knit, purl, K2tog finished measurements
21” [53.5cm] materials
yarn

• 1 ball Be Wool Multi by Universal Yarn needles
• Set of 5, US 15 [10mm] DPNs and 15 [10mm] 16” circular (optional) notions
• Clover Jumbo Locking Stitch Ring Markers
• Clover Tapestry Needles Jumbo
• UNIQUE SEWING Retractable measuring tape
• scissors
• thread and needle
• CLOVER Pom-Pom Makers Extra Large
Note: It takes 5 minutes to make a pompom using Clover Pom-Pom Maker! We describe it in detail with step-by-step photos in our earlier article, A knitted beanie is enhanced by twisting stitches in the ribbing gauge 9 sts x 16rnds = 4” [10cm] in Basketweave pattern
Now, let’s cast on!
 You can knit 4 hats in 4 days with bulky yarn and quick knit patterns. Let’s cast on the Basketweave Hat!
Basketweave Hat is an interesting and easy knit!
You can knit 4 hats in 4 days with bulky yarn and quick knit patterns. Let’s cast on the Basketweave Hat!
Basketweave Hat is an interesting and easy knit!
39 KNITmuch | issue 17
I made absolutely no modifications to this pattern knitting it, as written, from beginning to end. Anyone who follows my work knows that this is extremely rare! It was clear and very easy to follow. The basketweave pattern is simple, but adds some interest while knitting. It’s nice to have a change from plain ol’ stockinette stitch for this hat. I love the way that the little bit of texture breaks up any potential color pooling, and makes the pops of color in the Be Wool Multi, well, pop!
Remember, if you are knitting this project on the 16” circular needles, you will need to switch to DPNs or a larger circular for magic loop to do the decrease at the crown. After passing the yarn tail through the remaining stitches on the top of your hat, draw the yarn down through the center of the hole, and pull tightly to close before weaving in the end.
The final touch to this fabulous hat is a fabulous fake fur pompom or make your own using the jumbo pompom maker!

This hat was the quickest knit for me coming in at about 1 hour and 45 minutes. Gotta love super bulky yarn and giant needles! And with that, my third hat of four was complete. Conclusion

Alright, we are over halfway through with three warm and cozy hats to wear on these cold wintery days. We have two left to knit - the Coffee Beans & Sugar Cubes and Autumn Oak Hats. These next two are a bit more of a challenge, but still both super quick knits. Join me next for some cables and lace using cozy Posh Alpaca!
Super bulky and super fun! This Be Wool Multi - “Rusted” is the perfect yarn to show off the basketweave pattern texture.
A little bit of texture makes all the difference
40 KNITmuch | issue 17


41 KNITmuch | issue 17 DARK MUSHROOMS
Soles Series Welcome to Thoughtful Soles Series by Lorraine Thompson! This is a zany collection of knitted sock patterns to tickle your funny bone every time you wear them. CLICK on the cart to purchase the pattern! GINGHAM APPLES ColorWASH WOOL STEW HIGH Fiber BUMPS IN THE ROAD WINTER IS COMING T IS FOR TURN TICK TOCK WIGGLE ROOM BALI POP SOCKS SIMPLY PUT SOCKS LAZY DAYS SOCKS SUNFLOWER SOCKS SMOOTH SAILING SOCKS
Thoughtful
Autumn Oak knitted hat keeps you warm in the winter too!
At last, here we are at the final hat. We’ve moved from the easiest hats - Pike Street, Pomfret, and Basketweave - to the greatest challenge - The Autumn Oak Hat using Universal Yarn Posh Alpca Even more experienced knitters can enjoy working through the various cables that make up the oak leaf motif at the center. Throw in a bit of lace, and this project will have you fully engaged for a few hours. Cable needles at the ready. Let’s dive in!
Day four - Autumn Oak Hat
I just love the extra, cozy warmth of alpaca! Did you know that alpaca is seven times warmer than sheep’s wool? It’s true! Universal Yarn Posh Alpaca, includes alpaca to make sure your head stays toasty on cold winter days. Let’s look at the details.


» Color Mulled Wine
» Weight Super Bulky
» Amount 3.5oz [100g]
» Yardage 98yds [90m]
» Fiber Content 45% wool, 30% acrylic, 25% superfine alpaca
» Machine Washable No!
» Drying Lay flat to dry
Posh Alpaca is the only yarn that requires hand washing and drying to flat. Both wool and alpaca, unless they are superwash, will felt and shrink if they’re put in a washing machine. Don’t try it, or you’ll end up with a nice hat for your cat. The other thing to note with this yarn that isn’t mentioned on the label, it is soft spun. This means that it’s very loosely twisted and not plied. I recommend knitting needles with a more blunt tip. I had lace tips, and they split the yarn very easily which slowed me down a bit.
Four hats in four days: last one - Autumn Oak hat. Get ready to cable!
42 KNITmuch | issue 17
Posh Alpaca in Mulled Wine colorway is perfectly cozy!
skill level Intermediate/ Advanced - knit, purl, cabling, lace
finished measurements
18½” [47cm] materials yarn
• 1 ball of Posh Alpaca needles
• US Size 10.5 [6.5 mm] 16” circular and set of DPNs (or your preferred needle for knitting small circumferences) notions
• cable needle
• Clover Jumbo Locking Stitch Ring Markers
• Clover Tapestry Needles Jumbo
• UNIQUE SEWING Retractable measuring tape
• scissors
• thread and needle
• CLOVER Pom-Pom Makers Extra Large
Note: It takes 5 minutes to make a pompom using Clover PomPom Maker! We describe it in detail with step-by-step photos in our earlier article, A knitted beanie is enhanced by twisting stitches in the ribbing gauge
12 sts x 16 rnds = 4” (10cm) in Reverse Stockinette with larger needles
Ready, set,...watch video?
You expert cablers can dive into this pattern, no problem. If, however, you’re not so confident; I have a few videos you can watch that will walk you through these challenging cables and other unique techniques. There is also a little bit of basic lace in this pattern which I won’t be covering, so make sure you’re comfortable with the stitches in the Abbreviation section of the pattern. I’ve made video tutorials for 1x2 RPC, m1-3, RPCDec, LPCDec, and the S2KP2. Any other stitches you are unsure about you should be able to find tutorials online. As a bonus, in the 1x2RPCDec video share how to cable without a needle. It’s my favorite way to work cables!
Even if you think you know how to do the m1-3 stitch, I found a little problem with the stitch as written. In the second video I explain how I solved it. The video is on a piece that is being knit flat , however, it still applies for knitting in the round.
www.fionaknits.com
The next two videos cover the most complicated cables in the hat: RPCDec & LPCDec. They are both cables and decreases at the same time.
I added this last quick video as I came across the S2KP2 stitch, because I thought it might just be complicated enough to be confusing without it.
Across the finish line!
This hat was more of a challenge than all the others, but totally worth it! It took me just over three hours to knit, but that was partly down to a couple of mistakes I made that I had to rip out and reknit. Once blocked the oak motif really pops. I think I may make another one in a lighter color for an even more dramatic effect. I hope you love your new Autumn Oak hat!
Conclusion

Can you believe it’s only been four articles, and now you have four new hats! I hope you enjoyed knitting up these satisfyingly quick, super cozy, on trend bulky hats.

 Autumn Oak Hat pattern by Universal Yarn
Congratulations! Four hats knit up in four days to keep you and your loved ones warm this winter.
Autumn Oak Hat pattern by Universal Yarn
Congratulations! Four hats knit up in four days to keep you and your loved ones warm this winter.
43 KNITmuch | issue 17
Fiona Stevenson
